Thunk Machine
User manual
Thunk Machine is a browser-based live coding platform that acts as a visual synth, mixer, and performance instrument. You write and change JavaScript while the visuals keep running. Code and output share the same stage: listen to music, watch the image respond, change a number or an algorithm, and apply that change without reloading the page or stopping the performance.
The name comes from thunk, a programming term for a computation saved for later, often by wrapping it in a function. Thunk Machine draws on that idea: you define small pieces of visual behavior, combine them into scenes, and let the running system call them to produce each frame. The machine is the live environment where those pieces run while you edit and perform.
Editing the code is part of performing. A small change can alter color or motion, a scene edit can rearrange the entire composition, and a MIDI control can turn a source value into a physical performance gesture.
It is made for the overlapping worlds of live coding and algorave, creative coding and p5.js, VJ and audiovisual performance, generative art, shader practice, and computer-science education. A newcomer can begin by changing one number; an expert can build recursive compositions, stateful simulations, controller mappings, and custom GPU effects in the same environment.
Its approach is to keep the performance machinery alive while making visual ideas small and replaceable. Those ideas are patches; visible JavaScript arrays compose them into scenes. The interface assists this code-first model instead of hiding it behind a separate timeline or node graph.
This manual begins with the shortest path to a working visual and gradually builds toward reusable objects, live controls, MIDI, higher-order functions, nested render groups, and shaders. You do not need to understand the advanced sections before you start performing.
For your first session, follow the Quickstart: start silently, make a moving scene, save it, and return to it. Then choose a learning path below. Reading the code introduces the syntax used in the examples. The controller appendix covers experimental Push 3 and virtual-controller setup and performance gestures. Supporting workflow, API, and architecture documents open as repository reference material; you do not need them to complete the first session.
| Document information | |
|---|---|
| Manual edition | 1.12 |
| Updated | October 4, 2026 |
| Audience | Students, educators, creative coders, and live visual performers |
| Prerequisites | Current desktop Google Chrome; basic JavaScript is helpful but not required |
How to use this manual
For a compact performer card, use the quick reference.
You can read the manual from beginning to end as a course, or follow the path that matches your immediate goal:
- New to Thunk Machine: complete the Quickstart, then read Chapters 1–3 to understand the workspace and try the first examples.
- Writing patches: read Chapters 12–17 for drawing, context, audio, patch forms, and configuration; continue with Chapters 18–22 for advanced composition.
- Preparing a performance: read Chapters 4–11 for the Library, scenes, saving, controls, MIDI, clips, and transitions; Chapters 23–26 cover output, monitoring, and recovery.
- Understanding the design: read Chapters 27–28 for the design and computer-science model, and Chapter 26 for evaluation, identity, and recovery.
- Teaching or reviewing: use Chapters 29–37 for patterns, complete reference tables, troubleshooting, terminology, and links to deeper material.
Each chapter introduces one working idea before adding variations. Code examples are
intended for the Thunk Machine editor unless a block is explicitly marked as a shell
command. The first scene is a complete program. Later code examples illustrate one
operation: reuse definitions introduced earlier, install named Library patches
before referencing them, and replace alternative scene declarations rather than
appending duplicate names. Scene fragments need scene.activate() when you run them
to select the edited array.
Contents
- Part I — Get oriented
- Part II — Use the Library and build a performance
- Part III — Program patches
- Part IV — Compose advanced visuals
- Part V — Present and manage your work
- Part VI — Design, practice, and reference
- Appendix A — Push 3 and the virtual controller
Conventions
- Bold text identifies a control, panel, action, or status shown in the interface.
Monospace textidentifies source code, a filename, or a key.Cmd/Ctrlmeans use Command on macOS or Control on Windows and Linux.Option/Altmeans Option on macOS or Alt on Windows and Linux. Key tables useCtrlas the abbreviation for Control.- A patch is executable visual behavior; a scene is the array that composes patches.
Note: Notes explain behavior that may not be obvious from the interface.
Caution: Evaluate imported code only when you trust its source. Thunk Machine runs JavaScript as code; it is not a security sandbox.
Part I — Get oriented
1. Meet Thunk Machine
Thunk Machine is a new live coding environment that combines the freedom of programming with the depth of a visual synthesizer and the immediacy of a performance instrument. It grew from the idea that live coding should support an entire performance: developing visual material, shaping its behavior, arranging it into scenes, and playing it through controls, clips, scene changes, and cross dissolves. Writing and rewriting code remains part of how you play, while these performance tools help you turn an experiment into something you can rehearse, improvise with, and take on stage.
The same ambition shapes the programming model. Thunk Machine draws on functional programming and modern programming techniques to make code an expressive language for composition. It uses JavaScript to offer an immediate starting point for beginners, while giving experienced programmers the depth to build complex behaviors from small, reusable pieces. A simple drawing can become a system of interacting forms; a few connections can make an entire composition respond to sound and live controls. JavaScript’s first-class functions, closures, and higher-order functions support that growth, while arrow functions and destructured arguments keep the code concise, readable, and expressive.
Thunk Machine goes further, allowing JavaScript and GPU shaders to work together within the same composition. JavaScript handles drawing, simulation, structure, and control; shaders generate and process images pixel by pixel. Both can respond to the same audio, timing, controls, and modulation, letting you compose across them as parts of one instrument.
Acknowledgments and influences
Thunk Machine belongs to a long tradition of making art by changing code while it runs. It owes a debt to the artists, programmers, educators, and communities who have built that practice and shared their tools, performances, and knowledge.
Special thanks to p5.js, created by Lauren Lee McCarthy and developed by its many contributors, and to the Processing community. p5.js supplies the drawing foundation used throughout this instrument. Their work has made creative coding approachable to generations of artists and students.
Special thanks also to Daniel Shiffman, whose teaching in Processing and p5.js has helped so many people find their way into creative coding. Through The Coding Train and his books Learning Processing and The Nature of Code, he makes programming approachable while opening the door to deeper ideas in simulation, generative art, and creative expression.
Hydra, created by Olivia Jack and developed with its contributors, is an important reference for live visual synthesis and composable image transformations. Its approach is reflected in Thunk Machine's shader vocabulary. P5LIVE, by Ted Davis and its contributors, deserves particular recognition for its collaborative p5.js live-coding environment and the examples it offers for performing with code in the browser.
The wider field includes TidalCycles and Strudel, with their expressive musical patterns; SuperCollider, ChucK, Sonic Pi, and FoxDot, with their different approaches to programming sound and performing live; and Gibber, which brings live-coded audio and visuals together. These are a few points of entry into a much larger collection of instruments and experiments.
There is a programming-language lineage here too. The idea of composing computation from functions reaches back to Alonzo Church's lambda calculus and is central to Scheme. Guy L. Steele Jr. and Gerald Jay Sussman's Lambda Papers helped develop that tradition. First-class functions can be stored in a variable, passed to another function, or returned as a result. In Thunk Machine, that becomes something visible: a drawing function can be an entry in a scene, a function can build a group of patches, and a callback can change an effect over time.
We also acknowledge Daniel P. Friedman, Matthias Felleisen, and their colleagues for showing how much can be learned from small programs and carefully chosen questions. The Little Schemer and The Seasoned Schemer make recursion, functions as values, and program construction subjects to explore step by step. Friedman's work with William E. Byrd, Oleg Kiselyov, and Jason Hemann in The Reasoned Schemer extends that spirit into relational programming. This manual draws inspiration from that teaching tradition: start with a small working example, change it, observe the result, and gradually discover more powerful ways to compose it.
Thanks also to TOPLAP, the algorave community, and everyone who organizes workshops, writes documentation, shares a patch, or puts their code on a projector for others to learn from. That culture of sharing is as important as the software. We encourage you to explore these projects, support their creators, and bring what you learn back to your own practice.
The communities it is for
Thunk Machine sits at the intersection of several communities:
- Live coders and algorave performers who treat algorithms as part of electronic music and audiovisual performance.
- Creative coders and the p5.js community who already use approachable JavaScript to explore drawing, animation, interaction, and generative systems.
- VJs, visualists, and media performers who need audio-reactive sources, effects, projection output, fast recall, and physical controls.
- Students and educators who want advanced programming ideas to produce immediate, discussable visual consequences.
- Generative artists and shader authors who want to combine p5 drawing, procedural systems, media, and GPU effects without building the surrounding performance tool from scratch.
- Patch authors and classroom communities who want a small, readable unit of visual behavior that can be exchanged and adapted without replacing someone else's whole project.
You do not have to identify as a performer to use it. A first session may simply be changing a number and noticing what happens. The same environment can later support a prepared audiovisual set or an advanced study of state, recursion, and shaders.
What it is for
Thunk Machine treats code as both a creative material and a performance interface. Use it to:
- build visuals that respond to a music file, microphone, mixer, or audio interface;
- perform source edits and scene changes in front of an audience;
- improvise with onscreen controls, MIDI knobs, faders, switches, and drum pads;
- build, inspect, remix, and share visual patches;
- combine functions, object-oriented programming, functional programming, array transformations, and GLSL in one composition;
- learn creative coding by connecting JavaScript to visible behavior;
- learn computer science through arrays, objects, functions, state, recursion, composition, and graphics pipelines.
The approach
The interface removes repetitive infrastructure without hiding the program. Four choices define the approach:
- Keep the instrument running. The canvas, clock, sound analysis, controls, state, and audience output continue while one visual behavior changes.
- Make visual ideas replaceable. A patch packages one source, drawing system, simulation, diagnostic, or effect so it can be edited independently.
- Keep composition in readable code. A scene is a visible JavaScript array, not a second composition hidden in the interface.
- Apply changes deliberately and safely. Evaluation is the performer's cue. New code is checked before it replaces the last successful version.
You write JavaScript directly. Patches are JavaScript objects or functions that draw visuals, apply effects, or define behavior. Scenes are arrays of patches, and controls and modulations are variables defined in the code. The programming ideas you use here carry beyond this instrument: functions describe behavior, objects hold state, and arrays bring pieces together. As you explore further, closures and higher-order functions let you build and combine those pieces, while shaders let you transform their images.
Thunk Machine handles the machinery that keeps the performance running while you edit, but leaves those programming ideas visible in the source. You can see how the parts work, change how they fit together, and watch the result. The aim is to make creative experimentation easier while giving you room to learn and use the full language.
The live-coding loop
In a conventional coding workflow, you often edit, rebuild, reload, and then inspect the result. Thunk Machine shortens that into a performance loop:
- Watch and listen to what is running.
- Edit one useful unit of code.
- Evaluate it with
Cmd/Ctrl+Enter. - See the running image adopt the successful change.
- Repeat.
The music and visuals keep playing while you edit. When you evaluate your changes, Thunk Machine checks your code before replacing the working version. If it finds an error, it shows a message and preserves the supported previous definition, so you can correct the code and try again. Evaluating your changes updates the live performance. Saving preserves a version you can return to later.
The small mental model
Four ideas are enough to begin:
- A patch is one visual idea: a background, a field of shapes, an audio meter, a video source, or a pixel effect. If you know p5.js, think of a patch as a sketch you can run alongside other sketches in a scene, layering their visuals into one composition.
- A scene is an array, possibly nested (more on that later), that says which patches are playing and in what order.
- Patches run in a context that supplies them with the current time, audio information, control and modulation values, and their own state.
- Evaluation applies an edited patch or scene to the running instrument.
 audio · time · controls · modulations
           ↓
 [background → visual patch → effect] → stage
           ↑
       evaluate code
2. Your first scene
A scene defines a visual composition through its patches and scene array. A performance can contain several scenes, but the scene editor works on one scene at a time. Start with one scene here; later you will organize and switch between scenes during a performance.
Open Thunk Machine in current desktop Google Chrome. Other browsers are not supported for running the instrument. In the welcome dialog, choose Start silent for this example. If Thunk’s Field Guide appears, choose Maybe later while following this example. You can reopen it anytime with Guide.
You can also choose Audio file to load music or Microphone to use a
microphone, mixer, or audio interface. Audio files can be MP3, WAV, OGG, M4A, or
AAC, depending on browser support. After a file loads, Shift+Space or the
transport plays and pauses it; the loop control repeats the file. For now, sound
is optional: the example animates even when you start silent.
Paste and evaluate the program below to display a dark background and a circle that changes size. The program defines a patch object and a scene array. The walkthrough that follows explains their JavaScript syntax and how Thunk Machine uses them.
// %% patch dot
const dot = {
  draw({ time, audio }) {
    noStroke();
    fill("#57dbc8");
    circle(
      width / 2,
      height / 2,
      100 + sin(time * 2) * 30 + audio.bass * 180
    );
  },
};

// %% scene scene
const scene = [
  () => background(20, 22, 27),
  dot,
];

scene.activate();
- Click inside the editor’s editable code, press
Cmd/Ctrl+A, and paste the complete program above. This replaces the patch and scene code in the editor. The Controls and Modulations sections stay at the top. They are read-only in the editor and are usually changed through the interface rather than directly in code. Leave them as they are for now; we’ll discuss them later. - With the cursor in the editor, press
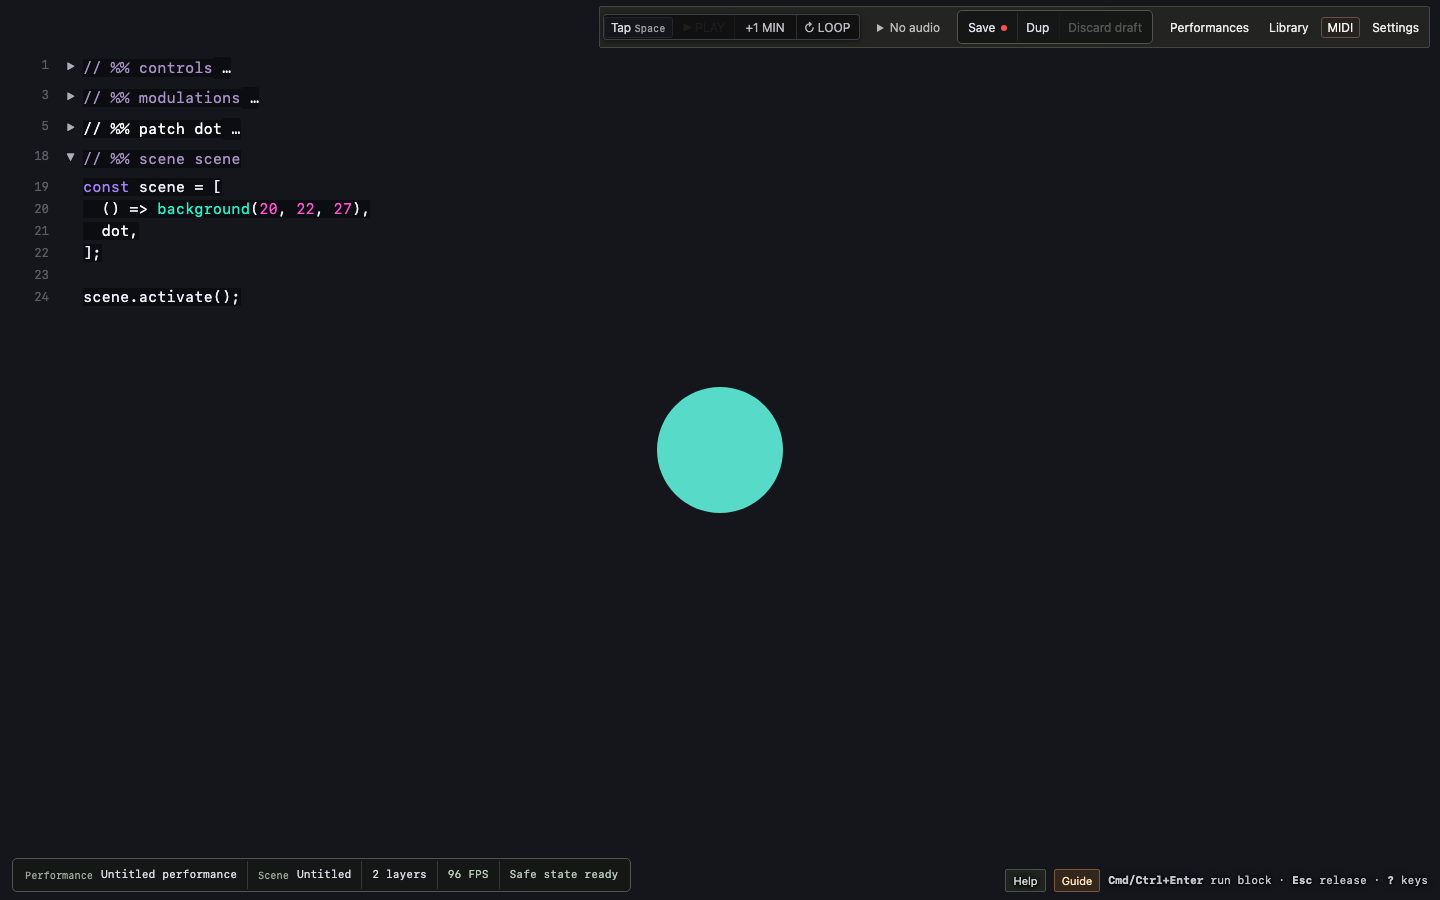
Cmd/Ctrl+Shift+Enterto evaluate the code you just pasted. You should see a turquoise circle gently changing size against a dark background.
Every frame, Thunk Machine traverses the scene array in order. For a function
entry, it calls the function. For an object entry, it calls the object’s draw
method. If you know p5.js, this is similar to calling a sketch’s draw function,
but without calling a setup function first.
Here, the first entry is a function, which draws a dark background. The second is
the dot object, whose draw method draws a turquoise circle that gently changes
size over time and grows in response to bass when audio is connected.
scene.activate() makes this the active scene—the scene Thunk Machine draws each
frame. Drawing repeats at the frame rate, creating the animation.
Try changing the scene’s background. In the scene section, replace
background(20, 22, 27) with background(65, 30, 90). The background stays dark
while you type; editing the code does not apply the change yet. With your cursor
in the scene section, press Cmd/Ctrl+Enter to evaluate that section. The
background now turns purple, while the circle keeps changing size.
Reading the code
The program uses JavaScript to define the patch and scene, p5.js functions to
draw them, and scene.activate() to select the scene Thunk Machine displays.
// %% patch dot is a comment that tells the editor where the dot patch
section begins, so it can be organized and collapsed. // %% scene scene does
the same for the scene. These markers are not executable code.
The patch object. In const dot = { ... }, { ... } is an object literal
containing a draw method. The declaration assigns that object to dot.
const declares a variable whose value cannot be reassigned within the same
execution; the object’s properties can still change. A method is a function
defined on an object. The statements inside draw draw the circle.
Thunk Machine calls draw each frame with one argument: an object containing
the current time, audio information, and other performance values. The parameter
{ time, audio } uses destructuring to read the time and audio properties
from that argument into local variables with the same names. The method can then
use those variables in its drawing instructions.
The drawing instructions. noStroke() and fill("#57dbc8") are calls to
p5.js functions. The parentheses contain the arguments supplied to each function.
noStroke() takes no arguments and disables outlines. fill("#57dbc8") supplies
one argument: a string containing a hexadecimal color. It sets the fill color
for subsequent drawing to turquoise.
circle(...) takes three arguments here: a horizontal position, a vertical
position, and a diameter, all in pixels. width and height are the stage’s
width and height. Dividing each by two places the circle at the center.
The diameter is calculated by 100 + sin(time * 2) * 30 + audio.bass * 180.
* multiplies values and + adds them. The constant 100 sets the base diameter.
sin(time * 2) * 30 varies it by up to 30 pixels above or below that base as
time changes. audio.bass reads the bass property of the audio object;
multiplying it by 180 adds a size increase based on the bass level. The
time-based term animates the circle even without an audio source.
The scene array. In const scene = [ ... ], [ ... ] is an array literal.
The declaration assigns the array to scene. Commas separate its two entries.
The first, () => background(20, 22, 27), is an arrow function. () declares
that it takes no parameters, and the expression after => is evaluated when
the function is called. Here, it calls background with red, green, and blue
values to draw a dark background.
The second entry, dot, refers to the patch object defined above. Thunk Machine
calls the background function first, then the object’s draw method, so the
circle appears over the background.
scene.activate() calls the array’s activate method, supplied by Thunk Machine.
It selects this array as the active scene to draw each frame.
Working with sections. The small arrow beside a // %% marker lets you
collapse that section to keep the editor tidy. Collapsing code only hides it from
view; it does not remove the code or stop the patch from drawing.
After changing the code in a patch or scene section, put your cursor anywhere
in that section and press Cmd/Ctrl+Enter to evaluate the updated code. To
evaluate all the editable code, use Cmd/Ctrl+Shift+Enter.
When replacing a whole section, select its comment marker and the code below it,
up to the next marker. Paste the replacement once, including its marker. This
keeps the patch and scene sections organized without leaving duplicate definitions.
Adding a property. An object literal can define data properties as well as
methods. The version below defines a size property alongside draw. Replace
the existing dot patch
with this version, then press Cmd/Ctrl+Enter in that patch section. Leave the
scene section in place.
// %% patch dot
const dot = {
  size: 120,
  draw({ time }) {
    noStroke();
    fill("#57dbc8");
    circle(width / 2, height / 2, this.size + sin(time) * 30);
  },
};
size: 120 defines a property named size with the value 120. In the call to
circle, this.size + sin(time) * 30 uses that property as the circle’s base
diameter. When Thunk Machine calls this object’s draw method, this refers to
the patch object, so this.size reads its size property.
Try changing size to 200, then press Cmd/Ctrl+Enter in the patch section to
evaluate the change and see a larger circle.
A patch can also be a function. When a scene entry is a function, Thunk Machine
invokes it each frame. When an entry is an object, Thunk Machine invokes its
draw method. Choose a patch form introduces
function patches, objects, and classes when you are ready to explore further.
Source and the running performance
The editor shows the code you are working on. The visuals on the stage come from
the code you last successfully evaluated. Editing the code does not change those
visuals until you evaluate the changes with Cmd/Ctrl+Enter in the section you
edited, or Cmd/Ctrl+Shift+Enter for all the editable code.
That gives you control over when an edit becomes part of the performance. You can prepare a change while the visuals continue, then apply it at the moment you choose. When the editor has changes that have not been applied, Editor differs from running code appears at the bottom right of the editor, above Help, Guide, and the keyboard hints.
Start with one visible change at a time: a color, a size, or a scene entry. You can use the same edit-and-evaluate process as your patches and performances grow.
3. Know the workspace
The workspace consists of a main stage where your visuals appear, a code editor over the stage, and controls, toolbars, and panels for shaping and performing them.
The numbered overview identifies the main areas. Each is explained below.
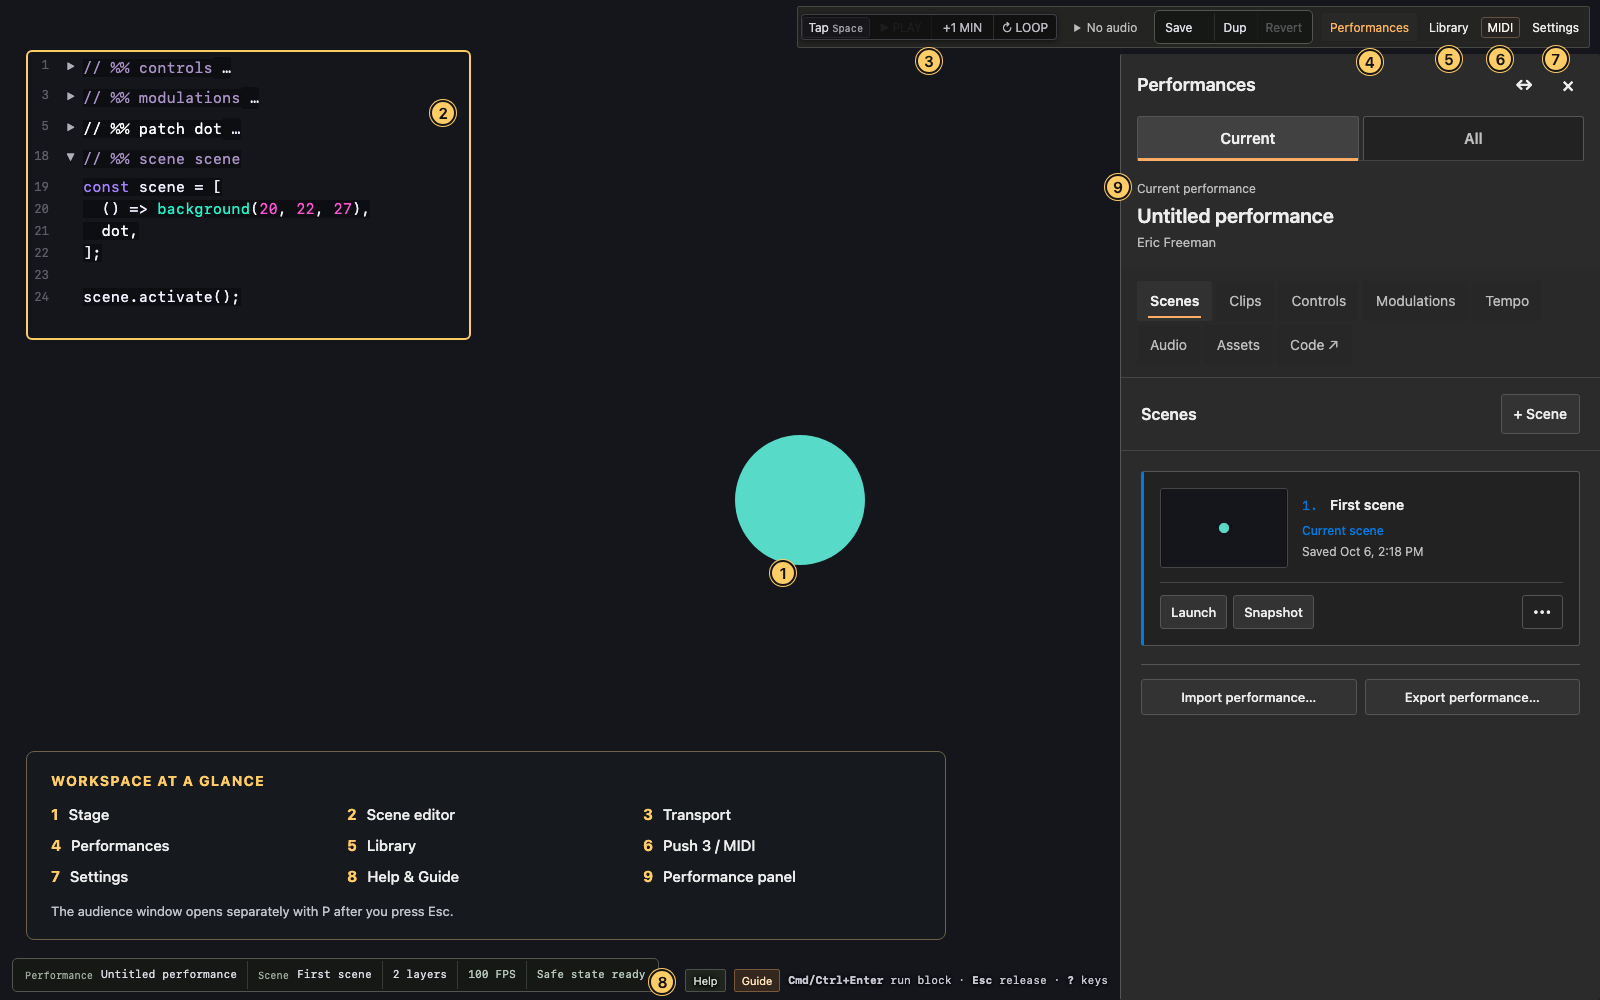
Stage
The stage displays the visuals drawn by the active scene. The scene editor and controls appear over it; toolbars and panels provide access to the performance and its settings.
Scene editor
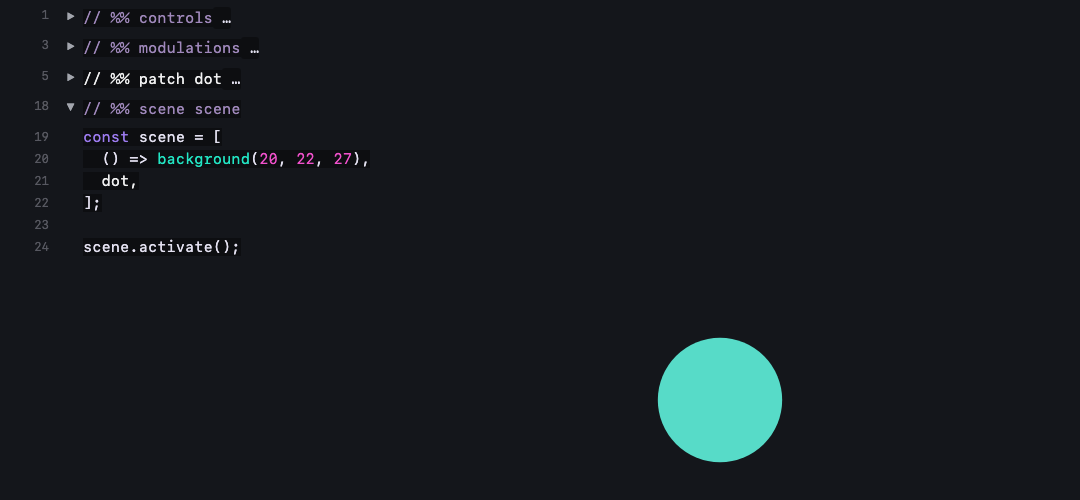
The scene editor shows one scene at a time, including its patches and scene array. You edit that scene here; later, you’ll create other scenes and switch between them during a performance.
The editor has a transparent background, with translucent shading behind the code to keep it readable over the visuals.
Patch sections start collapsed, and the scene section starts expanded. Click the arrow beside a section’s comment marker to reveal or collapse its code.
The editor appears by default. Press Esc to release editor focus, then E to
show or hide code on both the performer and audience screens. Editing changes
the source; Cmd/Ctrl+Enter evaluates the section under the cursor, and
Cmd/Ctrl+Shift+Enter evaluates all editable code.
The scene editor is separate from the shared-code editors. Code ↗ in Performances opens code shared by scenes in the current performance. Settings → Advanced → Edit global code… opens code shared across performances. Neither is needed for the first scene example.
Add a patch
Click the small + between sections. The screenshot highlights the button:
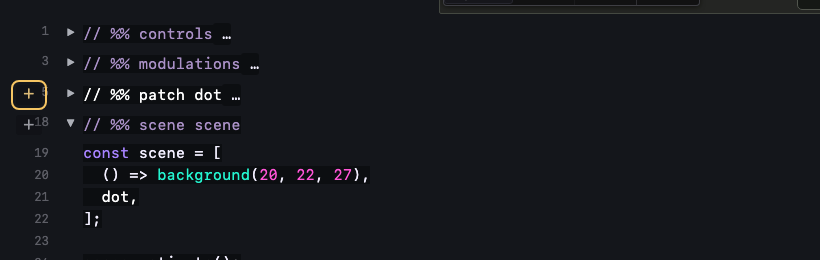
Enter the new patch’s name, then choose Create. Here the name is spark:
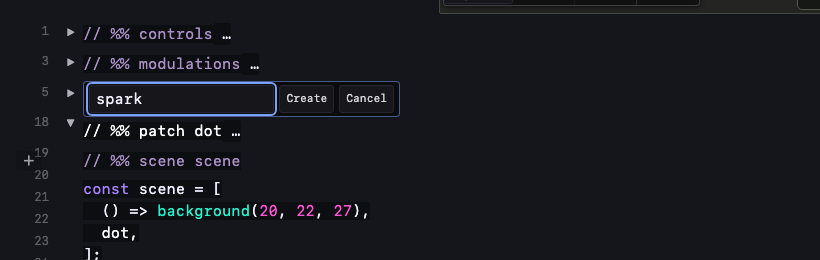
Thunk Machine creates the section marker and placeholder code. Edit that code, or replace the marker and placeholder together when pasting a complete marked patch. Keep only one section marker for each patch name.
Add the patch’s name to the scene array where you want it drawn. Evaluate the patch section, then the scene section, to display it.
Evaluate code
Live · Edited means the previous version is running while edits wait to be evaluated. Successful evaluation produces a brief flash.
The following commands work while the cursor is in the editor:
| Command | Action |
|---|---|
Cmd/Ctrl+Enter |
Evaluate the current section or complete top-level statement |
Cmd/Ctrl+Shift+Enter |
Evaluate all editable code |
Cmd/Ctrl+A |
Select all editable patch and scene code, including comment markers; leave Controls and Modulations unchanged |
Cmd/Ctrl+/ |
Comment or uncomment the selected lines |
Cmd/Ctrl+[ |
Wrap or unwrap the selected expression or patch name in [ ] |
Cmd/Ctrl+Z |
Undo an edit or restore a deleted source block |
Cmd/Ctrl+Option/Alt+T |
Tidy the current section |
Cmd/Ctrl+Shift+Up/Down |
Move the current line or selection |
Cmd/Ctrl+Option/Alt+[ |
Fold all marked sections, including Controls and Modulations |
Cmd/Ctrl+Option/Alt+] |
Unfold all marked sections while keeping their disclosure arrows available |
Esc |
Release editor focus for performance keys |
Section markers such as // %% patch name identify the sections you can
collapse and evaluate separately. Collapsed code retains its line numbers.
A function or class inside a patch collapses with that patch section. Deleting
the marker removes the section boundary; it does not delete the code below it.
Transport
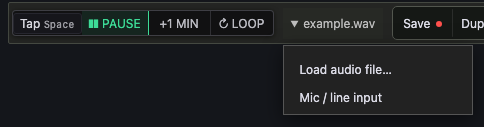
The transport controls audio-file playback. Use play/pause to start or pause the
file, and the loop control to repeat it. Shift+Space also plays or pauses a
loaded file. +1 MIN skips forward one minute. Tap sets the tempo from
repeated taps; it does not start audio playback.
The audio-source dropdown shows No audio, the loaded file’s name, or Mic / line. Use it to choose an audio file or microphone input. The stage can continue animating without audio; a patch only reacts to sound when its code uses audio values. See Read sound and FFT data.
Performances
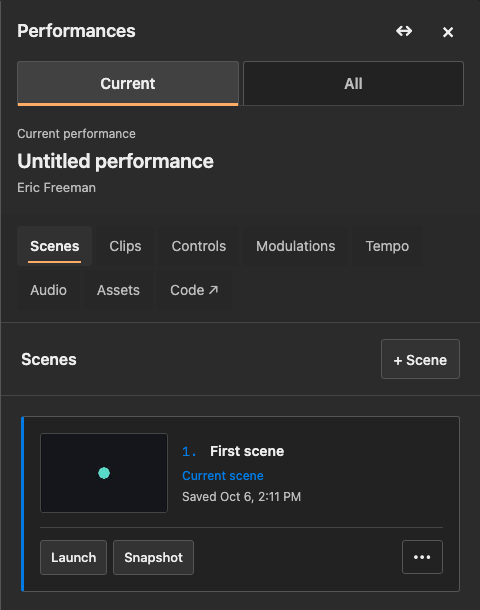
Open Performances in the top toolbar. A performance contains scenes, clips, controls, modulations, assets, and other settings used together in a set.
Choose All to browse saved performances or Current to work with the current performance. Its tools include Scenes, Clips, Assets, Controls, Modulations, Audio, and Tempo. These tools let you manage the material you perform, while the scene editor shows the code for the scene you are editing.
Cmd/Ctrl+\ opens or closes Performances. See
Save work, performances, and projects
for saving and recalling performances, and
Perform without losing the last good image
for scenes and clips during a performance.
Library
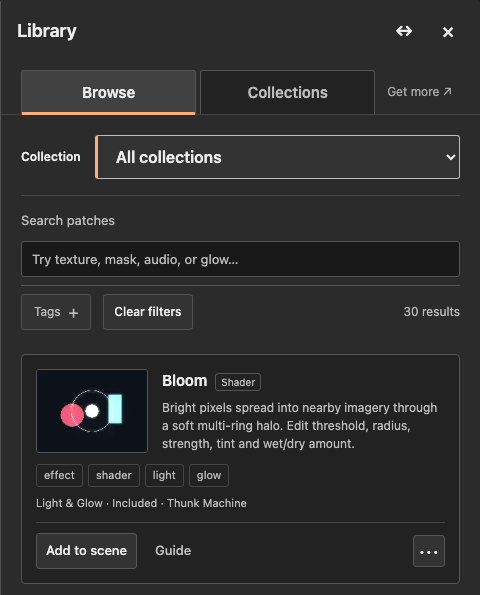
Open Library in the top toolbar to browse installed patch collections. Search for a patch, inspect its code and guidance, and add it to the scene editor. Adding code to the editor does not evaluate it; evaluate the patch and scene when you are ready to use it.
The Collections tab manages collections. Get more ↗ opens the website’s collection directory. See Understand the Library lifecycle for adding, editing, importing, and removing patches and collections.
Download the current editor code
Open Performances → Current → Scenes and choose Download code, beside
Export performance…, to save thunk-machine-editor.js.
The file includes the current Controls and Modulations declarations, including
global declarations shown in the editor, followed by all editable patch and scene
source. Edits you have not run are included exactly as written. Downloading does
not evaluate the code or change the running scene.
This is a JavaScript source download. Use Export performance for a backup that also preserves scene presets, settings, assignments, and optional attached assets.
Push 3 and MIDI
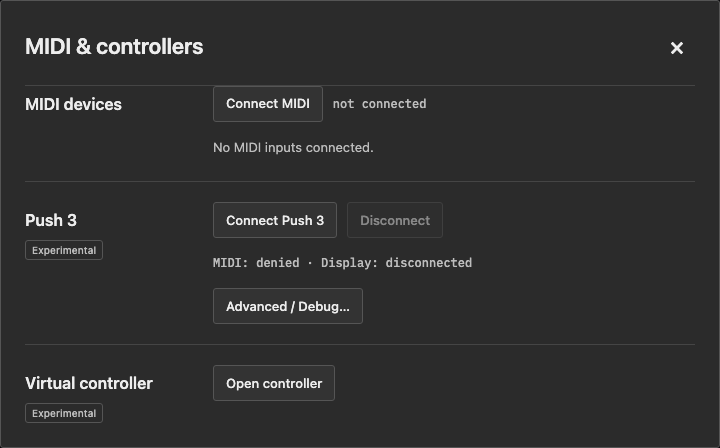
The next toolbar button is Push 3 when Push is connected, or MIDI otherwise. Use it to open controller setup. MIDI devices can operate controls; Push 3 also provides pads and display feedback for performing with scenes and clips.
See Map MIDI hardware for connection and mapping, and the Push 3 guide for controller operations.
Settings panel
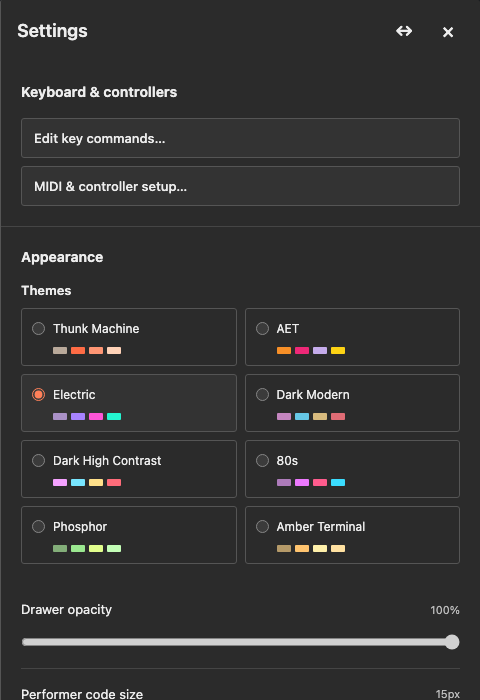
Open Settings in the top toolbar to configure the instrument. It contains keyboard and controller setup, appearance, audience output, networking, diagnostics, storage, backups, and recovery. The Settings reference explains each group and its controls in interface order.
Help
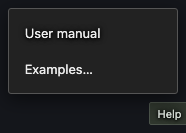
Choose Help → User manual to open this manual in a separate browser tab. Help → Examples… opens the demonstration picker. Guide opens Thunk’s Field Guide for guided tasks in the instrument.
Press Esc, then ? to show the keyboard command sheet. See the
Keyboard reference for the complete shortcut list.
Patch reference
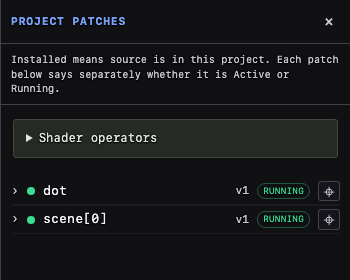
Press Esc, then R to open or close the patch reference. It shows interfaces
for patches installed in the current project and distinguishes installed,
active, and running patches. Use it to look up parameters and available shader
operators. Use Library to find and add patches.
Audience window
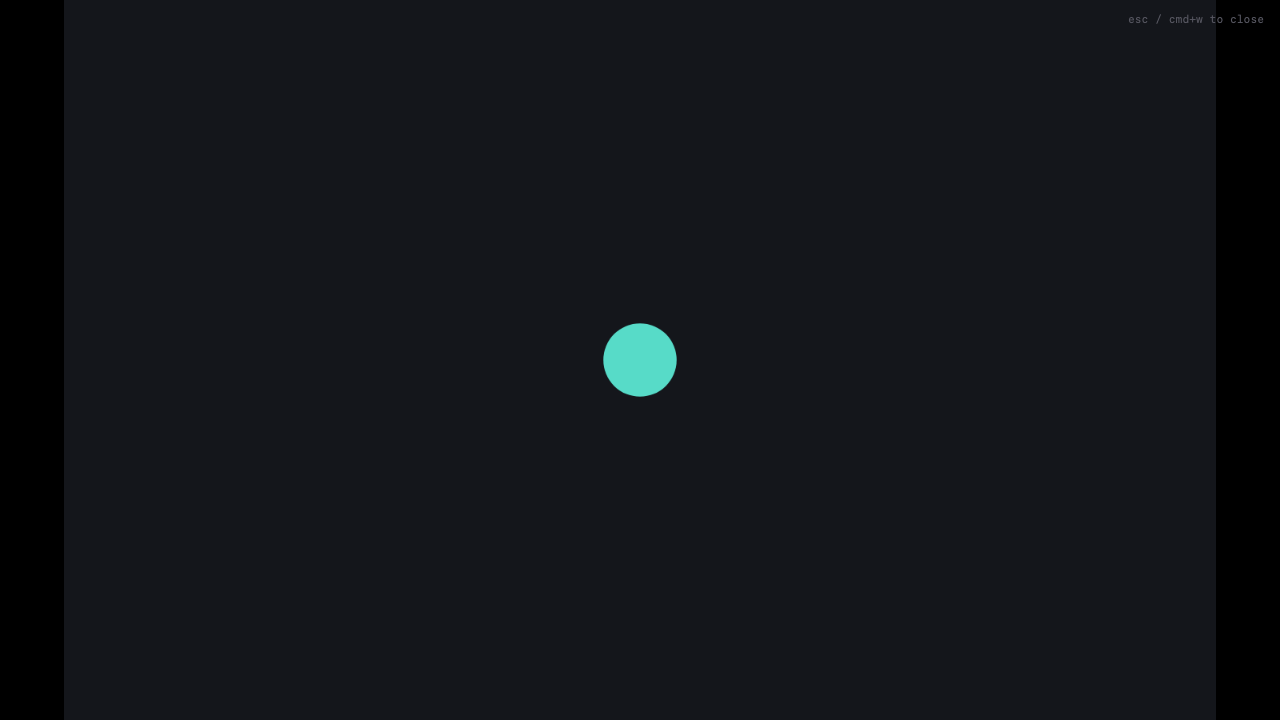
The audience window is a configurable output window for a projector or second
display. Press Esc, then P to open it, and move it to the audience display.
Choose its output layout and code size in Settings → Audience view.
It can show the visuals alone or include code. You continue editing and operating the instrument in the performer window. See Project code for an audience for display setup.
View shortcuts
Press Esc to release editor focus, then use these keys to change the workspace
view:
| Key | Action |
|---|---|
e |
Show or hide code on performer and audience screens together |
d |
Cycle three performer dim levels: undimmed, dim, and darker; audience output is unchanged |
n |
Hide or restore the top navigation bar |
f |
Enter or leave fullscreen |
p |
Open the audience window |
r |
Show or hide the installed-patch reference |
Cmd/Ctrl+\ |
Show or hide Performances |
? |
Show the command sheet |
Part II — Use the Library and build a performance
The Library offers a wide range of patches you can mix into your own scenes alongside code you write yourself. This part explains how to find and adapt those patches, organize scenes into a performance, and use controls, clips, and transitions to perform with them.
4. Understand the Library lifecycle
The Library uses four deliberate states:
Available → Installed → Active → Running
- Available: the patch exists in the library catalog.
- Installed: its editable source has been added to this project.
- Active: an evaluated scene contains an occurrence of the patch.
- Running: the active occurrence evaluated and rendered successfully.
Installing never silently changes the live image. Adding to scene edits source but also does not run it. Evaluate the scene array to activate the edit.
Use the Library's Browse chooser to select collections, This performance, or Current scene. Patch cards indicate whether their code is in the editor or scene; adding code does not run it. The Project patches reference retains the Installed → Active → Running lifecycle detail. Open-ended tags describe patches without changing their lifecycle meaning.
To create a new patch, use the subtle + in the editor gutter, enter a JavaScript
identifier, and edit the inserted object patch. To share its source, open Library →
Browse → This performance, find the patch, then choose ⋯ → Export source.
This downloads a human-readable .p5patch.js file. Include or document any external
helpers or media it requires. To package attached assets, use a collection export or
a portable performance export instead.
Opening an existing patch link or importing a patch file opens a review into a chosen writable collection. It does not insert or run source. The recipient still chooses Add to scene and evaluates the scene when ready. This keeps sharing from disrupting an existing performance.
Patch collections
Library → Browse opens across All collections. Search names, descriptions, authors, collection names, and tags. Exact name matches rank ahead of broader matches. Choose a collection or select multiple tags under Tags to narrow the results. Every selected tag must match; clicking a tag on a patch card adds or removes it from the filter. Clear filters returns to the complete catalog. Every result identifies its collection so same-named patches remain distinguishable.
Library → Collections groups Your Collections first, with My Patches at the top, followed by other editable personal collections. Installed Collections contains the included collections and read-only developer packs. Imported personal collections belong under Your Collections. This grouping does not change the collection format or Browse search; the save dialog still defaults to My Patches.
Included collections such as Essentials ship with the app. Developer collections are imported packs. Both are read-only originals. Use Save copy to library… on an individual patch to create a writable copy in a personal collection. Copy to performance instead places editable source in the current editor; it does not save a library copy or run the patch. Read-only follows collection ownership; there is no lock switch. My Patches and collections created with Collections → + Collection are writable. Each collection has a cover, creator, description and patch count. Edit details… changes personal collection names, creators, descriptions and covers. Covers are normalized to at most 480 pixels; embedded covers are limited to 128 KB. Browse on a collection card opens its patches in Browse. Collection actions (⋯) include Export and Remove where permitted. Patch thumbnails travel inside exported collections and remain available after import, including in saved patch copies. Each embedded patch thumbnail is limited to 32 KB, with a 1 MB total thumbnail limit per collection. PNG, JPEG, and WebP are supported; external image URLs and SVG are not. Bundled visual previews are embedded on export or library copy, not captured or rendered again while browsing. Removing a collection never removes scene code. Collections live in this browser's workspace, independently of performances.
The Browse chooser's This performance lists the actual working source copies across saved scenes, drafts, and the editor. Current scene narrows these to the current scene's source references. These filters clear the collection selection because working code is independent of its original collection. Choosing a collection returns to catalog browsing. Show code locates an editor patch; Use in scene adds a reference to existing code. These are filters, not separate libraries.
Use the book-plus icon (Save to library on hover) in an editor patch's header, or Save to library… in its Library actions (⋯). The save dialog defaults to My Patches, also offering another writable collection or a new one. Add a readable title and comma-separated discovery tags. An existing code name requires explicit replacement confirmation. Saving does not run the patch or change scene code.
Copy to performance inserts independent source; Add to scene also stages a scene reference. Run the scene when ready. If its code name is already present, the existing editor source is kept. Updating a library never updates performance copies automatically. Performance exports carry their scene code, not the Library.
Code-first library insertion
If pasted code contains duplicate patch headers, each duplicate can be deleted from its header without stopping the running patch. Hover the header to reveal Delete. Keep the intended definition; undo can restore an accidentally removed block. Library insertion does not add a second block with an existing patch name.
Errors update the Diagnostics count and normal error feedback without switching tabs or taking focus away from the editor. Open Settings → Diagnostics when you want the history.
Library Add to scene inserts missing patch source and a reference in the active scene without evaluating either. Return to the code and use Cmd/Ctrl+Enter to apply the scene; newly inserted dependencies are included in that evaluation. After insertion, the patch card offers Show code and reports In editor · in scene. This describes the source, not necessarily the running image. Included in a collection's provenance means it ships with the app. After insertion, the scene editor receives focus with the caret after the new patch reference, ready for Cmd/Ctrl+Enter.
Remove a patch from the scene and delete its source
Removing an entry from the scene and deleting a source cell are separate operations:
- Remove the patch from the scene array, or use
Cmd/Ctrl+/on its entry to comment it out. Check other scene cells for references too. - Press
Cmd/Ctrl+Enterinside the edited scene. Until you run that cell, the previous scene continues using the patch. - Hover over the unused patch's header, or focus the header with the keyboard.
Delete appears only when no scene source references the patch and it is
no longer part of the running scene. Select it to remove the entire cell,
including the
// %% patchheader. Deleting an unused patch also removes its live name, implementation and instance state. Refresh recovery records the deletion, so earlier executed assignments cannot bring that patch back. - Use
Cmd/Ctrl+Zin the editor to undo a deletion and restore the source block. Run the restored patch cell to make its name available again.
You can keep unused source in the project for later. Deleting only a cell's body leaves an empty header; use the header's Delete action to remove the whole cell. Deletion adds no persistent notice or Undo button. On touch devices, eligible Delete controls remain visible because hovering is unavailable.
The eligible header Delete action removes both the source cell and its retained runtime definition. It does not uninstall the independent Library catalog item. Deleting ordinary draft text alone is different: the previous accepted code can keep running until you evaluate the change. A new performance or reload rebuilds the runtime using its persisted source and accepted execution history.
5. Build and activate scenes
Each scene is one composition you can edit, save, and launch. Open Performances → Current → Scenes to see the scenes in the current performance. A scene card’s Launch action selects it for the stage and scene editor.
Use + Scene → Create scene to save the current composition as a named scene. Use + Scene → New blank scene to begin with an empty composition instead. After editing a scene, Save updates that scene’s saved version; Dup creates a separate copy. Revert returns to its saved version. You can prepare several scenes this way and launch their cards during a performance.
The scene’s code defines what it draws. A scene array contains the patches in
drawing order. In the first example, scene.activate() selected that array as
the scene to draw. The example below revisits that code before adding variations.
Define and activate the scene
A scene is ordinary JavaScript data. After defining dot in Chapter 2, replace
your existing scene section, including its heading, with this complete cell:
// %% scene scene
const scene = [
  () => background(20, 22, 27),
  dot,
];
scene.activate();
Call .activate() on the named array. You can evaluate the definition and its draw
command together or in separate blocks. Defining an array prepares it; .activate()
selects it as the active scene.
To change the image, add, remove, duplicate, comment, or reorder array entries and evaluate the scene cell. The Library's Add to scene action inserts at the cursor when it is on a top-level line in the active scene array; otherwise it appends to the bottom. The source changes first. Evaluate the scene to activate that change.
Turn a patch off and back on
In the scene array above, put your cursor on the line containing dot,.
Press Cmd/Ctrl+/ to comment out that entry:
const scene = [
  () => background(20, 22, 27),
  // dot,
];
scene.activate();
The circle keeps drawing while you edit. Press Cmd/Ctrl+Enter with your cursor
in the scene section to evaluate it. The circle disappears, leaving the background.
Press Cmd/Ctrl+/ on that line again to uncomment it, then Cmd/Ctrl+Enter to
evaluate the scene. The circle returns. You can use this pair of commands to
remove and restore any patch entry during a performance without deleting its code.
Inline patch
This scene replacement needs no earlier patch definitions. Include its heading and activation when replacing the scene cell:
// %% scene scene
const scene = [
  () => background(20, 22, 27),
  ({ time, audio }) => {
    circle(width / 2, height / 2, 60 + sin(time) * 20 + audio.bass * 100);
  },
];
scene.activate();
Moving an anonymous inline patch changes its scene-path identity and starts fresh state. Name a patch when stable identity matters.
6. Save work, performances, and projects
Thunk Machine keeps a browser-local working session, including editor text that has not been run. A normal reload resumes that session. Settings → Recovery → Browse session backups… offers older recovery copies. Save a named scene or performance explicitly when you want that version to become its stored preset.
Performances
Thumbnail previews use 16:9 frames in the browser and a 160×90 frame while browsing on Push 3. Uploaded images and new snapshots preserve the whole composition, fitting inside the frame without stretching or cropping. Images are stored at up to 480 pixels on their longest edge. Older square thumbnails still work; upload the original again to restore any edges removed by the previous square crop.
The start dialog lists your recent performances and recent audio files. Click a performance to load it, then choose a source as usual. Click an audio file to open it again; Chrome may ask once to allow access. If the file has moved, the dialog says so and removes it from the list.
A performance is the complete saved set: working source, scenes, clips, controls, modulations, layout, mappings, shared code, tempo, audio and view settings. Patch collections are independent of performances. Open Performances in the top bar, then choose All to browse saved performances or Current to return to the current performance's tools. The manager shows searchable performance cards with large image previews and a blue outline marking the current performance. Choose Edit on any card to change its name, artist, or image without loading it. For the current performance, Edit also offers a stage snapshot and saving changes to it. Current returns to the tab you were using. Scene cards use a blue accent for the current scene and show Unsaved changes when its working state differs from the saved preset. Launch is at the top of each card, with saving, reverting, and deleting actions in its footer.
Before the first save, name the unsaved performance and optionally use Change image… or Snapshot to set its thumbnail. Its Save button adds it to the library; without a chosen image, saving captures the stage. Later saves preserve the existing image.
Saving the performance keeps its settings without overwriting scene presets. Use Save scene to commit a scene’s changes; + Scene → Create scene or Dup stores a separate variation. The saved-performance list is distinct from the working version. Select a saved card’s Load button to load its scenes, layout, and settings. In Edit, the current performance offers Snapshot to retake its thumbnail and Change image… to choose one. + Performance offers Use current scene or Use default scene for a new unsaved working set; the previously saved version remains available. For the current performance, open Edit, then choose Export performance to write the working set, including its name, thumbnail, scenes, layout, and settings. A saved performance card also offers ⋯ → Export for its stored version. Export all performances writes all saved performances in one library file. Import performances… → Import performance… accepts a single performance or a whole library file. To move collections, preferences and attached files too, use Settings → Workspace backup → Export workspace…. For Push browsing, see Connecting Push 3.
Scenes
One scene runs at a time, except during a cross-dissolve. A saved scene stores a source composition that you can recall, while controls, mappings, modulations, and the clip bank belong to the performance. The editor can hold pending text that has not been run; switching scenes preserves that working session instead of evaluating it by surprise.
Open Performances → Current → Scenes, choose + Scene, enter a name, and choose Create scene to capture a separate scene
based on the current stage. Save or Cmd/Ctrl+S updates the selected scene;
Dup makes another saved version; Revert returns to its stored source. A dot
marks unsaved scene changes. Save performance stores the performance and
settings without overwriting each scene's stored source. A normal reload resumes
the working session; Browse session backups… offers older recovery copies.
Switching between saved performances also remembers each performance's working
draft, including an unnamed scene created with Cmd/Ctrl+Option/Alt+N. Returning
resumes that draft; switching does not save it or add it to the scene list.
The runtime bar marks an unnamed scene Untitled · Unsaved. Discard draft
asks before replacing it with the saved code of the scene you left (or the
performance's saved working code when there is no previous scene). Controls,
modulations, audio and other scenes stay unchanged, and discarded code is kept
in recovery. Save the unnamed scene to keep it as a scene instead.
The saved scene list lets you launch, save, revert, or delete a scene. A broken
scene shows an evaluation error while the previous good visual keeps running.
Correct its source and run again. Inactive scenes do not render. Ordinary recall
rebuilds their runtime and feedback imagery, but motion using time follows the
continuing session clock. Use sceneTime for an entrance that begins at scene
entry. Committing a prepared cross-dissolve keeps the incoming runtime instead
of restarting it. See Context fields.
Create scene stores a new scene while keeping an existing scene selected; choose Launch on the new card before editing that version. Duplicate selects its copy immediately. Clicking a selected scene’s title renames it, so use the explicit Launch action when recalling a scene.
| Command | Action |
|---|---|
Cmd/Ctrl+Option/Alt+1…9 |
Recall a numbered scene |
Cmd/Ctrl+S |
Save the selected scene |
Cmd/Ctrl+Option/Alt+S |
Duplicate the scene |
Cmd/Ctrl+Option/Alt+Shift+S |
Save the performance |
Cmd/Ctrl+Option/Alt+Shift+N |
Save a separate performance copy |
Cmd/Ctrl+Option/Alt+N |
Start a blank scene in the current performance |
s / 0 after leaving the editor |
Capture / restore Safe State |
Cross-dissolve between scenes
To prepare a transition, hold Shift and press an incoming scene pad on Push or
the virtual controller. From the keyboard, use Cmd/Ctrl+Option/Alt+Shift+1…9
for the incoming numbered scene. Preparation leaves scene A visible at 0% B
while scene B starts running in its own render scope.
Move the controller's vertical touch strip to set the blend directly. The top favors incoming scene B (blue, ↑ B); the bottom favors current scene A (amber, ↓ A). The position indicator shows the current mix. The jog wheel and paired blend buttons provide relative adjustments. After releasing editor focus, Left/Right also blend toward A/B; hold Shift for finer steps. On the virtual strip, Up/Down adjusts the blend and Home/End selects A/B.
Reaching either end does not finish the transition: both scenes continue running. Launch B normally, without Shift, to commit it without restarting its prepared runtime. Launch A normally to return to A, or launch another scene to leave the pair. A failed preparation leaves the current scene running.
A cross-dissolve renders both scenes and keeps their buffers alive, so it can cost substantially more than a single scene. Rehearse the actual pair at your output resolution, especially with feedback, WebGL or full-canvas shaders. Committing releases the outgoing scene's resources.
Project export and import
Under Performances → Current → Assets, give a local image, font, audio, or video
file a stable name and attach it. assets.image('poster'),
assets.font('display'), assets.url('clip'), and assets.file('track')
return promises. Use .then(...) or await inside an async function; top-level
await is not supported in the live editor. The file stays in this browser until explicitly
packaged; save the performance to retain the attachment as part of that named set.
For an attached song, Use as audio loads it into the transport; importing a
package does not start playback automatically.
For a complete loading example, attach an image named poster, save work you
want to keep, then replace the editable program with these two cells. Evaluate the complete program with Cmd/Ctrl+Shift+Enter.
The stage shows loading text, then the attached image; a missing file shows an
error. This example uses the current 2D canvas’s native image drawing operation.
// %% patch attachedPoster
const attachedPoster = {
  image: null,
  error: null,
  loadId: 0,
  enter() { this.load(); },
  load() {
    const id = ++this.loadId;
    this.image = null;
    this.error = null;
    assets.image("poster").then(
      image => { if (id === this.loadId) this.image = image; },
      error => { if (id === this.loadId) this.error = error.message; },
    );
  },
  draw() {
    if (this.image) {
      drawingContext.drawImage(this.image, 0, 0, width, height);
    } else {
      noStroke();
      fill(255);
      text(this.error || "Loading poster…", 24, 40);
    }
  },
  exit() { this.loadId += 1; this.image = null; },
  dispose() { this.exit(); },
};

// %% scene scene
const scene = [() => background(20), attachedPoster];
scene.activate();
When retrying a failed attachment or reevaluating this loader while it is already
active, evaluate attachedPoster.load() as a separate command. A replacement
with the same active occurrence identity does not call enter() again. The load
method invalidates older completions and starts a fresh request; leaving the scene
and returning also enters it again.
Lifecycle calls are synchronous: the host does not await a promise returned by
enter, draw, or exit. Start asynchronous preparation once, draw a pending
state, handle errors, and invalidate late results on exit/disposal. Do not start
a new load each frame or retain the reused draw context across await. An async
completion happens outside the first-frame rollback check. The asset store owns
its returned object URLs; do not revoke those shared URLs from a patch.
In Performances → All, open the current performance's Edit dialog and choose
Export performance. It asks whether to write source and settings only (.json)
or a portable .p5package.json with selected attachments.
Images and fonts are preselected; audio is unchecked by default. Check the attached
audio files you have permission to share. Video entries are disabled: video cannot
be packaged and must be relinked on the receiving computer. A package includes
the current working source, scenes, layout,
controls, settings, and chosen file bytes. Source-only files carry asset names but
not the file bytes, so a recipient must attach those files again. Import validates
the package and restores its selected files before running its code, after an
explicit trusted-code confirmation. Import does not delete unrelated named
performances.
7. Create live controls
Open Controls and select Add control (+). Choose Continuous,
Push pressure, Button, or Choice. The UI inserts ordinary source into a
// %% controls cell. That generated cell is read-only in the editor: the Controls
tool creates or changes its declarations, and Remove on the control card removes one. Click a
control's name to edit its type, range, step, default, and mapping in the settings
dialog. A control() you write in your own source remains yours to edit in code.
Controls are shared across the performance, so one value can drive several patch
properties as a macro.
Button controls automatically take the next free Push control pad, starting at pad 33. Hold a momentary button to keep it on; press a toggle button to switch it. The Controls card shows its pad number, and Locate flashes that pad when Push is connected. Learn MIDI can also bind another device.
Performance-wide controls
Control names, types, ranges, values, MIDI mappings, and modulation settings belong to the current performance. Push encoders target numeric controls in declaration order, eight per page; this is not an independently rearrangeable assignment matrix. Scene launch, Save, Dup, and Revert preserve them. Each scene can use the same control value in different ways; a macro is simply a control used by several patch parameters.
Save performance stores this setup, and performance exports include it. Loading another performance restores that performance's controls. Existing control() declarations still create or edit definitions when you explicitly run their code; replaying a scene does not replace the performance's definitions or values.
The Controls tab displays groups of eight playable controls, with assigned Push numeric targets first. Declaration order determines the controller pages; its Control selector chooses an existing target without moving that declaration. Click a control name for its type, range, default, MIDI mapping, and removal actions in a separate dialog. The + button opens the creation dialog.
Continuous value
control("ringSpeed", 0.5, {
  type: "continuous",
  min: 0,
  max: 4,
  step: 0.01,
});
Momentary button
control("flash", false, {
  type: "button",
  mode: "momentary",
});
Toggle button
control("freeze", false, {
  type: "button",
  mode: "toggle",
});
Make a button control do something visible
Naming a Boolean control freeze or flash does not install that effect. Connect
the value to a patch or shader. This example chooses a color while a button is
held; it needs no audio or hardware.
Save your work first. Replace all editable patch and scene code with this complete program and run Cmd/Ctrl+Shift+Enter. Open Controls, press and hold demoAccent, then release it. The disk turns blue while held and returns to orange. A momentary button pad does the same action; see Appendix A for its current assignment. Existing controls and pressure reservations can change its pad position.
// %% patch buttonDemo
control("demoAccent", false, { type: "button", mode: "momentary" });
function buttonDemo({ controls }) {
  noStroke();
  fill(controls.demoAccent ? "#57dbc8" : "#ff572b");
  circle(width / 2, height / 2, 180);
}
// %% scene buttonScene
const buttonScene = [() => background(17), buttonDemo];
buttonScene.activate();
For a latched choice, use mode: "toggle" in a newly named button declaration:
one press enables it and the next disables it. Momentary press/release is useful
for accents and trigger gates; toggles are useful for persistent choices. The
control provides the gesture; your code supplies the visible result.
Choice
control("shape", "circle", {
  type: "choice",
  choices: ["circle", "square", "line"],
});
Push pressure
Choose Push pressure in the creation dialog. It is a continuous numeric value with a minimum, maximum, step, and initial value. The next free Push pad is assigned automatically; its number appears in the control settings. Holding the pad changes the value through MPE channel pressure or per-note aftertouch, and releasing it returns the minimum. The pad no longer launches its previous action. The assignment travels with the performance and its export. Change the type back to Continuous to free that pad.
Read the current values from injected context:
const controlledRings = {
  draw({ controls, audio, time }) {
    if (controls.flash) {
      background(255);
    }

    const angle = controls.freeze ? 0 : time * controls.ringSpeed;
    const size = 80 + audio.bass * 160;
    circle(
      width / 2 + cos(angle) * 100,
      height / 2 + sin(angle) * 100,
      size,
    );
  },
};
controls.flash is the current Boolean value, not a control-definition object. The
definition stays in source; the context provides its live value. Re-evaluating a
control() declaration preserves the performer's current value when possible.
When no controls exist, the panel shows a short empty state and the create action instead of unused sliders or buttons.
Reusable visual motion
Open Help → Examples… → Run Motion Lab to try LFOs, attack/release and ADSR envelopes, lag, ramps, stepped sequences, range mapping, and seeded variation. Press Esc, then hold H to sustain the ADSR and release H to fade it out. In the Lag cell, the outline shows raw steps and the filled circle shows the smoothed value. These helpers work in both p5 patches and shader parameters.
Smooth motion with lag
lag(source, options) makes a numeric value follow another smoothly. For example:
const steps = sequence([0.7, 1.2, 0.9, 1.4], { period: 1 });
const softSize = lag(steps, { time: 0.2 });
const softBass = lag(c => c.audio.bass, { rise: 0.04, fall: 0.35 });
Use softSize(c) inside a p5 patch or pass softSize directly to
[myPatch].scale(softSize). Each helper is created once in evaluated code and
sampled once per frame, even when several patches use it. Helper inputs use the
shared fields time, dt, frame, audio, clock, controls, and keyboard,
not the full draw context. They cannot read modulations, sceneTime, state,
canvas, clipTime, or clipProgress; use an ordinary patch/property callback
for those. See Numeric signal helpers.
time defaults to 0.15 seconds. It is an exponential time constant: about 63% of a
fixed change is covered in that time, and 95% in three times that duration. rise
and fall optionally override the duration for increasing and decreasing values.
Zero duration follows immediately. Lag starts at its first sampled input unless
you supply initial, such as initial: 0. unit: 'beats' uses the optional clock
and holds progress when timing stops. This smooths control values; p5's existing
smooth() drawing command keeps its usual meaning.
Hold and release an ADSR envelope
A trigger starts a one-shot attack/release envelope. A gate keeps an ADSR
envelope held until the input becomes false or zero. This example uses
polygonShape from the three-patch exercise.
Evaluate that patch first, then replace your existing scene section body with this example
(keep its // %% scene scene heading): it combines smoothed size and held opacity.
const steps = sequence([0.7, 1.2, 0.9, 1.4], { period: 1 });
const softSize = lag(steps, { time: 0.2 });
const held = envelope({
  gate: c => c.keyboard.keys.has('h'),
  attack: 0.2, decay: 0.3, sustain: 0.55, release: 0.7,
  min: 0.2, max: 1,
});
const scene = [
  () => background(20, 22, 27),
  [polygonShape].scale(softSize).opacity(held),
];
scene.activate();
Press Esc to release editor focus, then hold H. Attack moves from the current
value to max; decay moves to the sustain level; sustain remains until you release
H; release moves to min. Sustain is a 0–1 fraction of the min/max range, not a
time. A release during attack or decay starts from the current value, and pressing
again during release also continues from the current value.
ADSR defaults are attack 0.02, decay 0.1, sustain 0.7, and release 0.4. Stage
durations use seconds, or beats with unit: 'beats'; zero skips a stage. Gate may
be a boolean, a finite number, or a callback returning either. Choose gate or
trigger; combining them, or supplying decay/sustain without a gate, is an error.
Editing a helper creates fresh state when you run it. Run its consumers again to
use that new definition, or evaluate the complete program with Cmd/Ctrl+Shift+Enter. Existing consumers
keep their captured helper until re-evaluated. Modulations and their optional
control targets can be edited in the Modulations tool.
See Tempo and timing for beats and ticks, and Timing and visual signals for the complete signal-helper APIs.
Modulations
Modulations creates named signals: periodic LFOs (including ramp, square,
and random-step waveforms), smooth random Noise, Sample & Hold,
Ramp, and Envelope.
A patch can read modulations.lfo1, or a modulation can target a continuous
performance control. The control's stored value remains the base while the signal
swings its effective value. The list, settings, names, and targets belong to the
performance rather than individual scene presets.
Choose + Modulation to create one. The card shows the waveform and current
output. Click the chevron to expand its editor in the sidebar; click the name to
rename it. Choose beat-synced timing or Hz (free). Free-running LFOs start in
the 0.01–2 Hz Slow range, with an optional 0.01–30 Hz Extended range. Drag
the frequency knob or use its numeric field. Depth and offset set its range.
Changes apply live. The generated, read-only // %% modulations cell mirrors the
performance's current definitions.
For smooth drift, choose Kind → Noise · smooth random in the create form or an existing modulation's editor. Roughness adds finer movement; rate, depth, offset and target work like an LFO. The preview scrolls through the actual noise signal with its current output at the center.
Noise uses orange on its cards, previews, and running Push buttons; LFOs use cool blue-violet. Each instance gets a saved seed, so renaming it preserves its movement. Switching off/on or reloading restarts its sequence; changing rate preserves its position. With Timing off, synced Noise continues at its free-running Hz rate.
Sample & Hold picks a random value and holds it until the next tick. Chance controls how often a tick changes the value; Glide slides to it over part of the interval. It uses the same beats/Hz timing as an LFO.
Ramp moves from zero to full over its Duration, measured in seconds or beats. Choose a linear, ease-in, or ease-out shape, then hold, loop, or ping-pong at the end. It starts when enabled; Fire restarts it. Releasing the button does not stop a ramp.
Envelope has attack, decay, sustain, and release. In Gate mode, press Hold to start it, keep pressing to sustain, and lift to release. Hit mode plays attack and decay back to zero after a tap. Invert on either kind moves downward instead of upward. Beat-based durations pause while Timing is off.
Envelope and Ramp automatically create a momentary trigger in Controls and take
the next available control pad on Push. You can select an existing momentary
Trigger control instead, or disable the automatic trigger control. Beat
trigger interval adds periodic triggers (0 = off); Envelope's Beat gate
length determines when each beat trigger releases. The beat gate never cuts
off a pad you are still holding. Code can call trigger("name") and
release("name"). Reloading starts with triggers released.
The colors match across cards, scopes, Push screens, and enabled modulation buttons:
| Kind | Color |
|---|---|
| LFO | Blue-violet (indigo LEDs) |
| Noise | Orange |
| Sample & Hold | Teal |
| Ramp | Amber |
| Envelope | Pink |
Continuous controls stay green. Automatic trigger pads are white at rest and show their modulation's color while held. Modulation buttons use steady colors.
For hardware gestures and the complete modulation encoder-page matrix, see Edit modulations on the controller. The main Modulations sidebar remains available without a controller.
Predict a modulation's range
A performance modulation provides a named signal, such as modulations.drift.
Repeating waves are signed, typically from −1 to 1; Envelope and Ramp shapes
normally span 0 to 1 before depth, offset or inversion. Depth is 0–1 and
Offset is −1–1. The named signal is:
modulations.name = clamp(offset + waveform × depth, −1, 1)
With a repeating sine, depth 0.25 and offset 0, the signal moves from −0.25 to
0.25. A patch can scale it into its own units: 120 + modulations.drift * 100
produces a diameter of 95–145 pixels. The named signal exists without a target;
reading it is already a useful connection.
Choosing a numeric Target also moves that control around the performer's base value. For each targeting modulation, the instrument computes:
next = base + (offset + waveform × depth) × (maximum − minimum)
It then rounds to the declared step, if any, and clamps to the control's range. For a 0–1 control with base 0.5, depth 0.25 and offset 0, a sine swings between 0.25 and 0.75. Offset 0.1 shifts that to 0.35–0.85. Increasing depth to 1 can flatten motion at the endpoints through clamping. For a 0–100 control the same depth means a swing of 25 units, not 0.25 units.
Several modulations can target one control. They apply in list order; each uses
the previous result as its base, then rounds/clamps again. Ordering can therefore
matter near an endpoint. Target calculations use the unbounded offset + waveform × depth term before the target's own range clamp; they do not multiply the
already-clipped named signal by the range. Targets must be numeric with a positive
range. Boolean buttons are read directly, not continuous modulation targets.
The knob or slider still edits the stored base value. The patch's controls.name
reads the resulting value for the frame. Saving does not capture every point of
the swing as a new base value. Disable the modulation to see the underlying
control choice again.
To try the numeric example, save your work first, replace all editable patch and scene code with this complete program, and run Cmd/Ctrl+Shift+Enter. In Controls, set demoSize to 0.5. In Modulations, confirm demoSwing is enabled with depth 0.25, offset 0 and target demoSize. Those explicit checks matter if those names already exist: redeclaration preserves performer settings.
// %% patch modulationDemo
control("demoSize", 0.5, {
  type: "continuous", min: 0, max: 1, step: 0.01,
});
modulation("demoSwing", {
  hz: 0.25, depth: 0.25, offset: 0, target: "demoSize",
});
function modulationDemo({ controls }) {
  noStroke();
  fill("#ff572b");
  circle(width / 2, height / 2, 80 + controls.demoSize * 160);
}
// %% scene modulationScene
const modulationScene = [() => background(17), modulationDemo];
modulationScene.activate();
The diameter should move between 120 and 200 pixels over a four-second cycle.
Move the base value in Controls and watch how the moving range shifts. A target
does not require the patch to read modulations.demoSwing: it already reads the
modulated controls.demoSize. Performance Modulations and code helpers such as
lfo() and envelope() are separate systems with their own defaults.
Performance modulation defaults are separate from numeric code helpers:
| Kind | Initial behavior and values |
|---|---|
| LFO | Sine, enabled, beat-sync at 1 beat/cycle; free fallback 0.25 Hz; depth 0.25, offset 0, no target |
| Noise | Same timing/depth/offset; roughness 0.3 and a saved seed |
| Sample & Hold | Same timing/depth/offset; glide 0, chance 1 |
| Envelope | Seconds; attack 0.1, decay 0.3, sustain 0.5, release 0.3; Gate, linear curve; waits for a trigger |
| Ramp | Seconds; duration 4, linear shape, hold endpoint; starts when enabled |
Envelope/Ramp share depth 0.25, offset 0, enabled, no target, and an automatic momentary trigger control. Invert negates their shape to 0…−1. Source beat-rate values accept 1/32…64 beats; controller rate choices are listed in Appendix A.
Editing during a performance
Click a control name to edit it in a settings dialog; Apply settings commits definition changes. LFO settings expand inside their sidebar cards. For a modulation, click the chevron to expand or collapse settings; click its name to rename it (Enter saves, Escape cancels). Renaming changes the code identifier, so update handwritten patch references to the old name. LFO changes apply live.
For an LFO in Hz (free) mode, drag the frequency knob vertically or use arrow keys. Hold Shift for finer changes; Home/End select the minimum/maximum.
The default logarithmic Slow range is 0.01–2 Hz (100 seconds down to half a second per cycle). New free-running LFOs default to 0.25 Hz, one cycle every four seconds. An explicit Extended range supports 0.01–30 Hz and preserves existing faster LFOs.
A seconds-per-cycle readout and numeric Hz field are also available. Beat-synced LFOs retain the beat selector.
8. Tempo and timing
Tempo supplies a shared beat clock for your performance. You can use it to keep movement in rhythm, trigger an effect on each beat, or queue a scene launch for the next beat or measure. It is separate from audio playback: a manual clock can run without music, and music can play with timing turned off.
Choose how the clock gets its tempo:
- Tap tempo or set BPM: tap along with the music, or enter a known tempo. Use this when you are setting the timing yourself.
- Beat detection: try to estimate the beat from incoming audio. This is experimental and is not recommended for performance timing.
- MIDI clock: follow the tempo and transport of a DAW, drum machine, or another MIDI clock source.
Open Performances → Current → Tempo to choose the timing source. Each source
feeds the same clock values in your patches, so you can change the source
without rewriting your beat-driven code.
Tap tempo or set BPM
Open Performances → Current → Tempo. Under Timing, choose Manual and enter a tempo in BPM (beats per minute), from 30 to 300. At 120 BPM, each beat lasts half a second.
You can also tap the rhythm. Press Esc to release editor focus, then tap Space
or T, or click Tap in the top navigation. The first tap aligns the beat;
the second estimates the tempo, and further consistent taps refine it. Tapping
or entering BPM selects Manual timing.
½ / ×2 halves or doubles the tempo. Align beat now places a beat boundary
at the moment you press it. Choose Off to stop the beat clock and hold its
position. Shift+Space plays or pauses audio; it does not stop Manual timing.
Beat detection: experimental, not recommended
Automatic beat detection is experimental and is not recommended for performance timing. Under Tempo → Timing → Auto · experimental, Pulse (PLP) and Onset grid try to follow the music, but both can lose tracking or follow the wrong pulse. A Tracking status does not guarantee a musical match. Use tapped or manually set tempo, or MIDI clock from an external source, when reliable beat timing matters. Tap takes over with Manual timing.
MIDI clock
MIDI clock supplies timing messages from another application or device. Thunk Machine follows that sender's tempo and beat position rather than estimating them from the sound. Use it to synchronize with a DAW or drum machine.
To connect a MIDI clock source:
- Open Settings → Keyboard & controllers → MIDI & controller setup….
- Choose Connect MIDI and allow browser access.
- Set Clock input to the port sending MIDI clock. Clock messages do not use a MIDI channel.
- Open Performances → Current → Tempo and select MIDI clock under Timing.
- Enable MIDI clock output on the sending device, then start its transport.
The instrument follows 24 MIDI clock pulses per beat. Start resets beat position, Continue resumes, Stop holds, and Song Position Pointer sets a position. Pulses alone can establish a tempo, but playback waits for Start or Continue. MIDI clock controls the shared timing used by patches, modulation, and next-beat scene launches; it does not play or pause a loaded audio file.
Tempo shows whether it is waiting for transport, running, stopped, missing its input, or has lost clock. After half a second without pulses, the clock holds. A returning pulse stream can resume after a dropout; after disconnecting or changing the input, start or continue the sender again. Local BPM, half/double, and alignment controls are disabled while following MIDI. Tap takes over with Manual timing.
The timing source and selected input are saved with the performance. Previously granted MIDI access can reconnect automatically; otherwise choose Connect MIDI. A saved port that is unavailable stays identified as unavailable rather than silently selecting another device. Runtime beat position follows the sender.
MIDI's 24 pulses per beat differ from the patch's clock.tick, which marks a
beat boundary. Thunk Machine also sends a separate clock for Push's hardware
light animations: Manual timing follows the instrument's clock; Off, Auto, and
MIDI timing use an animation fallback, normally 120 BPM. The incoming source is
not forwarded to arbitrary MIDI outputs.
Example: Ableton Live on a Mac
Use the Mac's IAC Driver as a virtual MIDI cable between Ableton Live and Thunk Machine:
- Open Audio MIDI Setup → Window → Show MIDI Studio. Double-click IAC Driver, enable Device is online, and click Apply. The default Bus 1 is enough. See Apple's IAC setup instructions.
- In Ableton, open Settings → Link, Tempo & MIDI. Under Output Ports, enable Sync for IAC Driver (Bus 1). See Ableton's MIDI sync instructions.
- In Thunk Machine's MIDI configuration, choose that IAC bus as Clock input, then select Tempo → Timing → MIDI clock.
- Press Play in Ableton. Change Ableton's BPM to check that Thunk follows; stop Ableton to hold the beat position.
Incoming clock and Push controls have separate roles: the selected IAC port supplies timing, while Push pads and buttons control the performance. Clock messages bypass MIDI Learn. If Thunk Machine is controlling Push, leave Ableton's Push control-surface assignment disabled so the two applications do not compete for its lights and display.
Beats, phase, and ticks
Patches receive timing through clock in their draw arguments:
clock.runningtells you whether the beat clock is advancing.clock.beatis the continuous beat position, including its fractional part.clock.phaseis progress through the current beat: 0 at its beginning, approaching 1 before the next beat.clock.tickis true for a frame in which at least one beat boundary was crossed. Use it to trigger an action, rather than sustain that action throughout a beat.
A tick is a timing event, not an audio measurement. audio.bass measures bass
energy; audio.onset detects a hit in the sound. Neither means that the tempo
clock has reached a beat boundary. The clock does not identify bars, downbeats,
or a time signature.
Try a beat-driven pulse
In the dot patch from Your first scene, replace its
draw method with this one, then evaluate the patch with Cmd/Ctrl+Enter:
draw({ clock }) {
  noStroke();
  fill("#57dbc8");
  const pulse = clock.running ? Math.pow(1 - clock.phase, 3) : 0;
  circle(width / 2, height / 2, 100 + pulse * 180);
},
Set or tap a Manual tempo, or start the sender when following MIDI clock. The circle grows at each beat and shrinks between beats. This uses phase for movement across the whole beat. When the clock stops, the circle returns to its base size.
For a one-frame flash, add a function entry after dot in the scene array:
({ clock }) => {
  if (clock.running && clock.tick) background("#ffcc66");
},
Evaluate the scene section. The gold background flashes on beat ticks. A burst
or other one-shot patch can instead connect its trigger setting to
({ clock }) => clock.running && clock.tick inside that patch's definition.
The patch's own envelope determines how long the effect lasts.
Launch on the next beat or measure
On Push, hold a timing button before pressing a scene pad:
- Pad alone launches immediately.
- Quantize + pad queues the scene for the next beat.
- Fixed Length + pad queues it for the next measure.
- Shift + pad prepares a cross dissolve immediately.
These are held modifiers, not on/off modes. Release the button after pressing the pad; the scene stays queued, and your next unmodified pad press launches immediately. A new queued request replaces the previous one; Cancel in the virtual controller clears it. With an off or stopped clock, the request launches immediately. Shift takes precedence over timing modifiers; if both timing buttons are held, Fixed Length takes precedence.
In Tempo, Beats per measure defaults to 4 (four quarter-note beats, as in 4/4). Set it to 3 for 3/4. Beat position zero starts the measure grid, so MIDI Start and Song Position Pointer give a reference when the sender supplies them. MIDI clock does not carry a time signature. If the grid does not match the music's downbeat, click Align measure now on that downbeat: it marks the nearest clock beat as a measure start without changing tempo or beat phase. Measure length and alignment are saved with the performance.
Direct scene-card Launch actions, numbered scene shortcuts, and
scene.activate() do not wait for a beat or measure. The boundary starts scene
preparation; it cannot guarantee that every scene renders instantly.
See Live launcher and virtual Push.
For clock fields, dropped-frame behavior, and signal-helper details, see Timing and visual signals.
9. Map MIDI hardware
Web MIDI lets a physical controller change the same live controls as the onscreen UI. The patch never needs to know a device name or MIDI message number.
- Plug in and power on the controller.
- Open MIDI in the toolbar, or Settings → Keyboard & controllers → MIDI & controller setup….
- Select Connect MIDI and permit browser access.
- Open Controls and select Learn MIDI beside a control.
- Move a knob or fader, press a switch, or strike a drum pad.
Knobs and faders usually send MIDI CC values and fit continuous controls. Drum pads and keys usually send Note On/Off messages and fit momentary or toggle buttons. Choice controls divide the incoming range among their options.
Mappings belong to the project and are captured by safe states and named performances. Source remains portable: another student can map different hardware to the same control names. Web MIDI is browser-dependent; an unsupported browser leaves all onscreen controls working.
Push 3 has its own startup path for an authorized USB display and MIDI User Port. General MIDI reuses granted permission when saved mappings require it, at startup or performance load; it does not request new permission automatically. Existing access is left alone, and automatic general MIDI is skipped while the dedicated Push output is active. If permission cannot be reused, use Connect MIDI. Missing hardware does not block performance loading. Mappings/routes are saved, but permissions and live device connections are not. Display setup and the LED bench are in Settings → Keyboard & controllers.
Connecting Push 3
Push 3 integration and the virtual controller are Experimental. Open Settings → Keyboard & controllers → MIDI & controller setup… to connect hardware or open the virtual controller. MIDI input/output and the USB display connect independently; a live screen alone does not establish that pads work. The browser instrument runs on the computer, not on standalone Push.
Follow Connect Push 3 in Appendix A for prerequisites, permissions, port selection, reconnect/disconnect, and display setup. The gesture reference covers numeric control pages, modulation editing, scene/clip pads, browsing, tempo, and feedback.
Keep the performer tab foreground and rehearse the actual browser/device. Physical MIDI, pressure, LED appearance, and USB-display latency are not proven by mocked controller tests. Manual timing uses timestamped MIDI animation; Off/Auto use fallback animation rather than hardware Auto phase scheduling.
10. Perform without losing the last good image
The host stages supported replacements and checks their first active frame:
- A syntax error leaves the last successful patch or scene running.
- A definition error leaves the last successful version registered.
- A first-frame draw error rolls back the failing patch definition and relevant scene configuration. Other successfully drawn replacements from the same evaluation may remain applied.
- The editor flashes red and Diagnostics explains the error.
- Re-evaluating an edited class replaces its project registration rather than accumulating duplicate top-level class declarations.
Use the error location and message, repair the source, and evaluate again. The failed source remains visible so it can be fixed.
A committed patch that throws transiently returns to healthy status only after all its copies succeed in a later frame. Previous diagnostic messages remain available. Stage and tempo callbacks catch exceptions so later frames can continue; optional controller, launcher, and audience feedback failures are reported without stopping the stage. Unhandled asynchronous errors also appear in Settings → Diagnostics. This protects against exceptions, not an infinite loop or browser/GPU failure.
JavaScript evaluation is not a security sandbox. An infinite loop can monopolize the browser before the host can recover. Keep loops bounded, avoid unbounded arrays, and test expensive shaders before a public set.
Clips
Open Performances → Current → Clips and choose + Clip. Select a patch and its duration, then choose Add clip. Each card shows its stable clip number (such as #1) to match its key command. Launch overlays it on the current scene, Stop ends it early, and Edit changes its patch or duration. A playing card turns green and returns to Ready when its duration ends. Remove stops the clip and removes its assignment. Up to 16 clips can belong to a performance; existing keyboard shortcuts and controller assignments continue to work without showing a hardware grid in this tab.
Launching a clip from code
A clip is a timed transparent patch over the current scene; it does not replace that scene. For a complete gesture, add and evaluate this patch cell:
// %% patch flash
const flash = ({ clipProgress = 0 }) => {
  noStroke();
  fill(255, 87, 43, (1 - clipProgress) * 180);
  circle(width / 2, height / 2, 80 + clipProgress * 320);
};
Add this separate cell and evaluate it once to assign the clip:
// %% patch clips
const clips = [{ patch: flash, durationMs: 2000 }];
clips.install();
With your scene running, evaluate clips.launch(0) as a separate command. An
orange disc expands and fades over two seconds while the scene continues. Clips
can overlap; up to 16 can be active or assigned. Durations can be at most 600
seconds. Keyboard shortcuts cover clips 1–8; the Clips interface exposes all 16.
For other patches, define an array such as
const clips = [{ patch: flash, durationMs: 2000 }]; and run clips.install() to
assign its entries to the bottom two rows of Push 3. Press a pad to launch a clip,
or run clips.launch(0) to launch its first entry from code. Shift plus a clip
pad still reaches the effect toggle underneath. Clip length is in milliseconds;
older code using duration in seconds remains supported. In the patch, read clipTime for seconds since launch or
clipProgress for a 0–1 lifetime. It draws into a transparent layer and expires
without switching scenes. Pressing an active clip pad again stops it;
clips.launch(index) in code restarts it. See Clips in
the API reference for a full example.
Live launcher and virtual Push
The experimental virtual controller gives you a performance surface in a separate browser window. Open Settings → Keyboard & controllers → MIDI & controller setup… → Virtual controller → Open controller. The top four pad rows launch scenes; lower pads operate assigned Boolean controls and clips. A Boolean control changes a value; a patch or effect must read that value to change the image. Scene recall keeps the current audio source, clock, and performance controls. Clips overlay the scene instead of replacing it.
Hold Quantize before pressing a scene pad to queue it for the next beat; hold Fixed Length for the next measure. Release the button after pressing the pad. An unmodified pad launches immediately, and Shift still prepares a cross dissolve. On the virtual controller, click Quantize or Fixed Length to turn on that timing mode, then click a scene pad. Click the active button again to return to immediate launches. Choosing the other button switches modes. Cancel clears a queued launch. See Launch on the next beat or measure for measure length, alignment, and clock behavior. Numbered scene-recall shortcuts and direct scene-card launches bypass this queue.
Eight encoders operate numeric controls in declaration order, eight per page. Page selection does not rearrange source declarations. Physical Push’s lower display buttons normally launch scenes 1–8 in the current bank; Shift/MOD exposes modulations. The virtual controller shares these actions and layout, but a mouse does not reproduce physical aftertouch. Its ordinary strip target picker also has no equivalent normal physical-strip assignment; both strips can control an active cross-dissolve.
Use Appendix A for the complete hardware/virtual setup, source assignments, pad roles, gestures, editing pages, display feedback, differences, and experimental limits. Both controllers remain optional: code, scene cards, and onscreen controls provide the underlying actions.
11. A reliable live-set workflow
Before rehearsal:
- Choose and test the browser, audio output, input, and projector.
- Install only the patches the project needs.
- Put explicit backgrounds first and post-processing last.
- Name important inline ideas so their identity and state stay stable.
- Bound histories. Launch every intended scene after a fresh reload/import, then return to it: test cold preparation and warmed returns on the same machine, browser profile, origin, and output resolution. Watch occasional cue stalls as well as sustained frame rate. Try actual cross-dissolve pairs and clip combinations; two smoothly running individual scenes can still overload a blend. Watch memory/resource history for continuing growth. Use the intended controller, preferably physical Push pads when performing with Push; mocked tests cannot establish device/display latency.
- Create controls and map MIDI by semantic name.
- Save scenes in desired slot order.
- Export a portable package with the permitted assets selected, or export source only and copy the media files separately.
Before the audience arrives:
- Reload and recall each important performance.
- For file playback, load the track before the set, wait for the ready transport, and confirm moving meters, the intended output, and audible level. For mic/line input, confirm moving meters and your external sound-system routing: Thunk Machine analyzes live input without speaker monitoring. Silent visuals need no audible source.
- Confirm the audience window or fullscreen display.
- Set Safe State on a tested scene.
- Keep Settings → Diagnostics available on the operator display.
During the set:
- Make one understandable edit at a time.
- Evaluate the smallest relevant cell.
- Watch for the success or error flash.
- Use Duplicate for a variation that becomes selected immediately. + Scene → Create scene keeps an existing selection; explicitly Launch the new card before editing it. Save discoveries worth recalling.
- Use
0if experimentation moves too far from the known-good state.
Part III — Program patches
Once you have used patches in a performance, learn how to write your own. A patch defines what to draw. Thunk Machine supplies changing time, sound, and control values through its context.
These chapters explain p5.js drawing, context, audio, JavaScript patch forms, and configuration. They provide the programming foundation for the advanced composition chapters that follow.
12. p5.js inside a patch
p5 drawing functions and globals remain available: circle, rect, line,
beginShape, vertex, fill, stroke, noise, map, width, height,
mouseX, and many others.
The origin (0, 0) is at the upper-left. x increases to the right and y
increases downward.
const movingLine = ({ time }) => {
  const x = width / 2 + sin(time) * width * 0.35;
  stroke(255);
  strokeWeight(4);
  line(x, 0, width - x, height);
};
Thunk Machine wraps each patch in drawing-state protection, so ordinary style and transform changes do not normally leak into the next patch. A patch that should clear or establish the canvas belongs first in the scene. Most drawing and diagnostic patches should remain transparent so they can be layered.
13. The injected context
Thunk Machine supplies each patch with a context: an object containing the
current time, audio information, controls, modulations, and the patch’s state.
It passes this object as an argument when it calls a function patch or an object
patch’s draw method.
Use object destructuring in the parameter to select the values your code needs:
draw({ time, audio }) {
  circle(width / 2, height / 2, 100 + audio.bass * 180);
}
The curly braces { time, audio } read those properties from the context into
local variables named time and audio.
Thunk Machine reuses the context object while drawing. Read its values during the
call rather than storing the whole object for later. For asynchronous code, keep
only the values you need: copy a number such as time, or retain the specific
state reference. The context’s state and canvas properties may refer to
another patch occurrence or layer by the time an asynchronous operation finishes.
| Context field | Meaning |
|---|---|
audio |
Current level, frequency bands, onset, spectrum, and waveform |
time |
Seconds since the host started |
sceneTime |
Seconds since this scene was activated |
dt |
Seconds since the previous frame, bounded after a stall |
state |
Persistent data unique to this occurrence in the scene |
canvas |
Current render target: main renderer or nested group; usable as a shader texture |
controls |
Current values declared with control() |
modulations |
Current named performance modulation outputs |
clock |
Optional shared tempo snapshot; stopped timing holds its position |
clipTime |
Seconds since this clip launched; only supplied to clip patches |
clipProgress |
Clip lifetime fraction from 0 to 1; only supplied to clip patches |
keyboard |
Read-only physical keyboard state |
Thunk Machine supplies these values so patch authors do not have to set up audio analysis, timing, keyboard input, and a drawing surface themselves.
A patch needs two kinds of information: settings you choose, such as its color or base size, and values that change during the performance, such as time or audio levels.
You supply settings when you create the patch. Thunk Machine supplies the context each time it calls the patch to draw. The drawing code can use both:
class PulseRing {
  constructor(radius, speed) {
    this.radius = radius;
    this.speed = speed;
  }

  draw({ time, audio }) {
    const diameter = this.radius + sin(time * this.speed) * 30 + audio.bass * 90;
    circle(width / 2, height / 2, diameter);
  }
}

const slowRing = new PulseRing(180, 0.7);
You provide 180 and 0.7 once. The engine provides fresh time and audio on
every frame.
14. Read sound and FFT data
Thunk Machine uses the browser’s Web Audio API to analyse incoming sound.
It supplies the results through the context’s audio object, so your patches can
respond to volume, frequency ranges, and detected audio hits:
audio.level       // normalized overall energy, generally 0..1
audio.bass        // normalized low-frequency energy
audio.mid         // normalized middle-frequency energy
audio.treble      // normalized high-frequency energy
audio.onset       // true on a detected audio hit (not an estimated clock beat)
audio.centroid    // normalized spectral brightness, 0..1
audio.sinceOnset  // seconds since the last detected hit
audio.spectrum    // FFT magnitudes, each 0..255
audio.waveform    // time-domain samples, each -1..1
Install diagnostic patches such as waveform, frequency bars, and audio meters to see what the analyser is receiving. Smoothing and auto-gain live in the Audio tools.
Draw a waveform
A waveform shows how the audio signal rises and falls over time. This example
defines a function patch: Thunk Machine calls the function each frame and
passes it the context. The function reads waveform samples from audio and
draws them as a connected line across the stage.
const waveLine = ({ audio }) => {
  noFill();
  stroke(80, 220, 255);
  beginShape();

  audio.waveform.forEach((sample, index) => {
    const x = map(index, 0, audio.waveform.length - 1, 0, width);
    const y = height / 2 + sample * height * 0.3;
    vertex(x, y);
  });

  endShape();
};
Draw frequency bars
const spectrumBars = ({ audio }) => {
  noStroke();
  const bins = audio.spectrum.slice(0, 96);
  const barWidth = width / bins.length;

  bins.forEach((magnitude, index) => {
    const barHeight = map(magnitude, 0, 255, 0, height * 0.7);
    rect(index * barWidth, height - barHeight, barWidth - 1, barHeight);
  });
};
The arrays are immutable ordinary JavaScript arrays. Array methods make audio a natural way to learn data transformations:
const loudBins = audio.spectrum.filter((value) => value > 180);

const points = audio.waveform.map((sample, index) => ({
  x: index * width / audio.waveform.length,
  y: height / 2 + sample * 120,
}));

const average = audio.waveform.reduce(
  (sum, sample) => sum + abs(sample),
  0,
) / max(1, audio.waveform.length);
forEach performs an action, map creates transformed values, filter selects
values, and reduce combines many values into one.
Choose a fast audio response
The ordinary audio.level, bass, mid and treble values follow the Audio
panel's smoothing and normalization settings. For brief hits and rapid response,
read audio.fast instead. Its analyser has no temporal smoothing; each scalar
uses its own decaying peak reference to normalize the current reading. The Audio
panel's smoothing and auto-gain switches do not change this path.
Both paths sample broad selected frequency regions: bass 20–140 Hz, mid 400–2600 Hz, treble 5200–14000 Hz, limited by the available sample rate. They leave gaps between regions; they are not three equal full-spectrum bands. Neither path is a calibrated loudness meter. Normalized readings are relative to recent input, so a quiet track can still produce a strong visual response.
To compare them, save your work first, replace all editable patch and scene source with this complete program, and run Cmd/Ctrl+Shift+Enter. Load a music file or choose a microphone/line input and start it. The left orange disk follows the ordinary level; the right blue disk follows the unsmoothed level. Compare sharp hits and pauses; their scales also differ because their gain references differ.
// %% patch audioComparison
function audioComparison({ audio }) {
  noStroke();
  fill("#ff572b");
  circle(width * 0.3, height / 2, 40 + audio.level * 200);
  fill("#57dbc8");
  circle(width * 0.7, height / 2, 40 + audio.fast.level * 200);
}
// %% scene comparisonScene
const comparisonScene = [() => background(17), audioComparison];
comparisonScene.activate();
Without an active audio source, both disks stay at their minimum size. Microphone
and line input feed analysis without speaker monitoring; check the external audio
system separately. audio.fast has no onset detector, centroid or clock fields.
Use audio.onset for detected hits and clock for beat timing.
| Fast field | Units/range | Meaning |
|---|---|---|
audio.fast.level |
0..1 |
Current waveform RMS relative to its decaying peak reference |
audio.fast.bass, .mid, .treble |
0..1 |
Selected-band magnitude relative to that band's independent peak reference |
audio.fast.raw.level |
Unitless floating RMS | Unnormalized waveform RMS |
audio.fast.raw.bass, .mid, .treble |
Unitless floating magnitudes | Square root of summed squared linear FFT magnitudes in the selected band |
audio.fast.spectrum |
0..255, floating values |
Linear FFT magnitudes scaled by 255 and capped at 255 |
audio.fast.waveform |
Normally -1..1, floating samples |
Unsmoothed time-domain samples |
The fast path uses a 2048-sample FFT, yielding 1024 frequency bins. Use
audio.sampleRate and audio.nyquist from the outer snapshot to interpret their
frequency positions. Fast raw bands use a different scale from the normal raw
spectral bands' 0..255 scale; calibrate thresholds with the actual path and
input rather than copying a threshold between them. Silent fast readings contain
zero scalars and empty arrays, so check length before indexing an array.
15. Choose a patch form
All four forms below are first-class JavaScript values and can be placed directly in a scene.
Function patch
Use a function declaration for a small stateless idea:
function horizon({ audio }) {
  stroke(255);
  line(0, height / 2, width, height / 2 + audio.mid * 100);
}
Arrow-function patch
An arrow function is compact and works especially well for an inline patch:
const bassFlash = ({ audio }) =>
  audio.bass > 0.72 && background(255, 40, 180);
&& evaluates the background call only when the bass level exceeds 0.72.
Object patch
Use an object literal when the patch has named properties and methods:
const rings = {
  count: 6,
  spacing: 32,

  grow(amount) {
    this.spacing += amount;
  },

  draw({ audio }) {
    noFill();
    for (let index = 1; index <= this.count; index += 1) {
      circle(
        width / 2,
        height / 2,
        index * this.spacing + audio.bass * 80,
      );
    }
  },
};

rings.grow(2);
Thunk Machine supplies the context when it calls a patch’s draw method.
Methods you call yourself receive the arguments you provide. For example,
rings.grow(2) passes the number 2 to grow.
In these methods, this refers to the rings object, so this.spacing reads its
spacing property. An arrow function does not create its own this; use the
method syntax shown here when a method needs to access the object’s properties.
Class-instance patch
Use a class to define a constructor, drawing method, and helper methods for multiple patch instances. Each instance stores its own settings and animation state:
class Orbiters {
  constructor({ count = 8, radius = 140, hue = 190 } = {}) {
    this.phase = 0;
    this.count = count;
    this.radius = radius;
    this.hue = hue;
  }

  update(dt, treble) {
    this.phase += dt * (0.5 + treble * 3);
  }

  draw({ dt, audio }) {
    this.update(dt, audio.treble);
    for (let index = 0; index < this.count; index += 1) {
      const angle = this.phase + index * TWO_PI / this.count;
      circle(
        width / 2 + cos(angle) * this.radius,
        height / 2 + sin(angle) * this.radius,
        12 + audio.bass * 28,
      );
    }
  }
}

const smallOrbiters = new Orbiters({ count: 5, radius: 90 });
const largeOrbiters = new Orbiters({ count: 12, radius: 220, hue: 315 });

const scene = [
  () => background(0),
  smallOrbiters,
  largeOrbiters,
];
scene.activate();
Each new Orbiters(...) creates a separate instance. Thunk Machine calls each
instance’s draw method in scene order every frame. Each instance has its own
phase property, so its animation advances independently.
If you put the same instance into the scene twice, both entries use that object’s
settings and phase. Create two instances when you want separate animation state.
Reevaluating new Orbiters(...) creates a new instance with phase set to zero.
For state preserved through compatible live replacement, see
per-occurrence state.
16. Configure and reuse patches
Object spread
Object spread makes a shallow variation without changing the original:
const smallRings = { ...rings, count: 3, spacing: 20 };
const largeRings = { ...rings, count: 8, spacing: 50 };

const scene = [
  smallRings,
  largeRings,
];
Both objects copy the draw function, and its this points to the variation
being drawn. Spread copies own enumerable properties; it does not establish
prototype inheritance. Nested objects remain shared because the copy is shallow.
Use a constructor or factory for class-instance variations: spreading an
instance does not copy prototype methods or private fields. This fragment
requires the Chapter 15 rings definition; add scene.activate() and evaluate
the scene to display it.
Factory function and closure
A factory is a function that returns a patch:
const makeSparkles = (count, colour) => ({
  draw({ time, audio }) {
    for (let index = 0; index < count; index += 1) {
      const angle = index * TWO_PI / count + time * 0.2;
      fill(...colour);
      circle(
        width / 2 + cos(angle) * width * 0.3,
        height / 2 + sin(angle) * height * 0.3,
        3 + audio.treble * 15,
      );
    }
  },
});

const pinkSparkles = makeSparkles(30, [255, 70, 180]);
count and colour stay available through a closure. The factory runs when the
definition is evaluated; the returned object's draw runs every frame.
A closure keeps the values from the evaluation that created it. Changing a helper does not automatically rebuild its existing consumers. Try these two cells alongside your scene:
// %% patch baseRadius
const baseRadius = 40;
// %% patch capturedDot
const capturedDot = ({ time }) => {
  noStroke();
  fill("#ff572b");
  circle(width / 2, height / 2, baseRadius + sin(time) * 10);
};
Run both cells, add capturedDot to your scene, and run the scene. Change
baseRadius to 100 and run only its cell: the already-created capturedDot
still reads 40. Run the capturedDot cell again to capture 100. The same
rule applies to factories, helpers, and constructed instances. Named patches
in scene arrays resolve through the host’s live registry; arbitrary closures
and direct method calls use ordinary JavaScript lexical capture.
Inject behavior with a function
A configuration option may itself be a function. This lets a caller decide whether a property is fixed or changes with context:
const valueOf = (value, context) => (
  typeof value === "function" ? value(context) : value
);

class ReactiveDots {
  constructor({ size = 12, spin = 0.2 } = {}) {
    this.size = size;
    this.spin = spin;
  }

  draw(context) {
    const size = valueOf(this.size, context);
    const spin = valueOf(this.spin, context);
    const angle = context.time * spin;
    circle(
      width / 2 + cos(angle) * 180,
      height / 2 + sin(angle) * 180,
      size,
    );
  }
}

control("spin", 0.2, { type: "continuous", min: 0, max: 2, step: 0.01 });
const reactiveDots = new ReactiveDots({
  size: ({ audio }) => 8 + audio.bass * 60,
  spin: ({ controls }) => controls.spin,
});
Evaluate this definition before adding reactiveDots to your existing scene;
run the scene after adding it. The spin declaration provides the value read by
the callback without requiring a separate UI setup.
Here the constructor receives behavior. The engine still injects context only into
draw; draw deliberately passes that context to the injected functions. This is a
useful bridge between object-oriented and functional design.
17. Exercise: compose three patches
This exercise combines three patch objects into a scene: a gradient background,
expanding rings, and a rotating polygon. Each object keeps its settings near the
top and reads them through this in its draw method.
To try it in a separate performance, choose Performances → All → + Performance
→ Use default scene. Replace the editable patch and scene source with the
complete program below, then press Cmd/Ctrl+Shift+Enter to evaluate it.
// %% patch gradientField
const gradientField = {
  top: [20, 25, 65], bottom: [240, 80, 115],
  draw() {
    noStroke();
    const first = color(...this.top), last = color(...this.bottom);
    for (let i = 0; i < 128; i++) {
      fill(lerpColor(first, last, i / 127));
      rect(0, i * height / 128, width, height / 128 + 1);
    }
  },
};

// %% patch ringField
const ringField = {
  count: 8, speed: 0.25, tint: [110, 220, 255], weight: 3,
  draw({ time, audio }) {
    noFill();
    const count = max(1, floor(this.count));
    const reach = Math.hypot(width, height) * 0.55;
    strokeWeight(this.weight + (audio?.bass ?? 0) * 3);
    for (let i = 0; i < count; i++) {
      const phase = (i / count + time * this.speed) % 1;
      stroke(...this.tint, (1 - phase) * 190);
      circle(width / 2, height / 2, phase * reach * 2);
    }
  },
};

// %% patch polygonShape
const polygonShape = {
  sides: 6, radius: 120, spin: 0.3, pulse: 0.22, tint: [255, 120, 80],
  draw({ time, audio }) {
    noStroke(); fill(...this.tint); beginShape();
    const count = max(3, floor(this.sides));
    const radius = this.radius * (1 + sin(time * 1.8) * this.pulse + (audio?.bass ?? 0) * 0.25);
    for (let i = 0; i < count; i++) {
      const angle = TWO_PI * i / count + time * this.spin;
      vertex(width / 2 + cos(angle) * radius, height / 2 + sin(angle) * radius);
    }
    endShape(CLOSE);
  },
};

// %% scene scene
const scene = [
  gradientField,
  ringField,
  polygonShape,
];
scene.activate();
The scene draws the gradient first, then the rings, then the polygon. The rings
expand as time advances; the polygon rotates and changes size. If audio is
playing, bass also changes the rings’ stroke weight and the polygon’s radius.
Try changing radius: 120 to radius: 180, or spin: 0.3 to spin: 0.6.
With your cursor in the polygonShape section, press Cmd/Ctrl+Enter to evaluate
that patch. The scene continues using polygonShape, so you do not need to
evaluate the scene again for this edit.
To change the composition, comment out ringField, in the scene array with
Cmd/Ctrl+/, then evaluate the scene section with Cmd/Ctrl+Enter. Uncomment
and evaluate it again to restore the rings. Later, nested arrays
let you apply effects to selected parts of this composition.
Part IV — Compose advanced visuals
Once you can create and perform scenes, explore how code composes their visuals. These chapters cover higher-order functions, nested layers, per-patch state, ShaderChain effects, and media sources.
18. Higher-order scene composition
Use a patch twice
After evaluating the Chapter 15 Orbiters class and its two instances, replace
the scene cell with this headed cell and evaluate it:
// %% scene scene
const scene = [
  () => background(20, 22, 27),
  smallOrbiters,
  largeOrbiters,
];
scene.activate();
The same named patch may also appear repeatedly. This illustrative array
requires Chapter 15’s rings; put it in the existing scene cell and activate it:
const scene = [
  rings,
  rings,
  rings,
];
Each occurrence receives independent context.state. The object itself is shared,
including its own properties and resources. The reference identifies occurrences as
rings, rings#2, and rings#3.
A higher-order function receives or returns a function, patch, or group. Because
patches and arrays are ordinary values, scene construction can itself be creative
code. The following variations replace the existing scene definition rather
than adding a second const scene. Evaluate required patch definitions first;
examples using legacy presets require the sources noted at the start of this
part. Keep or add scene.activate() after a scene fragment, then run its cell.
Parameterize a layer
const visibleWhen = (test, ...patches) => patches
  .opacity(context => test(context) ? 1 : 0);

const loudRings = visibleWhen(
  ({ audio }) => audio.level > 0.35,
  rings,
);

const scene = [
  solidBackground,
  loudRings,
];
scene.activate();
The helper receives a predicate and patches, then returns an array with an opacity
effect. The host still runs each patch's lifecycle and keeps its occurrence state.
Opacity zero hides the image while drawing continues. .mute(true) pauses a group
when you reevaluate its scene.
Function returning an array
const withGlow = (patch) => [patch].bloom(0.4, 3, 0.6);

const scene = [
  solidBackground,
  withGlow(waveLine),
  vignette,
];
withGlow(waveLine) runs once when the scene cell evaluates. Its returned array is
an isolated render group. It does not run again on every frame.
A bare function in a scene is different: it is a patch and is called every frame.
Immediately invoked arrow function
Use an IIFE when a one-time scene decision should stay inline:
const scene = [
  solidBackground,
  (() => {
    const choices = [neonTunnel, asciiNoise];
    return random(choices);
  })(),
  plasma,
];
The final () calls the arrow immediately. A new choice is made each time that scene
cell is evaluated, not on each frame.
Select two different patches without disturbing a required final effect:
const scene = [
  solidBackground,
  (() => {
    const choices = [neonTunnel, asciiNoise, laserFan];
    return choices
      .map((patch) => ({ patch, order: random() }))
      .sort((a, b) => a.order - b.order)
      .slice(0, 2)
      .map(({ patch }) => patch);
  })(),
  plasma,
];
The returned array is a group. If isolation is not wanted, build the selection before the scene and spread it into the parent:
const selected = [neonTunnel, asciiNoise, laserFan]
  .map(patch => ({ patch, order: random() }))
  .sort((a, b) => a.order - b.order)
  .slice(0, 2)
  .map(({ patch }) => patch);
const scene = [
  solidBackground,
  ...selected,
  plasma,
];
Spread syntax flattens values into the parent scene. Nesting preserves the returned array as an isolated group.
Conditional composition
const useDiagnostics = false;

const scene = [
  solidBackground,
  neonTunnel,
  ...(useDiagnostics ? [waveLine, spectrumBars] : []),
  plasma,
];
Transform a collection of configurations
const radii = [60, 120, 180];
const orbitFields = radii.map((radius, index) => (
  new Orbiters({ count: 5 + index * 3, radius })
));

const scene = [
  solidBackground,
  ...orbitFields,
];
These patterns are evaluated code that constructs the scene. They are not additional work performed on every animation frame.
19. Isolate effects with nested arrays
Why wrap a patch in brackets?
Put brackets around a patch to give it its own image layer. Then apply the
effect to that layer. A patch is drawing behavior: it might be a function, an
object with a draw method, or a class instance. A shader effect processes the
pixels produced by that behavior, not the JavaScript object itself.
Compare these scene entries:
| Entry | What it means |
|---|---|
dot |
Draw the patch directly into the current layer. |
[dot] |
Draw the patch on its own transparent layer, then place that image into the current layer. |
[dot].pixelate(40, 40) |
Draw the patch on its own layer, pixelate that layer's image, then place the result into the current layer. |
[dot, halo].pixelate(40, 40) |
Draw both patches on one layer and pixelate their combined image. |
For example, after defining dot and halo, replace the scene section with:
// %% scene scene
const scene = [
  () => background(12, 14, 20),
  [dot].pixelate(40, 40),
  halo,
];
scene.activate();
Run the scene section with Cmd/Ctrl+Enter. Each frame, the background draws in
the outer scene, dot draws on a separate transparent layer, and pixelation
processes only that layer. The result is composited over the background; halo
then draws above it without pixelation. The inner layer does not include the
outer background or other scene entries.
To pixelate both shapes together, replace the two entries for the isolated dot and the separate halo with one entry:
[dot, halo].pixelate(40, 40),
Keep the background before that entry in the outer scene. Do not leave a second
halo entry outside the group unless you intentionally want to draw it again.
To process the whole scene instead, put .pixelate(40, 40) after the outer array's
closing bracket, before its semicolon.
Why not dot.pixelate(...)? The instrument's effect methods belong to arrays
of patches, which describe image layers. It does not add those methods to plain
patch functions or objects: an object may already have a method named pixelate
with its own meaning. The brackets make the distinction explicit without changing
the patch's properties or drawing code. Effect chains return a new layer array;
the original patch can still appear elsewhere without that effect.
Brackets choose what gets affected; the method chooses the effect. The outer scene is also an array, but it describes the whole composition; an array inside it describes a separate image layer. Nested arrays are therefore more than a way to organize the list: they determine which pixels an effect can see.
How nested layers render
A nested array is a transparent offscreen render group:
const scene = [
  solidBackground,
  [asciiNoise, plasma],
  vignette,
];
The sequence is:
- Draw
solidBackgroundin the outer scene. - Draw
asciiNoiseinto a new transparent group. - Apply
plasmaonly to that group's pixels. - Composite the completed group onto the outer scene.
- Apply
vignetteto everything assembled so far.
Groups are recursive:
const scene = [
  solidBackground,
  [
    neonTunnel,
    [asciiNoise, bloom],
    plasma,
  ],
  vignette,
];
Nesting is not merely visual punctuation. It changes an effect's input. A sparse
transparent patch inside [asciiNoise, plasma] may remain sparse or dark because
Plasma cannot see an outer background. Include a richer source in the group when the
effect needs more pixels:
const scene = [
  solidBackground,
  [neonTunnel, asciiNoise, plasma],
];
See Nested render groups for the complete rendering and identity model.
20. Keep state across frames
Use state() for data that belongs to one occurrence of a patch:
const trails = {
  state() {
    return { points: [] };
  },

  draw({ state, audio }) {
    state.points.push({ x: mouseX, y: mouseY, energy: audio.level });

    if (state.points.length > 120) {
      state.points.shift();
    }

    state.points.forEach((point) => {
      circle(point.x, point.y, 3 + point.energy * 24);
    });
  },
};
Keep histories bounded. An array that grows forever will eventually reduce frame rate or exhaust memory.
Available lifecycle methods are:
| Method | When it runs |
|---|---|
state() |
Creates plain persistent state for an occurrence |
enter(context) |
The occurrence enters an active scene |
onset(context) |
An onset event occurs |
draw(context) |
Every animation frame |
exit(context) |
The occurrence leaves the active scene |
dispose() |
Owned resources should be released permanently |
Use reset(patch) to recreate state for every active occurrence of a patch.
Re-evaluating a compatible named patch normally preserves its occurrence state, which
is useful during performance. A state() factory initializes a new occurrence;
it does not migrate existing state when you add fields. To add a field during
live editing without losing existing data, initialize it in draw, for example
state.speed ??= 1. To intentionally restart the occurrence, run reset(trails).
Object properties, private fields, and closure variables belong to the shared
implementation, not to each occurrence’s context.state. They can be shared by
repeated references and replaced when a new implementation is constructed.
reset() recreates occurrence state; it does not reconstruct the patch object
or reset its private fields and resource handles.
21. Transform pixels with ShaderChain
Use the same effect methods directly on an array of sketches:
const scene = [
  solidBackground,
  [
    waveLine,
    rings,
  ]
    .rotate(0, 0.2)
    .blur(2)
    .opacity(0.7),
];
scene.activate();
The two sketches share rotation, blur, and opacity; the background stays outside
that group. Put laserFan after a blurred nested group to leave it sharp, or
inside the group before .blur(2) to blur all three. See
Layer composition for nesting and argument units.
Drawing patches create pixels. A ShaderChain is a patch that captures pixels drawn
before it and processes them on the GPU. Keep named chains for reusable effect
patches or explicit wet/dry mix, blend mode, and bypass settings:
const pixelDrift = new ShaderChain()
  .pixelate(
    ({ audio }) => 10 + audio.bass * 40,
    ({ audio }) => 10 + audio.mid * 40,
  )
  .repeatX(2, ({ audio }) => audio.treble * 0.18)
  .scrollX(({ time, audio }) => time * 0.015 + audio.treble * 0.05)
  .posterize(({ audio }) => 5 + floor(audio.mid * 5), 0.72)
  .contrast(1.15);
Numeric operator arguments may be numbers or functions of the current context. The chain resolves function values every frame. This is behavior injection built into the shader API.
Use it in scene order:
const scene = [
  solidBackground,
  neonTunnel,
  pixelDrift,
  vignette,
];
Common operators include:
- Transform:
rotate,scale,pixelate,repeat,repeatX,repeatY,kaleid,scroll,scrollX,scrollY,mirror, andcrop. - Sampling:
blur,sharpen,edgeDetect,bloom,vignette,rgbSplit,feedback, andlumaMask. - Color:
posterize,shift,invert,contrast,brightness,luma,thresh,color,saturate,hue,colorama,sum, andrgba. - Two-image composition:
add,multiply,screen,overlay,difference,subtract,lighten,darken,composite,mask(luminance × alpha), andalphaMask(alpha only). The image argument is an array of patches rendered as a private input.
These operators are also array methods, with colorShift() in place of the shader's
shift(); JavaScript's shift() retains its normal behavior, including throwing
on frozen arrays. Thunk Machine installs the effect methods on Array.prototype;
they are not built into JavaScript. Wet/dry mix, blend mode, and bypass belong to
the explicit ShaderChain and apply to the whole chain. Place one directly after
the sketches it should process:
const scene = [
  waveLine,
  pixelDrift,
];
scene.activate();
Blend modes include alpha, add, multiply, screen, overlay, difference, subtract, lighten, and darken. Operator order matters because each step receives the previous step's pixels.
Place a chain inside a nested group to limit its input:
const scene = [
  solidBackground,
  [waveLine, pixelDrift],
  laserFan,
];
For a custom WebGL class, keep GPU resources on the object, allocate them lazily,
resize as needed, and release them in dispose(). Custom fragment shaders commonly
receive resolution, time, audio, and the previous canvas texture as uniforms.
Let one image distort another
An effect can use another patch's image as an input. With existing lettering,
rings, and backdrop patches:
const scene = [
  backdrop,
  [lettering].modulate([rings].blur(4), 0.08),
];
scene.activate();
The rings render offscreen, then distort the lettering. They do not appear as another visible layer unless you also place them directly in the scene. Both sides can contain several patches, nested arrays, and their own chained effects.
Red controls horizontal displacement; green controls vertical displacement.
The center is 0.5 in normalized color: use background(128) for an approximately
neutral opaque map. Transparent areas cause no displacement. Stronger red samples
farther right, moving visible features left; stronger green moves features up.
Amount defaults to 0.1, allowing up to 5% displacement on each axis. Zero shows
the original image; negative amounts reverse the direction. Image edges wrap.
Amount also accepts our usual context callbacks. For example, create a smoother once, then use it in the scene:
const bass = lag(c => c.audio.bass, { rise: 0.04, fall: 0.3 });
const scene = [
  backdrop,
  [lettering].modulate([rings], c => 0.02 + bass(c) * 0.1),
];
scene.activate();
For a complete working example, open Help → Examples… → Run Image Modulation. Press Esc, then hold H to compare the original
image. Adjust Modulation depth in Controls. Edit modRings and Run its patch
to change the distortion while the scene continues. The example also works without
sound, and keeps your existing source in the project.
The rings are an image input feeding the effect rather than a visible layer. Those patches receive the usual state, time, audio, clock, and lifecycle calls. Reusing an input creates separate occurrences, as with ordinary nested arrays. Its object-owned fields and resources still follow the normal sharing rules.
You can modulate an input with another input. Circular same-frame dependencies
are rejected; use .feedback() for previous-frame effects. .mute() on the input
pauses its patches and makes the map transparent. Editing a named patch updates
its live occurrences; changing a helper array requires rerunning its consumer
scene. Each additional input and shader pass has a rendering cost.
The same private-input model also supports .composite([rings], 'alpha', 0.65),
.difference([rings], 1), and .mask([rings], 1). The first composites
the second image over the current layer, the second compares their colors, and
the third uses the input's brightness and alpha to reveal the current layer.
This is different from a chain's .mix(), which is wet/dry against its own input.
For a reusable image across the scene, install the Library's outputBuffer
utility. In [lettering, outputBuffer.read(0.7), outputBuffer], the read comes
before the writer and therefore uses the previous frame—a bounded feedback
loop. Put the read after the writer for same-frame reuse. You may add more reads
without rerendering the source. outputBuffer.clear() erases retained pixels;
project reloads also start with an empty buffer.
Build a custom shader patch
Use a class when the visual needs its own GLSL program or offscreen WebGL target. A typical implementation has five responsibilities:
- Store editable configuration on the instance.
- Keep shader source and GPU handles in private fields.
- Create or resize the offscreen target lazily.
- Resolve fixed or function-valued settings and send them as uniforms each frame.
- Release the target and program in
dispose().
The reusable value resolver is small:
#value(setting, context) {
  return typeof setting === "function" ? setting(context) : setting;
}
That permits both configurations:
const fixed = new MyShader({ speed: 0.4 });

const reactive = new MyShader({
  speed: ({ audio, controls }) => 0.1 + audio.mid * controls.energy,
});
In the patch's frame method, a source shader can render directly into its offscreen
target. A post-processor also sends context.canvas to a sampler such as uScene,
then replaces the current target with the processed image. Nested groups automatically
change which canvas arrives in context.canvas.
Adapt a ShaderToy-style fragment
Shader examples from ShaderToy and similar sites usually need a small interface adapter rather than a conceptual rewrite:
- declare
precision highp float;for WebGL 1; - replace
iTimewith a uniform such asuTime; - replace
iResolution.xywith avec2 uResolutionuniform; - derive pixel coordinates from the texture coordinate supplied by the vertex shader;
- wrap
mainImage(out vec4, in vec2)in GLSL'smain(); - use
texture2D()rather than APIs that require a newer GLSL version; - send audio bands as a
vec3uniform when desired; - preserve the original license, author, and source URL in patch comments.
varying vec2 vTexCoord;
uniform vec2 uResolution;
uniform float uTime;
uniform vec3 uAudio;

void mainImage(out vec4 color, in vec2 fragCoord) {
  vec2 uv = (fragCoord - 0.5 * uResolution) / uResolution.y;
  float glow = 0.02 / max(0.001, abs(length(uv) - 0.3));
  color = vec4(glow * vec3(0.2, 0.7, 1.0 + uAudio.x), 1.0);
}

void main() {
  vec4 color;
  mainImage(color, vTexCoord * uResolution);
  gl_FragColor = color;
}
If the image is vertically inverted, flip the texture coordinate once in the adapter
with vec2 uv = vec2(vTexCoord.x, 1.0 - vTexCoord.y);. Do not scatter compensating
flips throughout the shader.
Long raymarch loops, supersampling, and nested procedural noise are the first places to add quality controls. A uniform can change thresholds or distances, but GLSL loop bounds often need compile-time-friendly limits. Test custom shaders at the intended projection resolution before using them in a set.
Import an ISF file
Open Library → Collections and select ⋯ → Import patch… on an editable collection.
Choose a local .fs file. A single-pass generator becomes an editable patch;
an effect with one standard inputImage image input processes the pixels drawn
before it in the scene. Choose a writable destination collection in the review.
The import saves shader text and local settings for
float and color inputs, not performance controls. Edit the settings at the top,
or explicitly wire the shader input callbacks to your chosen performance controls.
Importing does not change the editor or running scene. Choose Add to scene,
review the generated source, then run the scene cell to
activate it. A working diagnostic is
animated-color.fs; its speed,
RGBA color, and time pulse check parsing, settings, and the host clock. Other
image inputs, multipass shaders, and non-float/color controls are outside the
supported import set. See ISFSource.
22. Use local media as patches
Choose Add to scene for localImage or localVideo in Library → Browse →
Sources, then run the scene cell. Evaluate the relevant method to choose or
replace its file:
localImage.choose();
// Or: localVideo.choose();
The chooser must follow a user action; browsers do not allow a project to reopen an
arbitrary local file silently. Change either patch's fit among contain,
cover, and stretch, or set its opacity between 0 and 1. localVideo
loops silently, exposes a videoSpeed control from 0.1× to 4× (default 1×),
and pauses when inactive.
For a file that should return after refresh, explicitly attach it under a name in
Performances → Current → Assets, then set this.assetName = 'poster' in the
localImage patch (or the corresponding video name in localVideo). On scene entry,
the patch loads that named file from browser storage. If it is missing, the asset row
shows that state; choose Relink on the row to select a replacement with the same
name. An active linked media patch reloads the replacement without restarting the
scene. The one-off choose() path remains session-only.
cameraFeed is also in Sources. Add and run it first, then evaluate
cameraFeed.start() to request browser camera permission. cameraFeed.stop()
releases the stream. Leaving its scene releases the camera tracks; returning
attempts to restart only if you had started it. It never requests permission
merely because you installed the patch.
The earlier local-video preset is also preserved in starter/legacy/. Video
patches should:
- keep the video muted;
- use a configurable playback speed;
- loop without becoming the audio source;
- draw transparently or cover the canvas according to their documented mode;
- release their element or texture in
dispose().
Code-only exports never embed media bytes. A portable package can include attached images, fonts, and audio selected in the export dialog. Images and fonts are preselected; audio requires an explicit choice. Video cannot be packaged and must be relinked on the receiving computer. After a code-only import, attach named assets or choose session media again. Camera frames are never exported.
Part V — Present and manage your work
Configure audience output, inspect resource usage, and prepare recovery options. The final chapter explains evaluation and recovery in detail.
23. Project code for an audience
There are three common performance views:
- Hide code with
efor clean visuals. - Keep translucent code over fullscreen output with
f. - Open the audience window with
pand move it to a projector while editing in the main window.
For a two-display soundcheck:
- In the operator window, press Esc, then P. Allow popups for the site if the audience window is blocked, then repeat the command.
- In Settings → Audience view, choose the intended layout and code source. Live code includes current typing; last-executed code excludes unrun or rejected drafts.
- Move the audience popup to your projector/second display and use browser or operating-system controls to make that window fullscreen.
- Check the actual framing. The audience receives a letterboxed copy of the stage, not an independent render at its own resolution.
- Return focus to the operator window before editing or triggering. The audience popup does not forward performer shortcuts. Tab there cycles its layouts; Escape closes that popup.
Settings → Audience view controls what the external display receives. Live code
mirrors the performer's visible code, open folds, scrolling, caret, and selection.
Performer and audience code sizes are independently adjustable in Settings; e
shows or hides code on both screens together. Use the
Reference drawer during rehearsal; hide settings and diagnostics when they are not
part of the show.
Put your code inside the scene
The included Sources collection contains Code View (codeDisplay). Search code or filter
by the utility tag, then add it to the scene. Its settings choose accepted code
(lastRun, the default), the editor, or a named patch. The Audio Diagnostics
collection (or diagnostic tag) contains Waveform, Frequency Bars, and Audio Meters.
Frequency Bars has a gain property for display sensitivity: 32 by default,
1 for the raw scale, or a larger multiplier for quiet input. Boosted bars stop
at the chart height; the FFT maximum readout and shared audio values remain raw.
bottomMargin leaves room below the bars (56 pixels by default); the FFT
readout sits at the lower-right above the performer footer.
Audio Meters is a compact projected panel near the upper-right. Its x and y
properties position it within the available canvas from 0 to 1; width,
rowHeight, and fontSize set its size. showRaw hides or shows raw readings,
and backgroundOpacity: 0 removes the dark backing. It is part of the scene,
unlike the performer-only Signal Analyzer (Cmd/Ctrl+Option/Alt+V).
The code can be part of the picture. codeView() makes an ordinary patch that
draws the editor's syntax-coloured text on transparency. It follows typing,
scrolling, and open or folded cells. The code image updates before you evaluate your changes;
the behavior you are editing changes only when you run it.
With existing backdrop and rings patches:
const liveCode = codeView();
const scene = [
  backdrop,
  [liveCode].modulate([rings], 0.025).opacity(0.85),
];
scene.activate();
For the complete example, open Help → Examples… → Run Code Scene. Open a code cell and type. Press Esc, then E to hide the editor: its text remains in the scene, bending through the animated image input. Hold H outside the editor to compare the undistorted text. Press E again to resume editing.
Choose what the patch shows by replacing its declaration:
const liveCode = codeView({ patch: 'myPatch', fontSize: 24 });
This shows myPatch's current source from the top, independently of editor
scrolling. If that name is missing, the image is transparent. A large patch clips
at the canvas edge; reduce the font size to fit more lines.
const liveCode = codeView({ source: 'lastRun' });
This shows the latest code accepted by the evaluator, updating when queued work is applied. It ignores unrun drafts and rejected evaluations. It is not a Safe State snapshot: accepted code can still fail when it later draws.
codeView({ cursor: true }) includes the blinking caret while an editor field is
focused. The default omits it. Font size defaults to the editor setting; an
explicit fontSize accepts 6–160 pixels and scales the text layout.
For audio-reactive sizing, use a function receiving the normal draw context:
const liveCode = codeView({
  patch: 'myPatch',
  fontSize: ({ time, audio }) => 24 + audio.mid * 80,
});
The function runs once per frame. Return a finite number; reactive sizes are clamped to 6–160 pixels. This changes the canvas text, not your editor font.
The image contains text, with transparent space between glyphs. It excludes
buttons, line numbers, selection fills, and backing boxes. It works with the usual
array effects and can itself be a .modulate() image input. The scene's own code
can appear in its output: the patch reads text rather than capturing the stage.
Projection and published canvas streams include the result as part of the scene.
24. Monitor memory and browser storage
Open Settings → Diagnostics → Memory monitor to inspect resource trends. It samples every two seconds while visible and retains up to 900 samples (about 30 minutes). Show small overlay keeps a compact readout on the performer screen; Reset history clears samples, and Export samples downloads them. JavaScript heap readings are browser-dependent estimates. ShaderChain surface bytes describe its RGBA buffers, not total GPU memory. Counters start at page load.
Under Settings → Browser storage, use Refresh to update usage and Remove unused files… to review orphaned attached files before removal. Export a workspace backup first when clearing significant local data. Removing unused files is different from deleting a performance or clearing all browser site data.
25. Capture and restore Safe State
Safe State is the performance emergency checkpoint. In Settings → Recovery, select Set safe when the current project is known to work. The snapshot records the source, installed patch versions, active scene, live values and mappings, compatible runtime state, and other settings required to recover.
The Recovery section shows whether a safe snapshot exists. Select Restore there
or press 0 after leaving editor focus to recover.
Restoration reports success and any parts that could not be restored.
Safe State restores supported definitions/configuration and clone-compatible occurrence state. It is not a deep copy of arbitrary object-owned fields, media state, DOM changes, network requests, or other external side effects.
A failed evaluation never replaces Safe State. Set a fresh safe state only after you have deliberately tested the new version.
26. Transactional replacement, identity, and recovery
Live replacement is handled like a small transaction. The new code must pass several gates before it becomes the confirmed version.
| Phase | What happens | If it fails |
|---|---|---|
| Compile | JavaScript is compiled from the selected cell or statement | Nothing changes |
| Execute | Declarations and live commands run in a staging environment | Staged registrations/commands are not committed; direct JavaScript side effects may remain |
| Validate | Patch forms, scene entries, and command targets are checked | Staged registrations/commands are not committed; direct JavaScript side effects may remain |
| Snapshot | State for affected occurrences is cloned when possible | Code can proceed; unclonable state is reported |
| Queue | Valid changes wait for the next frame boundary | No half-updated frame appears |
| Candidate | Active copies of each candidate definition try its behavior | The failing definition and relevant scene configuration/state are restored; unrelated successful candidates may remain applied |
| Confirm | The candidate becomes the successful version | History records the version |
Why the frame boundary matters
An evaluated patch can finish in the middle of a displayed frame. Applying it immediately could produce a scene in which some patches used old definitions and others used new ones. Queuing replacement until the frame boundary makes the change consistent within that frame. This staging does not make a multi-patch evaluation one all-or-nothing first-render transaction.
Why the first frame matters
Compilation proves that code is syntactically valid; it does not prove that a draw
will succeed. A missing variable, bad WebGL call, or unexpected state may fail only
when the candidate first runs. Confirmation is therefore delayed until every active
copy of that candidate definition completes one frame. Candidates are checked
independently: if a succeeds and b fails after both were replaced in one
evaluation, a can remain new while b returns to its previous version. Use
small evaluation units and a tested Safe State for wider recovery.
Bindings make source values persistent
Successful top-level declarations become an evaluation environment for later cells. This is why a scene cell can refer to a patch evaluated earlier and why ordinary method calls can operate on the retained object. Re-evaluating a named cell replaces that binding deliberately instead of redeclaring it in one accumulating global scope.
An explicit // %% patch name cell groups a class, factory, and constructed instance
into one replaceable unit. Replace that existing cell when applying a variation.
Evaluating the complete program does not rewrite duplicate patch cells or duplicate class/const
declarations into one version: remove accidental duplicates yourself, then run
again. The last accepted program remains available while a duplicate declaration
is rejected.
Three different kinds of recovery
| Mechanism | Purpose | Scope |
|---|---|---|
| Automatic rollback | Reject a staged evaluation or failed candidate | Supported definition/binding/scene configuration and clone-compatible affected occurrence state; not arbitrary side effects |
| Safe State | Performer-controlled emergency checkpoint | Source, definitions, versions, scene tree, controls, mappings, and clone-compatible instance state |
| Named performance | Deliberate recall point | The complete saved set: working source, scenes, clips, controls, modulations, layout, mappings, shared code, tempo, audio and view settings |
Browser-local autosave provides restart persistence, while project export provides a portable backup. These mechanisms overlap by design but serve different moments: rollback protects an edit, Safe State protects a set, a performance supports recall, and export protects the project outside one browser.
The limits of transactions
The evaluator can catch thrown errors but cannot interrupt JavaScript that never
returns. An infinite loop can freeze the tab before rollback is possible. Browser and
GPU resources also cannot always be cloned. Keep serializable simulation data in
state, keep live resource handles on their owning object, and release those handles
in dispose().
Ordinary JavaScript mutation is immediate. For example, with an existing object
patch rings, this command can change its count even though evaluation fails:
rings.count = 99;
throw new Error("stop");
The staged registration fails, but its direct object mutation is not undone.
Safe State also retains implementation objects rather than deep-cloning every
object field. DOM/storage writes, network requests, media actions, and asynchronous
completion are outside that recovery guarantee. For guarded replacement, evaluate
a fresh patch definition; keep recoverable simulation data in context.state.
Part VI — Design, practice, and reference
Use these chapters to explore the design and programming model, practice patterns, and look up interface controls, shortcuts, runtime APIs, and troubleshooting.
27. The design goals
Thunk Machine is designed around one promise: a performer can replace visual logic without restarting the rest of the instrument. Several goals follow from that promise.
Keep the feedback loop short
The distance from an idea to a visible result should be one edit and one evaluation. The environment supplies the continuing clock, audio analysis, canvas, controls, and error boundary so a patch author can focus on the behavior being explored.
Keep unrelated work alive
Changing one patch should not restart the music, reset the clock, reconstruct every other patch, or close the audience display. A patch is therefore a replaceable unit, not an entire application.
Keep composition visible
The active composition is represented by a JavaScript array in the editor. Adding, removing, duplicating, reordering, spreading, or nesting array entries changes the same structure the runtime uses. Library buttons edit that visible source instead of maintaining a hidden layer graph.
Keep JavaScript first-class
Thunk Machine adds a small host API instead of inventing a separate visual language. Functions, objects, classes, arrays, methods, closures, and higher-order functions retain their normal JavaScript meaning. Knowledge gained here transfers to other programming environments.
Keep mistakes survivable
New definitions are staged before replacing working behavior. Compilation, evaluation, and validation reject failed registrations; first-render failure restores the failing candidate’s supported runtime state/configuration. Direct JavaScript side effects remain outside that guarantee. Safe State adds a larger performer-controlled checkpoint with the same stated limits.
Keep the performer and audience separate
The operator needs code, messages, audio state, library tools, and recovery controls. The audience may need only pixels, or pixels plus selected code. Separate views let the same instrument support both needs.
Keep sharing inspectable
A shared patch is source text with metadata. Receiving it never silently evaluates or activates it. The recipient can inspect, install, edit, and deliberately add it to a scene.
Make advanced ideas observable
The system turns abstract ideas into immediate visual consequences:
- array entries run in written order;
- nesting becomes rendering scope;
- identity determines whether a trail continues;
- a closure holds configuration;
- an injected function becomes changing shader behavior;
- rollback restores the last image after an error;
- a MIDI message changes a source-declared control.
This is why the architecture is useful educationally: the computer-science model is not hidden behind the artwork. It is what makes the artwork composable and live.
28. The computer science inside the instrument
First-class values and polymorphism
A patch is a value. It can be stored in a variable, placed in an array, passed to a function, returned from a factory, or selected from a collection. The host accepts more than one shape of value:
function                       → call function(context)
object or class instance       → call object.draw(context)
This is polymorphism: different implementations satisfy one behavioral contract. It is also the Strategy pattern: the scene chooses which visual strategies are in use without needing to know their internal algorithms.
Dependency injection
Patches do not construct their own analyser, global clock, MIDI manager, or canvas. The host provides a context object each frame. This is dependency injection: behavior depends on capabilities supplied from outside.
The design has two injection times:
construction/evaluation time     frame time
----------------------------     ------------------------------
constructor arguments            audio
object properties                time, sceneTime, dt
closure variables                controls and keyboard
function-valued options          state and canvas
Construction-time values describe the patch's configuration. Frame-time context describes the changing world. Function-valued options connect the two: an object can be configured with a function that derives one property from current context.
Closures and factories
A factory separates creation from use. Its local values remain available to the returned patch through a closure:
const makePulse = (base, response) => ({
  draw({ audio }) {
    circle(width / 2, height / 2, base + audio.bass * response);
  },
});
base and response are private configuration without a class. A factory can also
return a class instance or a nested group.
Higher-order functions
A function is higher-order when it accepts or returns behavior. In Thunk Machine this can happen at two different rates:
- A scene factory such as
withGlow(patch)runs when its scene code is evaluated. - A function-valued shader argument such as
({ audio }) => audio.bassruns each frame.
Understanding evaluation time prevents accidental work. A one-time composition decision belongs outside the frame loop; a musical response belongs inside it.
Recursive data and the Composite pattern
A scene is a recursive data structure:
Scene item = Patch | Group
Group      = Array<Scene item>
A flat array describes one ordered layer. A nested array is both a child collection and one composited result in its parent. This is the Composite pattern: individual patches and groups participate in one recursive tree while groups introduce a rendering boundary.
The simple syntax supports arbitrary depth because the host traverses the tree recursively. Each group receives a transparent offscreen target, renders its children, and returns the completed image to its parent.
Object-oriented encapsulation
Class-instance patches use objects as durable owners of behavior and resources:
- constructor arguments establish configuration;
- public properties expose live-coding opportunities;
- methods divide an algorithm into understandable operations;
- private fields protect implementation details;
dispose()closes resources owned by the instance.
The host retains the real object rather than copying it into a literal form, so
prototypes, getters, private fields, and normal this behavior remain intact.
Identity and state
Behavior and state change on different schedules. Re-evaluating a patch replaces its behavior, but the active scene slot retains its identity. State is stored against that identity, allowing a trail, simulation, or phase to continue through code edits.
shared by repeated copies       unique to each occurrence
-------------------------       -------------------------
implementation                  instance identifier
source and version              state object
methods                         enter/exit membership
The first occurrence uses the patch name; additional occurrences use name#2,
name#3, and so on. Anonymous patches use paths such as scene[1][0]. Moving an
anonymous patch changes its path and therefore its identity.
Lifecycle and event dispatch
Lifecycle methods turn continuous frame processing and discrete events into a common
object protocol. The host dispatches enter, onset, draw, exit, and dispose at
defined transitions. A patch can implement only the methods it needs.
This separates when something happens from what a patch does in response. Beat detection occurs once in shared infrastructure; every interested patch receives the same event.
Data-oriented audio processing
The analyser produces one immutable snapshot per frame. All patches read the same snapshot instead of running separate FFT calculations. Scalar features are convenient derived data; waveform and spectrum remain arrays for more detailed algorithms.
Sharing one snapshot provides temporal consistency: every patch in a frame sees the same level, bands, onset decision, waveform, and spectrum.
GPU pipeline composition
Drawing patches contribute pixels. ShaderChain compiles ordered operations into
shader passes and treats the pixels produced so far as a texture. Each
operator transforms coordinates, samples pixels, or changes color; operator order is
function composition over an image.
Compatible operators share a pass; neighborhood filters materialize their input when needed. Every operation receives its predecessor's result. Native array effect methods add fluent composition around ordinary sketches, and the scene cell in the editor is the single source of truth for groups, effects and order.
Nested arrays introduce texture scope. An effect inside a group samples that group's current pixels, while an outer effect samples the already-composited parent image.
Separation of model, controller, and views
Internally, responsibilities are separated even though the interface feels like one instrument:
editor source
     ↓
evaluator → registry → host frame → canvas
                ↕            ↑
          state store    audio + controls
                ↓
            controller → tools / reference / audience views
- The evaluator turns selected source into staged values and commands.
- The registry owns patch definitions, scene trees, versions, and status.
- The state store owns per-occurrence state.
- The host advances frames and dispatches lifecycle calls.
- The controller exposes data-only snapshots and named actions.
- Views display state and request actions without owning the runtime model.
This separation lets the code editor, Library, Reference drawer, status bar, and audience window observe one model without becoming competing sources of truth.
29. Patterns worth practicing
These are alternative patch/scene fragments, not one program to paste end to
end. Evaluate required definitions first, keep one declaration for each name,
and replace the existing scene cell when applying a scene recipe. The rings
examples require Chapter 15’s object; Orbiters requires its class definition.
Library examples require the named source to be installed. Run the changed
patch and then the scene if its membership changes; add scene.activate() when
an illustrative scene fragment omits the command.
One value, many destinations
control("energy", 0.5, { type: "continuous", min: 0, max: 1, step: 0.01 });

const sharedEnergy = new ShaderChain()
  .scale(({ controls }) => 1 + controls.energy * 0.3)
  .saturate(({ controls }) => 0.7 + controls.energy * 1.8);
A single musical gesture can coordinate several visual dimensions.
Audio plus performer intent
const size = ({ audio, controls }) => (
  20 + audio.bass * 180 * controls.energy
);
Audio supplies motion; the performer supplies its range.
Select a visual algorithm
control("mode", "rings", {
  type: "choice",
  choices: ["rings", "orbiters", "scope"],
});

const selector = {
  draw(context) {
    const choices = {
      rings,
      orbiters: smallOrbiters,
      scope: waveLine,
    };

    const selected = choices[context.controls.mode];
    if (typeof selected === "function") selected(context);
    else selected.draw(context);
  },
};
This is the Strategy pattern expressed with first-class patch values. It is best for stateless choices because all choices are being called through one scene occurrence. For stateful choices, select the patch while constructing the scene so the host can give each selected occurrence its own lifecycle and state.
Scene recipe as a higher-order function
const visualSandwich = (source, effect, overlay) => [
  solidBackground,
  [source, effect],
  overlay,
];

const scene = visualSandwich(neonTunnel, plasma, vignette);
scene.activate();
The function captures a compositional rule while leaving the ingredients open.
Teapot point-cloud example
Open Help → Examples… → Run Teapot example. This adds editable controls, a
teapotPoints patch, and a teapotScene scene, then runs the example. Existing source
stays in the working source. Use Save or Cmd/Ctrl+S to save it as a scene.
The teapot loads a bundled, downloaded Utah teapot OBJ with p5 loadModel(), then
renders its vertices into a private, transparent WebGL canvas. Loading is asynchronous;
a loading label appears until the file arrives. It runs without audio. In
Controls, adjust teapotSpin, teapotDots, teapotMotion, and teapotAudio.
Load audio or enable mic input for bass-driven displacement. Set motion and audio to
zero to see the undeformed geometry; set spin to zero to stop rotation.
The scene wraps the patch in [teapotPoints].opacity(0.95). Try .repeatX(2) or
.rotate(0, 0.1) after that operation, then run the scene cell. These transform the
rendered image; teapotSpin rotates the actual 3D geometry. The patch handles canvas
resizing and releases its WebGL buffer when its implementation is disposed.
The model is starter/models/teapot.obj; provenance is in that folder’s README.
To try another OBJ, change modelUrl in the patch and run its cell. Use a same-origin
URL or a server that permits CORS. Vertices are centered, fitted, and sampled to at
most 8,000 points. A loading failure is reported through the normal patch diagnostics.
30. Interface reference
Stage and editor
| Area | Purpose |
|---|---|
| Stage | The current visual output and background behind the editor |
| Folded cells | Patches start collapsed; scenes start expanded. Use the disclosure arrows to change the view |
| Editor | One continuous document with editable source, line numbers, selection, and inline folds. Controls and Modulations at the top are read-only |
| Source on a cell header | Copies that section's complete source, including its // %% heading, to the clipboard; it does not open another editor or evaluate code |
| Delete on a cell header | Appears on hover or keyboard focus for an unused patch; removes the header and code. Cmd/Ctrl+Z restores it |
| Live bar | Current performance, running scene source shortcut, layer count, FPS, and Safe State status. During a cross-dissolve, shows both scene names and the blend percentage toward scene B. |
| Transport | File playback and looping controls that remain available during editing |
Line numbers start at Controls and count the complete displayed document. When cells are folded, the hidden lines still exist, so the next visible cell may begin at a much larger number.
The detailed counts in Diagnostics answer different questions:
- Installed: how many patch sources are in the project.
- Active: how many patch occurrences are in the evaluated scene.
- Running: how many active occurrences have rendered successfully.
Panels and navigation
Use Performances, Library, Push 3 or MIDI, and Settings in the
top bar. The Performance workspace and related areas are listed below;
Cmd/Ctrl+\ opens or closes it.
| Area or action | Main tasks |
|---|---|
| Audio | Inspect the source and playback position, choose an input device, loop, adjust smoothing, and enable or disable auto-gain |
| Scenes | Name, save, launch, duplicate, or revert scenes. Edit composition order in scene code. |
| Clips | Add, edit, launch, and stop up to 16 timed overlays using named clip cards |
| Assets | Attach media to the performance under stable names |
| Code ↗ | Open the performance-wide shared-code editor (performance.js by default) |
| Library | Search patch collections, reuse performance source, and import collections or ISF files |
| Settings → Diagnostics | Read messages, inspect resource usage, and revert to a successful patch version from Evaluation history |
| All / Current | Browse saved performances or return to the current performance tools |
| Settings | Keyboard & controllers, Appearance, Diagnostics, Browser storage, Workspace backup, Recovery, global shared code, and audience layout |
| Controls | Declare and operate performance controls, including automatically assigned Push pressure; learn/remove other MIDI mappings |
| Modulations | Create and edit performance-level modulation signals |
| Tempo | Set or tap BPM, follow MIDI clock, and try Motion Lab |
The Network tab is unavailable. The experimental StreamRoom source API remains
callable; Networking documents local testing and deployment.
Settings
Open Settings in the top toolbar. The panel groups keyboard and controller configuration, appearance, audience output, shared code, networking, diagnostics, storage, backups, and recovery. The groups below follow their order in the panel.
Keyboard & controllers
Edit key commands… opens the keyboard bindings editor. Change a command’s shortcut there, or export and import browser-local bindings. The Keyboard reference lists the default shortcuts.
MIDI & controller setup… opens the device connection dialog. Use it to connect MIDI devices or Push 3, configure the controller display, and access the LED bench. Browser device permissions and hardware connections are separate from saved performance code. See Map MIDI hardware and the Push 3 guide for the connection and performance workflow.
Appearance
In Settings → Appearance → Themes, choose among eight preconfigured themes. Themes change the code editor’s appearance, not the colors drawn by your patches.
Drawer opacity sets how much of the stage is visible through tool panels. Performer code size sets the editor font size, from 12 to 24 pixels. Neither changes the size of text drawn by a patch.
Editor hints enables or disables code-completion suggestions and function argument hints. Hints appear while typing; they do not evaluate code. With multiple suggestions, Up and Down select a suggestion and Tab accepts it. Clicking also selects a suggestion. With a single suggestion or only an argument hint, Up and Down dismiss the hint and move between code rows. Escape dismisses hints, and Ctrl+Space requests them explicitly.
In Settings → Appearance → Fade after inactivity, Navigation & controls and Code have independent dropdowns: Never, 15 seconds, 30 seconds, 1 minute, 2 minutes, 5 minutes, 10 minutes, or Manual. Only Manual exposes a millisecond field (250–3,600,000 ms). Both default to Never. Browser-local preferences survive reload; existing non-preset delays become Manual. Pointer movement, keyboard input, scrolling or focus restores visibility. Navigation includes open panels, reference, status and the Help footer. Code includes completion and argument hints, which fade and return with the editor. Timers pause during startup, scene loading, audio decoding, file or microphone permission prompts, a drag, text composition or an open dialog. The full inactivity delay starts after loading finishes and dialogs close; time spent waiting does not count. Fading does not stop rendering, audio or MIDI, and does not change whether the editor is visible. Reduced-motion settings disable the fade transition. These preferences are not saved per performance.
Audience view
Output selects what the audience window displays. The interface labels are:
- canvas: the stage visuals.
- canvas + live code: the visuals with the current editor code, including edits you have not evaluated.
- canvas + last executed block: the visuals with the most recently evaluated code block.
- canvas + trace: the visuals with the execution trace.
Audience code size sets the audience font size, from 12 to 36 pixels,
independently of the performer editor. Press Esc, then P to open the audience
window. See Project code for an audience for
setting up a second display and choosing how code appears in the output.
Advanced
Edit global code… opens the browser-global shared-code editor. Use it for helpers shared across performances. It is separate from the scene editor and the performance’s Code ↗ editor. You do not need global code to define a patch or scene. See Files, sharing, and persistence for how these sources are stored.
Network
Connection URL sets the signaling endpoint used by the experimental
StreamRoom source API. Enter the endpoint and choose Apply. Use default
restores the default endpoint; the status below reports the connection state.
This does not configure audio or MIDI. See Networking for server
setup and source examples.
Diagnostics
Warn below FPS sets the frame-rate warning threshold, from 1 to 120 frames per second. It changes when a warning is reported; it does not set the rendering frame rate.
Expand Messages & diagnostics to see the current frame rate, installed, active, and running patch counts, and runtime status. Messages appear newest first. Earlier errors remain after a successful edit; Clear message history clears that message history.
Memory monitor samples resource usage every two seconds while visible and retains up to 900 samples. Show small overlay adds a compact performer readout; Reset history clears samples, and Export samples downloads them. JavaScript heap readings are approximate and browser-dependent. ShaderChain buffer readings are not total GPU memory. See Monitor memory and browser storage.
Evaluation history records successful patch versions and provides actions to return to one. See Evaluation and recovery for what those actions restore.
Browser storage
The usage readout reports storage for this browser and site. Refresh updates it. Remove unused files… opens a review of attached files no longer referenced by the workspace before removal. It does not delete performances.
Workspace backup
Export workspace… downloads a .p5workspace.json backup containing saved
performances, working drafts, collections, global code, preferences, recovery
history, thumbnails, and referenced attached media.
Import workspace… opens a backup for review before replacing this browser’s workspace. The restore dialog offers Export current, then restore or Replace workspace. Restore reloads the instrument. External file permissions and externally selected audio do not transfer with the backup.
Download unreadable records appears when stored records cannot be read. It exports the original records for repair; that file is not an importable workspace backup. See Move an entire workspace for backup contents, limits, and restore behavior.
Recovery
Set safe captures the current Safe State. Restore returns to that snapshot; it is unavailable until a snapshot exists. The note above the buttons reports whether a snapshot is available. Safe State includes more than the scene code: see Capture and restore Safe State.
Browse session backups… opens recovery copies of the working session. Use it to inspect and recover an earlier session. These recovery copies are separate from the performances you explicitly save.
Start over
Reset to starter… asks for confirmation before discarding the working code, installed patch versions and history, scenes, and patch state, then returning to the starter. It has no Undo. Export work you want to keep before confirming. This is different from creating a new scene or recalling a saved performance; see New performance, reset, and reload.
Library browsing
Choose Guide on a library card to open a centered patch details panel. Its Parameters tab appears for patches with exposed settings. Open it to see the setting name, its saved default and guidance about units, ranges or choices. Edit settings inside the patch source, then run that patch cell to apply the change. The guide describes the library copy; your copy in a performance may have different values.
Core patch comments include the same guidance, so it travels with copied and exported patches. Personal patches can provide their own guidance by placing a comment beside a setting, for example:
radius: 0.2, // Radius in shorter-edge fractions; 0.2 is 20% of the shorter edge.
Positions commonly use canvas fractions (0 at the left/top, 1 at the right/bottom),
while form sizes use the shorter edge. Stroke widths and halo radii use pixels.
Angles in editable core patches use degrees. Check each setting's note for its
specific units: phase, speed, radius and amount can mean different things
in different patches.
Signal-enabled patches also have a Connections tab in the guide. Choose a setting and
copy a beat, bass, time, controls or noise arrow into that setting inside the
patch. Run the patch cell after editing. Beat examples need a running tempo
clock; bass needs audio. The controls example includes a separate declaration
for the controls cell. Envelope patches offer a beat counter on trigger;
leave trigger: null when driving level directly.
Effects have a Layers tab showing a scene arrangement. The guide stays open
while you browse; choosing Guide on another card updates its contents. Glow cards
keep a short “Needs a transparent group” hint visible. Effects process
imagery before them in the same layer. Nested arrays isolate an effect to a
transparent group. Glow needs shape transparency: keep opaque backgrounds
outside [yourShapes, glow]. The copyable scene uses Line Field as an example;
replace it with your own source and use your editor copy’s effect name.
Included patches are organized into twenty-six independent collections:
- Essentials: solid backgrounds, composable shapes, line fields, radial fields, concentric forms, repeated forms, scatter fields, ribbons, color fields and soft sine bands.
- Motion & Gestures: bursts, geometric echoes, sequences, waves and expanding ripple rings with user-driven timing.
- Form & Interaction: orbital relationships, connected fields, morphing outlines and particle attraction.
- Composition & Transitions: directional wipes and repeated panel layouts.
- Masks & Cutouts: Window Mask, Spatial Fade, Compound Mask, Noise Mask, Color Key and Luminance Mask.
- Depth & Space: perspective grids, tunnels, depth fields and layered parallax.
- Text: multiline typography, glyph waves, circular text, repetition and controlled reveals.
- Noise & Atmosphere: shader clouds, fog, noise textures and wisps with repeatable seeds.
- Beat & Impact: flashes, visibility gates, screen impacts, glitch hits and mosh hits with user-connected envelopes.
- Ambient & Flow: slow blooms, flowing textures and organic motion.
- Particles & Trails: particle emitters, noise flow, editable paths, fading strokes and proximity connections.
- Geometric Studies: Molnar-inspired grids, rings, harmonic geometry and woven ellipse orbits.
- Patterns & Systems: noise, cellular systems, tessellation, fractals, checker grids and dot-size waves.
- Effects: blur, pixelation and image transforms.
- Symmetry & Repetition: Mirror, Kaleidoscope, Radial Repeat and Recursive Inset.
- Light & Glow: bloom, silhouette halos, light rays, a controllable highlight sweep and vignette.
- Texture & Surface: grain, halftone, ink/paper dithering, outlines and embossed relief.
- Feedback & Time: feedback loops, delayed echoes, frame delay, freeze and temporal averaging.
- Color & Palette: palette mapping, grading, duotone, hue cycling and posterization.
- Distortion: Displacement, Ripple, Wave and Lens for bending earlier imagery.
- Sources: Image, Video File, Camera, Code View, API Data, 3D Model and experimental Network Video.
- Video Treatments: Video Noise, VHR Distortion, VHS Tape and TV Distortion.
- Utilities: output capture, Clock Display and Counter Display.
- Audio Diagnostics: waveform, spectrum and meters.
- Miscellaneous: Pong, Dancer (
thunkDancer) and Bouncing Ball. - Network (Experimental): StreamRoom publishing; Network Video receiving is in Sources.
Essentials patches expose settings as properties. Each accepts a fixed value or a function of the current context; no audio, beat, controller or modulation connection is made automatically. Positions use fractions of the canvas, lengths use fractions of its shorter dimension, angles use degrees, and opacity uses 0–1. Line weights use pixels. Optional speeds default to zero.
For example, after adding Line Field and Radial Field to a scene, connect their settings in a later code cell:
parallelLines.rotation = ({ controls }) => controls.lineAngle;
radialField.outerRadius = ({ audio }) => 0.15 + audio.bass * 0.35;
radialField.rotation = ({ modulations }) => modulations.turn * 360;
Declare lineAngle in Controls and create turn in Modulations before using those
connections. Keep a numeric setting when you want a static composition. Line Field
starts vertical; set rotation to 90 for horizontal lines. Radial Field's spread
changes a full starburst into a fan. Concentric Forms supports circles, rectangles
and polygons; Repeated Forms uses rows and columns for both rows and grids.
Scatter Field's seed gives repeatable layouts without changing other patches'
randomness. Color Field's tint multiplies its two palette colors; white preserves
the palette. All layers support opacity and draw without clearing earlier layers.
Motion & Gestures adds four standalone patches, using the same parameter connection style and units as Essentials:
- Burst (
burst) sends shapes outward. Withtrigger: null,progressscrubs its lifetime directly (0–1), so the default is a stationary preview. Settriggerto a boolean pulse to fire on its rising edge, or a counter to fire when its value changes to a nonzero number.durationis seconds;maxBurstscaps overlapping events. Shape and motion settings remain live across active bursts. - Echo (
formEcho) repeats a form with progressive scale, rotation, displacement and opacity. These are geometric copies;scaleStep,rotationStep,xStep,yStepandopacityFalloffdefine how each copy changes. - Sequence (
formSequence) lights a moving region in a row, grid or radial arrangement.positiontraverses the sequence from 0–1;activeWidthis its trailing width in steps.directionreverses travel and the trail. SetidleOpacityto 0 to hide inactive forms. Enablewrapfor a repeating sequence. - Wave Field (
waveField) propagates displacement, size and opacity changes through a grid of shapes.phaseis measured in cycles.directioncontrols wave travel;displacementAnglecontrols how the shapes move.falloffandcenterlocalize the wave.
Sequence and Wave Field expose optional speed, defaulting to zero. For example,
connect the existing shared clock or audio after adding these patches:
burst.trigger = ({ audio }) => audio.onset;
formSequence.position = ({ clock }) => (clock.beat + clock.phase) / 16;
waveField.phase = ({ modulations }) => modulations.wave;
Create wave in Modulations before using that last connection. No patch declares
controls or modulations, and no trigger or audio mapping is installed by default.
Form & Interaction adds four more standalone patches with fixed or function-valued settings and no automatic signal connections:
- Orbit System (
orbitSystem) places forms on elliptical orbits around localcenters.phasedrives their positions;eccentricity,radiusStep,orbitAngleandorbitTwistshape their paths. DisableshowPathsfor just the forms. - Connected Field (
connectedField) builds a seeded constellation. It chooses nearby links in distance order, withmaxConnectionsenforced at both ends.connectionDistancecontrols reach;phaseanddriftreshape point positions. SetmaxConnectionsto 0 for dots alone, or disableshowPointsfor a mesh. - Morphing Forms (
morphingForms) blends circle, polygon, star and flower outlines.morphselects the blend from 0–1;roundnessmoves the outline toward a circle.symmetry,distortionandphaseshape ripples. Usecount,morphStepandrotationStepfor repeated variations. - Attractor Field (
attractorField) simulates particles with attraction, swirl, drag and turbulence. It starts frozen: setspeedabove 0 to evolve the field.attractorscontains local[x, y, weight]positions; negative weights repel. Changeseed,countorresetto recreate the field.trailLengthcontrols short paths, and each scene occurrence has independent particle state.
Local centers and attraction points use fractions of the shorter canvas dimension,
relative to the patch's x, y origin. Optional speeds default to 0. For example:
connectedField.connectionDistance = ({ audio }) => 0.05 + audio.bass * 0.2;
orbitSystem.phase = ({ modulations }) => modulations.orbit;
morphingForms.morph = ({ controls }) => controls.morph;
attractorField.speed = 1;
attractorField.strength = ({ audio }) => 0.1 + audio.bass;
Create orbit in Modulations and morph in Controls before using those connections.
Particle count, neighbor comparisons, connection degree and trail history are bounded.
Composition & Transitions processes imagery drawn earlier in the same layer. These patches expose properties directly, just like Essentials: a property can hold a fixed value or a function of the supplied signals. Each uses a native ShaderChain effect. No motion, trigger, audio mapping, control or modulation is installed automatically.
- Sweep / Wipe (
sweepWipe) uses a directional edge, moving band or radial sector. In linear and radial modes,progress: 0hides the layer andprogress: 1reveals it completely. Band mode moves a strip;widthsets its thickness.angleuses degrees, andsoftnessis a fraction of travel.x,yset the radial origin. - Window / Mask (
windowMask) provides ellipse, rounded rectangle, diamond and polygon openings.width,height,featherandcornerRadiususe fractions of the shorter canvas dimension.x,yuse canvas fractions.invertedreveals the outside of the opening;sidescontrols polygon geometry. - Split / Repeat (
splitRepeat) repeats the source into 1–32 rows and columns.gapis a fraction of a panel, and gaps are transparent.mirrorX,mirrorYflip alternating panels.staggershifts alternating rows.fitselectsstretch,containorcover; contain preserves aspect with transparent margins. - Spatial Fade (
spatialFade) changes alpha by radial distance or along a direction.radiusandfalloffuse shorter-edge fractions. Linear mode accepts a signed radius as its boundary offset.amount: 0is neutral andamount: 1applies the full fade. Wipe and Window expose the sameamountcontrol.
Use a nested layer when the opening should reveal a different visual underneath:
// Add colorField, radialField and windowMask from the Library first.
const scene = [colorField, [radialField, windowMask]];
scene.activate();
windowMask.width = ({ audio }) => 0.2 + audio.bass * 0.6;
The mask removes alpha from its own layer; it does not paint black over the scene. Placed at the scene root, it affects the whole image built before it. You can chain these effects inside the same group and connect progress, position, dimensions or amount to your own controls or modulation signals.
ShaderChain also exposes wipeMask(options), windowMask(options),
tilePanels(options) and spatialFade(options). At that lower level, angles use
radians and mode/shape/fit choices use numeric indices; the Library patches convert
their human-readable choices and degree values for you.
Depth & Space adds four transparent standalone sources. All properties accept fixed values or functions of the supplied signals; motion defaults to zero. These patches project depth with ordinary p5 drawing and work in existing layers.
- Perspective Grid (
perspectiveGrid):x,yposition the vanishing point;planeHeightsets the floor's offset from the horizon.columns,rows,spacing,depthSpacingandperspectiveshape the grid. Rotate it for a wall, or use negativeplaneHeightfor a ceiling.phaseadvances in row spacings. - Tunnel (
tunnel): circle, rectangle or polygon frames recede into depth.depth,perspective,taper,twistandcenterDriftX/Yshape the passage.phasemoves through one full tunnel cycle;nearFadesmooths frame wrapping. - Depth Field (
depthField): seeded forms scale and fade with depth.spreadX/Y,depth,sizeVariationanddepthFadeshape the volume;cameraX/Yshift the view.phasewraps travel through the whole field. - Layered Parallax (
layeredParallax): seeded forms occupy up to 16 planes.depthStepseparates them;offsetX/Y,sizeStepandrotationStepvary each plane.cameraX/Ymove nearby planes farther than distant planes. OptionaldriftX/Yamplitudes followphase, withspeeddefaulting to zero.
Lengths and camera offsets use shorter-edge units; angles use degrees. For example:
tunnel.phase = ({ time }) => time * 0.08;
tunnel.twist = ({ audio }) => 30 + audio.bass * 180;
depthField.phase = ({ time }) => -time * 0.04;
layeredParallax.cameraX = ({ time }) => Math.sin(time * 0.4) * 0.3;
perspectiveGrid.phase = ({ time }) => -time * 0.5;
Positive field/tunnel phase moves forms away from the camera; negative phase
moves toward it. Set perspective to 0 for an orthographic arrangement.
All geometry is bounded, deterministic and independent of global p5 random state.
Text adds five transparent typography sources. content, font, fontStyle,
size, tracking, tint, opacity, filled and weight are editable properties
that accept fixed values or functions. Use a font family available in the browser;
no font downloads or signal connections happen automatically. fontStyle accepts
normal, bold, italic or bold italic. Font sizes and
spacing use shorter-edge units, angles use degrees, and motion starts at zero.
- Text Block (
textBlock): multiline titles and captions withalign,leadingand per-glyphtracking. Newlines separate lines; the block is centered vertically around itsx,yorigin. - Glyph Wave (
glyphWave): per-letter position, rotation, size and opacity waves.wavelengthcounts glyphs per cycle;directioncontrols displacement. Drivephaseor optionally setspeedabove zero. - Text Ring (
textRing): distributes measured glyphs over anarcaroundradius.anglesets the arc center;phaserotates it.orientationcan betangentorupright;reversereverses the direction along the arc. - Repeated Text (
repeatedText): tiled rows with gaps, odd-rowstaggerandrowRotation.phasescrolls horizontally in tile widths, with clipping at the tile area's edges. Setrowsto 1 for a scrolling banner. - Text Reveal (
textReveal): stable layout withglyph,wordorlinereveals.progress0 hides all; 1 shows all.softnesscontrols overlapping fades (0 gives hard steps);slideX/YandstartScaleshape the arrival. Progress is scrubbed directly, so users choose timing and retriggers.
textBlock.content = 'LIVE\nTONIGHT';
glyphWave.phase = ({ time }) => time * 0.25;
textRing.phase = ({ time }) => time * 0.04;
repeatedText.phase = ({ time }) => -time * 0.2;
textReveal.progress = ({ time }) => (Math.sin(time * 0.5) + 1) / 2;
Text uses measured per-glyph placement, with browser grapheme segmentation for emoji and combining characters. It is intended for composable visual typography; use Text Block for multiline content and one-line content for wave, ring and repeat layouts. Rendering is bounded to 512 glyphs per line and 16 lines. Repeated Text limits its rows and columns to keep each frame within 8,192 glyph draws.
Noise & Atmosphere adds four procedural shader sources. They composite over
imagery drawn earlier in their layer, with transparent gaps revealing the layers
underneath. No input image is required. All properties accept fixed values or
functions of the supplied signals. speed, driftX and driftY default to 0.
- Clouds (
clouds): layered noise withcoverage,softness,density,billowandwarp.lightAngleandlightStrengthshape soft directional shading betweenshadowTintandtint. - Fog (
fog): haze withdensityand a vertical depth gradient.horizonis a canvas Y fraction;heightFalloffcontrols how far below it fog reaches full density. SetheightFalloffto 0 for uniform haze across the canvas. - Noise Texture (
noiseTexture): a general noise field for texture or image modulation.contrast,coverageandsoftnesscontrol tonal shape and transparency;shadowTintandtintdefine the color range. - Wisps (
wisps): stretched filaments withstretch,direction,curl,thicknessandbreakup. Increasestretchfor longer strands, rotate them withdirection, and increasebreakupto interrupt their continuity.
frequency sets noise cells per shorter canvas edge. octaves is bounded to
1–6; roughness sets the contribution of finer layers and lacunarity their
frequency multiplier. seed makes the field repeatable within the renderer.
phase evolves the field smoothly without a repeating cycle; offsetX/Y move
through it in shorter-edge units. Optional speed advances phase per second;
driftX/Y advance offsets independently. Changing the seed selects a new field,
so animate phase or offsets for smooth motion. Angles are degrees, colors use
RGB 0–255, and opacity uses 0–1. Zero density or opacity removes the atmosphere.
clouds.phase = ({ time }) => time * 0.05;
clouds.offsetX = ({ time }) => time * 0.015;
fog.density = ({ audio }) => 0.2 + audio.bass * 0.4;
wisps.direction = ({ time }) => Math.sin(time * 0.2) * 20;
Use the sources directly in a scene, or isolate them in nested layers:
const scene = [colorField, [clouds], textBlock, [fog]];
scene.activate();
These are layered 2D noise fields with shading, rather than volumetric raymarches.
They render in one shader pass with no feedback history or extra image inputs.
ShaderChain also exposes atmosphere(options) for composing the native source;
its modes are 0 (clouds), 1 (fog), 2 (texture), 3 (wisps), angles use radians, and
tint / shadow use normalized RGBA arrays. The Library patches handle these
conversions. Noise helpers are compiled only when this operator is used.
Beat & Impact consolidates the beat-ready treatments into five editable patches.
The legacy collections have been retired from browsing. Their original sources
remain archived in starter/legacy/retired-collections.js; existing performance
and personal-library copies keep their source. Oscillator Field is now in
Essentials, Ripple Rings in Motion & Gestures, Checker Grid and Dot Matrix in
Patterns & Systems, and Ellipse Orbit in Geometric Studies. These reworked patches
start still: connect phase inside their settings to animate them, for example
phase: ({ sceneTime, time }) => (sceneTime ?? time ?? 0) * 0.1,. For Ellipse Orbit,
phase: ({ sceneTime, time }) => (sceneTime ?? time ?? 0) * 0.5 / (Math.PI * 2),
recreates the original weave evolution. Its orange ellipses and geometry are retained.
Use Impact FX, Glitch Hit and Mosh Hit with Guide connections for the retired
bass and signal presets.
Every new patch starts neutral. Set level directly (0–1), or assign trigger
to choose event playback. A null trigger uses level; a connected trigger ignores
level. Boolean rising edges or changes to a nonzero numeric counter start a hit.
A held trigger does not restart it. attack, hold and release use seconds;
curve shapes release falloff. New hits restart the envelope, and envelope state
is independent for each occurrence of the patch in a scene. No clock, audio or
keyboard connection is made automatically.
- Flash (
strobeFlash): transparent fullscreen tint withopacitymultiplied by the pulse level. Use white for a bright flash or black for a dark flash. - Gate (
strobeGate): multiplies the layer's alpha.mode: 'hide'hides on a hit;mode: 'reveal'shows on a hit.amountcontrols the gate depth. Put it inside a nested layer to reveal the parent rather than the canvas. - Impact FX (
impactFx): combines zoom, translation, rotation, shake, RGB separation, contrast and brightness.x,y,shakeX/Yuse canvas fractions,rotationandsplitAngleuse degrees, andseparationuses pixels.shakeSpeedsets movement during an active hit; set it to 0 and scrubshakePhasefor a static or user-driven displacement. - Glitch Hit (
glitchHit): reuses native band tearing, channel desync, block damage and analog interference.amountis multiplied by the pulse, so the shader cannot fire a random damage burst while the patch is at rest.rate,bands,blockPixels,seed,displace,channels,crush,corruptandanalogremain editable. - Mosh Hit (
moshHit): reuses native previous-frame block smearing.amount,rate,blockPixels,seedandmotioncontrol damage. Its feedback belongs to the shader binding; use distinct patch bindings for distinct histories. Turning the level off passes live input through again.
Examples of deliberate connections:
strobeFlash.trigger = ({ clock }) => clock.running && clock.tick;
strobeFlash.hold = 0.03;
strobeFlash.release = 0.08;
glitchHit.trigger = ({ audio }) => audio.onset;
impactFx.level = ({ audio }) => audio.bass;
moshHit.trigger = ({ clock }) => clock.running ? Math.floor(clock.beat) + 1 : 0;
For a periodic gate, drive level from beat phase instead of an event envelope:
strobeGate.level = ({ clock }) =>
  clock.running && clock.phase < 0.1 ? 1 : 0;
const scene = [colorField, [radialField, strobeGate]];
scene.activate();
Flashes and gates can create strobing. Start with restrained opacity, gate depth and rate when building a performance. Shader hits reuse existing native operators; only Mosh Hit needs feedback history.
Each collection can be browsed or exported. Individual patches can be copied
into a performance or saved in a personal collection. Imported developer packs such as Phosphor & Glitch remain separate;
Vertical Bands belongs to Phosphor & Glitch, not Essentials. Version 1.4 of that
pack contains 22 visual sources with signal-capable settings, degree-based angles,
and parameter guidance. Audio and controls only affect settings you explicitly connect. Find
Feedback Loop in Feedback & Time; Impact FX, Glitch Hit and Mosh Hit in
Beat & Impact; and Video Noise, VHR Distortion, TV Distortion and VHS Tape in
Video Treatments. Reimport the updated pack and choose Replace collection to update
an installed copy; existing scene code and personal variations remain intact.
For an editable personal collection, import
visual-patch-library/phosphor-and-glitch-personal.p5collection.json instead.
It contains the same 22 patches and appears under Your Collections. The developer
copy remains separate and can be removed through its collection actions.
Pong draws on transparency by default, so earlier scene layers remain visible.
Set its backgroundColor to an RGB array for an opaque court, or null to
return to transparency.
The Library opens on Browse, across all collections. Search for orbit to find
its transparent, editable patch. Use open-ended tags such as ambient, media, or
effect to narrow the results, or choose a collection. These are descriptions,
not exclusive types: a shader can generate imagery or process an input, and a patch
can carry several tags. Small p5.js or Shader badges identify implementation;
the Shader badge tooltip distinguishes native shaders from ISF.
Choose Help → Examples… for complete demonstrations such as Orbit, Teapot, and Motion Lab.
Five starter scenes combine the core Library patches. Each adds editable patch cells and a scene array; signal connections and animated settings live inside those patches. They use distinct names, so they can coexist with patches you've already installed. Running an example selects its scene without replacing your existing scene source.
- Beat Impact combines line fields and concentric forms with Glitch Hit and Impact FX. The tempo clock retriggers both envelopes. Press Esc, then tap Space for tempo; setting the clock source to Off stops new hits. Audio adds size movement when available.
- Neon Trails groups particles, feedback and Glow in a transparent layer. Tune emitter rate, feedback decay and glow radius inside their patches.
- Atmosphere combines slowly evolving clouds and fog with a moving Light Rays origin and Vignette. Tune drift, density and light threshold.
- Kinetic Type animates a glyph wave through mirrored panels and a soft
wipe. Edit
contentandspeedinsidekineticGlyphs. - Video Treatment puts a local video through color grading, grain and
vignette. Evaluate
treatedVideo.choose()to select a video. A moving procedural preview shows the effects before you select a file; the video covers it when loaded. Its saved video reference uses a separate asset name.
Load a starter scene, change one property inside its patch, and evaluate that
patch cell to explore the result. Scene arrays keep composition and ordering
visible.
Use Help → Examples… → Run Orbit example for a complete woven-ellipse scene
with parameters you can edit live.
Browse filters never change source or runtime state.
Catalog titles are spaced for browsing; the source identifier shown in code stays
unchanged. Built-in visual patches have static previews; media, diagnostic, and
custom patches use visual motifs. Browsing never starts additional render loops.
Search also understands task words: grain mask finds Noise Field,
chroma key finds Green Key, and audio scope finds Waveform. Multiple words
must all match the same patch.
In an editable collection’s ⋯ menu, Import patch… accepts a local ISF .fs file. It supports
single-pass generators and image effects using the standard inputImage input,
plus float and color inputs. An effect processes the scene pixels drawn before
it. Import saves editable shader source and local input properties into a chosen
writable collection, without changing scene code. Choose Add to scene, review the code and Run to activate it.
Inputs can be explicitly wired to performance controls. The imported GLSL is embedded in the
project source, so source and performance exports carry it without a separate file.
Other image inputs, transitions, multiple passes, imported resources, and other
ISF input types are rejected with an error until supported.
Within Browse, the chooser selects a collection, This performance, or Current
scene. Tags allows multiple selections; a patch must match every selected tag.
Remove an individual tag with its × button, or use Clear filters to reset Browse.
There are no fixed category groups. Collections manages installed packs
and their cover artwork, creator details, imports and exports.
Each patch row offers Add to scene while it is outside the scene; see Code-first library insertion for placement and evaluation. After insertion, Show code takes you to its editable source and In editor · in scene describes its location. Included identifies patches shipped with the app; it does not mean a patch is in your scene.
Reference drawer
The Reference drawer lists installed patches and their public properties and methods. It reads descriptors without invoking getters. Jump to source navigates the editor but never evaluates code or changes the scene.
Audience output
Open the audience window with p. The audience selector supports:
| Layout | Audience receives |
|---|---|
| canvas | Clean rendered output |
| canvas + live code | Visible performer code and open folds, with syntax color, live caret and selection; follows typing and scrolling without evaluation |
| canvas + last executed block | Most recently accepted block; rejected edits stay off the display |
| canvas + trace | Output with the evaluation trace presentation |
Keep the operator window on the computer display and move the audience window to the projector or external display.
Code appears at the upper left and scrolls to follow the caret. Settings has separate
Performer code size and Audience code size controls. E (or the Code button)
shows or hides code on both screens without changing the chosen audience layout.
The display copies the existing stage; it does not run patches a second time.
Live code uses cached editor glyphs, refreshes at most 30 times per second, and only
rebuilds when the visible text, folds, scroll, selection, or syntax theme changes.
During a cross-dissolve, the controller strip's top favors the incoming scene B (blue, ↑ B); its bottom favors the current scene A (amber, ↓ A). The paired scene pads and display use the same markers. Direction stays consistent regardless of the pads' positions. The markers disappear once a scene is committed.
31. Keyboard reference
Keyboard behavior depends on focus. Editor commands work while the caret is in code.
Single-key performance commands work after pressing Esc to release editor focus.
Open Settings → Edit key commands… to edit, export, or import browser-local bindings.
Editor and global commands
| Command | Action |
|---|---|
Cmd/Ctrl+Enter |
Evaluate the current cell or complete top-level statement |
Cmd/Ctrl+A |
Select all editable patch and scene code, including headings; exclude managed declarations |
Cmd/Ctrl+Shift+Enter |
Evaluate the complete source buffer |
Cmd/Ctrl+Option/Alt+V |
Show or hide the performer-only Signal Analyzer |
Cmd/Ctrl+/ |
Add or remove one reversible comment layer |
Cmd/Ctrl+[ |
Wrap or unwrap the selected expression or patch name in [ ] |
Cmd/Ctrl+Option/Alt+T |
Tidy indentation in the current cell without evaluating |
Cmd/Ctrl+Shift+Up/Down |
Move the current line or selected consecutive lines |
Cmd/Ctrl+Z |
Undo source editing, including whole-cell deletion |
Cmd/Ctrl+Shift+Z |
Redo ordinary text edits using the editor's native history |
Enter |
Insert a line with context-aware indentation |
Tab / Shift+Tab |
Indent or outdent the current line or selection |
Cmd/Ctrl+Option/Alt+[ |
Fold all marked sections, including Controls and Modulations |
Cmd/Ctrl+Option/Alt+] |
Unfold all marked sections and retain their disclosure arrows |
Cmd/Ctrl+Option/Alt+F |
Fold or unfold the current marked section |
Cmd/Ctrl+Option/Alt+Enter |
Focus the current section's heading actions |
Cmd/Ctrl+Option/Alt+/ |
Open or close the command sheet while editing |
Cmd/Ctrl+P |
Open the performance chooser; arrows, Enter, or Escape navigate it |
Cmd/Ctrl+Option/Alt+1…9 |
Recall the corresponding numbered scene slot |
Cmd/Ctrl+Option/Alt+Shift+1…9 |
Prepare a cross-dissolve to a numbered scene |
Cmd/Ctrl+S |
Save current scene |
Cmd/Ctrl+Option/Alt+S |
Duplicate the current scene |
Cmd/Ctrl+Option/Alt+Shift+S |
Save performance |
Cmd/Ctrl+Option/Alt+Shift+N |
Save performance as a new copy |
Cmd/Ctrl+Option/Alt+N |
Start a blank scene in the current performance |
Cmd/Ctrl+\ |
Open or close Performances |
Option/Alt+Shift+Right |
Skip forward one minute in loaded audio |
Esc |
Release editor focus |
Option/Alt+Up/Down also moves lines in browsers that do not reserve that shortcut.
The Cmd/Ctrl+Shift+Up/Down form is the portable choice.
Performance commands after Esc
| Key | Action |
|---|---|
Space / t |
Tap tempo |
Shift+Space |
Play or pause a loaded audio file |
Shift+1…8 |
Toggle clips 1–8 |
0 |
Restore Safe State |
s |
Capture the current confirmed project as Safe State |
r |
Show or hide the installed-patch Reference drawer |
e |
Show or hide code on performer and audience screens together |
d |
Cycle three performer dim levels: undimmed, dim, and darker; audience output is unchanged |
n |
Hide or restore the top navigation bar |
f |
Enter or leave fullscreen |
p |
Open or close the audience window |
l |
Toggle audio-file looping |
a |
Choose an audio file |
m |
Start live microphone/input audio |
? |
Open or close the command sheet |
Left / Right during a cross-dissolve |
Blend toward A / B; hold Shift for finer steps |
Physical keyboard state is also available to patches through context.keyboard; a
performance key that the interface handles can therefore have both interface and
patch implications. Prefer non-command keys for patch-specific interaction.
32. Runtime reference
Accepted patch forms
const functionPatch = (context) => {};

const objectPatch = {
  draw(context) {},
};

class PatchClass {
  draw(context) {}
}
const classPatch = new PatchClass();
A function becomes a patch when a scene references it or when it is the named value
of an explicit patch cell. An object is a patch when it has a callable draw method.
A class declaration by itself is a constructor, not a patch; place an instance in the
scene.
Context fields
| Field | Type | Meaning |
|---|---|---|
audio |
object | Shared immutable audio snapshot for the frame |
canvas |
p5 renderer | Current render target; the main canvas or current nested group |
state |
object | Persistent data unique to this scene occurrence |
dt |
number | Seconds since the previous frame, capped at 0.1 after a stall |
time |
number | Seconds since the instrument clock began |
sceneTime |
number | Seconds since the active scene changed |
controls |
object | Current values from control() declarations |
modulations |
object | Current outputs of named performance modulations |
clock |
object | Shared timing snapshot: source, status, running, bpm, beat, phase, beatAge (seconds since the preceding boundary while running), tick, crossings, confidence |
clipTime |
number or undefined | Seconds since launch for clip patches; absent outside a clip |
clipProgress |
number or undefined | Clip lifetime fraction from 0 to 1; absent outside a clip |
keyboard |
object | Read-only keyboard state with keys, shift, and alt |
keyboard.keys is a Set of currently held event.key values:
const keyboardDot = ({ keyboard }) => {
  const x = keyboard.keys.has("ArrowLeft") ? width * 0.3 : width * 0.7;
  circle(x, height / 2, keyboard.shift ? 100 : 40);
};
The same context object is reused for efficiency; treat its shared fields as
read-only. Store persistent patch data in state or on the patch object as
appropriate.
Audio fields
| Field | Range/type | Meaning |
|---|---|---|
audio.level |
generally 0..1 |
Normalized overall amplitude |
audio.bass |
generally 0..1 |
Normalized low-frequency energy |
audio.mid |
generally 0..1 |
Normalized middle-frequency energy |
audio.treble |
generally 0..1 |
Normalized high-frequency energy |
audio.onset |
Boolean | Onset decision for this frame |
audio.centroid |
0..1 |
Log-normalized spectral centroid (brightness); audio.raw.centroid is Hz |
audio.sinceOnset |
seconds | Elapsed analysis time since the last detected onset; starts at 999 before a hit |
audio.spectrum |
array of 0..255 |
FFT magnitude bins |
audio.waveform |
array of -1..1 |
Time-domain samples |
audio.sampleRate |
number | Samples per second reported by the audio context |
audio.nyquist |
number | Highest represented frequency, half the sample rate |
audio.raw |
object | Original scalar features plus the same spectrum and waveform arrays |
With no source, the host supplies a silent snapshot so patches can continue running. All patches in one frame receive the same analysis.
| Fast field | Units/range | Meaning |
|---|---|---|
audio.fast.level |
0..1 |
Current waveform RMS relative to its decaying peak reference |
audio.fast.bass, .mid, .treble |
0..1 |
Selected-band magnitude relative to that band's independent peak reference |
audio.fast.raw.level |
Unitless floating RMS | Unnormalized waveform RMS |
audio.fast.raw.bass, .mid, .treble |
Unitless floating magnitudes | Square root of summed squared linear FFT magnitudes in the selected band |
audio.fast.spectrum |
0..255, floating values |
Linear FFT magnitudes scaled by 255 and capped at 255 |
audio.fast.waveform |
Normally -1..1, floating samples |
Unsmoothed time-domain samples |
The fast path uses a 2048-sample FFT, yielding 1024 frequency bins. Use
audio.sampleRate and audio.nyquist from the outer snapshot to interpret their
frequency positions. Fast raw bands use a different scale from the normal raw
spectral bands' 0..255 scale; calibrate thresholds with the actual path and
input rather than copying a threshold between them. Silent fast readings contain
zero scalars and empty arrays, so check length before indexing an array.
For an audio-response comparison, see Choose a fast audio response.
Lifecycle methods
| Method | Contract |
|---|---|
state() |
Return a plain object used as initial per-occurrence state |
enter(context) |
Called once when the occurrence enters the active scene |
onset(context) |
Called on a frame whose shared audio snapshot reports an onset |
draw(context) |
Called once per active frame; required for object/instance patches |
exit(context) |
Called when the occurrence leaves the active scene |
dispose() |
Release resources when the implementation is permanently replaced or discarded |
Lifecycle methods run with the patch object as this. State intended for rollback or
Safe State should contain numbers, strings, booleans, arrays, and plain objects that
structuredClone can copy. Keep DOM nodes, WebGL handles, media elements, and other
resources on the owning object rather than in state.
Numeric signal helpers
Create these once in evaluated source, outside draw(). Each returns a context
callback: call size(context) in p5 code, or pass size directly to an effect
argument. Helpers sample once per frame from a shared, frozen subset of context:
| Available to helper inputs/trigger callbacks | Not available there |
|---|---|
time, dt, frame, audio, clock, controls, keyboard |
sceneTime, modulations, state, canvas, clipTime, clipProgress |
Calling size(context) is a consistent convention, but the helper uses its own
shared snapshot rather than that argument. Use ordinary draw/property callbacks
when you need named modulations or occurrence/scene fields.
These code helpers are separate from the performance's Modulations cards. Re-evaluating a helper creates fresh state; rerun its consumers to use it.
| Helper | Options and defaults |
|---|---|
lfo(options) |
period: 4 seconds or beats; min: 0, max: 1, phase: 0; wave: 'sine', 'triangle', 'saw' or 'square' |
ramp(options) |
period: 1 seconds or beats; from: 0, to: 1; optional trigger; reaches and holds its endpoint |
remap(source, options) |
Number or context callback; from: [0, 1], to: [0, 1], clamp: true |
variation(options) |
Deterministic seeded steps: seed: 1, min: 0, max: 1; period: 1 seconds, beats or trigger |
sequence(values, options) |
Nonempty numeric sequence; period: 1 seconds, beats or trigger; wraps at the end |
lag(source, options) |
Smooth a value; time: 0.15, optional rise, fall, initial; unit: 'seconds' or 'beats' |
envelope(options) |
Triggered attack/release, or held ADSR with gate; attack: 0.02, release: 0.4, min: 0, max: 1; ADSR adds decay: 0.1, sustain: 0.7 |
period and beats are mutually exclusive. Beat-based signals use the optional
clock and hold while it is stopped; seconds-based motion works with timing Off.
For full trigger, gate, reset and timing contracts, see
Timing and visual signals.
Live commands
| Command | Result |
|---|---|
scene.activate() |
Select the named array for the ongoing frame loop, at a frame boundary |
reset(patch) |
Recreate state for every active occurrence of the supplied patch value |
control(name, initial, options) |
Declare or update a performance-wide live control; current performer value is preserved on reevaluation |
trigger(name) / release(name) |
Press/release an Envelope gate or restart a Ramp by name |
modulation(name, options) |
Declare a modulation the performance does not have yet (wave, beats or hz, depth, offset, target, on); the generated // %% modulations cell writes these for you and an existing modulation is left as the performer set it |
Commands use actual JavaScript values: scene.activate() selects a scene array and
reset(rings) resets a patch's occurrences.
Control value types are number, Boolean, or string:
control("amount", 0.5, {
  type: "continuous",
  min: 0,
  max: 1,
  step: 0.01,
});

control("gate", false, {
  type: "button",
  mode: "momentary", // or "toggle"
});

control("mode", "rings", {
  type: "choice",
  choices: ["rings", "grid", "scope"],
});
Scene and identity rules
| Source form | Runtime meaning |
|---|---|
[a, b, c] |
Flat scene or group, processed left to right |
[a, [b, effect], c] |
b and effect render in an isolated transparent group |
[...group] |
Group members are inserted into the parent; no isolation |
factory() |
Factory runs during evaluation; returned patch or array is retained |
| bare function in scene | Function is invoked as a patch each frame |
| repeated named patch | Shared implementation with independent occurrence state |
| anonymous patch | Identity is its recursive zero-based scene path |
ShaderChain methods
Numeric operator arguments and .mix(amount) accept numbers or functions of the
current context. .blend(mode) takes a string; .bypass(enabled) takes a boolean.
Array layers support the positional operators below except tvDistortion and
glasses3D, which require an explicit new ShaderChain(). The newer option-object
families have the separate availability table below; some are chain-only. Shader shift
is named colorShift on arrays so native Array.shift() keeps its meaning.
For example, [dot, new ShaderChain().glasses3D({ separation: 5 })]
limits that chain to the nested dot layer.
Generated layer/effect arrays are frozen: do not use .push() or assign their
entries. The array structure is immutable, while contained patch objects retain
normal JavaScript behavior. Use [dot].opacity(0.5).append(halo) to extend a
processed layer. Empty arrays are allowed; holes, null, false, invalid patch
values, and cyclic nesting are rejected. For conditional entries, use
...(enabled ? [dot] : []) rather than enabled && dot.
Array-only composition helpers return new arrays without flattening nested groups:
| Method | Meaning |
|---|---|
.translate(x = 0, y = 0) |
Offset the rendered layer in normalized stage coordinates |
.opacity(amount = 1) |
Multiply the rendered layer's alpha |
.append(...patches) |
Append patch entries; unlike .add(image), this does not combine private input pixels |
.fx(...effects) |
Append effect patches, including an explicit ShaderChain |
.mute(enabled = true) |
Pause the group while preserving its state |
Chain-level methods:
| Method | Meaning |
|---|---|
.mix(amount) |
Wet/dry amount |
.blend(mode) |
alpha, add, multiply, screen, overlay, difference, subtract, lighten, or darken |
.bypass(enabled = true) |
Skip or re-enable the chain without deleting it |
.clear() |
Remove all operators from the chain |
.clone() |
Create a separate chain with copied operators and chain settings |
chain.operations |
Inspect copied operator records; referenced patch/image values remain ordinary references |
chain.bypassed |
Read the current bypass flag |
chain.passCount |
Read the planned pass count; this is not a timing or total GPU-memory measurement |
chain.imageInputs |
Inspect private texture dependencies as { uniform, source } records |
.withImageInputs(map) |
Advanced host-recovery helper: return a separate chain with source values replaced by uniform-name keys in a Map; normal authoring uses .modulate(), image combinations, and nested arrays |
Transform and coordinate operators:
| Method | Arguments |
|---|---|
.transform(x, y, scaleX, scaleY, angle, anchorX, anchorY) |
Complete normalized transform |
.mirror(horizontal, vertical) |
Axis reflection amounts |
.crop(left, right, top, bottom) |
Normalized visible bounds |
.noiseWarp(amount, scale, speed) |
Animated value-noise displacement |
.modulate(image, amount) |
Displacement from another array of patches; amount defaults to 0.1 |
.rotate(angle, speed) |
Angle and optional continuous speed |
.scale(amount, xMult, yMult, offsetX, offsetY) |
Zoom, axis multipliers, and offset |
.pixelate(pixelX, pixelY) |
Horizontal and vertical cell counts |
.repeat(repeatX, repeatY, offsetX, offsetY) |
Two-axis tiling with alternating offsets |
.repeatX(reps, offset) |
Horizontal tiling |
.repeatY(reps, offset) |
Vertical tiling |
.kaleid(sides) |
Radial mirrored segments |
.scroll(x, y, speedX, speedY) |
Two-axis offset and speed |
.scrollX(x, speed) |
Horizontal offset and speed |
.scrollY(y, speed) |
Vertical offset and speed |
Sampling and temporal operators:
| Method | Arguments |
|---|---|
.blur(radius) |
Blur radius |
.sharpen(amount) |
Sharpening amount |
.edgeDetect(amount, radius, alphaEdges) |
Edge amount, sample radius, and optional alpha-edge contribution |
.bloom(amount, radius, threshold) |
Glow amount, radius, and brightness threshold |
.vignette(amount, softness) |
Edge darkening and transition softness |
.rgbSplit(amount, angle) |
Channel separation and direction |
.glitch({ amount, rate, bands, blockPixels, seed, trigger, displace, channels, crush, corrupt, analog }) |
Stepped displacement, channel offsets, crushing, corruption and analog interference |
.datamosh({ amount, rate, blockPixels, seed, trigger, motion }) |
Temporal block corruption and motion-driven smearing |
.videoNoise({ amount, rate, width, height, seed }) |
Low-resolution video signal grain; defaults to a 320×240 grid |
.vhrDistortion({ amount, rate, bend, roll, seed }) |
Curved video screen, tearing bursts, roll, scanlines, and vignette |
.vhsTape({ amount, tracking, bleed, rate, seed }) |
Layered tape drift, traveling crease, bottom head-switching, color bloom, and brightness beat |
.tvDistortion({ amount, vertJerk, vertMovement, bottomStatic, scanlines, rgbOffset, horzFuzz, rate, seed }) |
TV signal jumps, fuzz, static, RGB offset, and scanlines; each layer can be set to 0 |
.glasses3D({ amount, separation, depth }) |
Red/cyan anaglyph treatment for the preceding image; separation is in pixels |
.feedback(amount, decay, zoom) |
Previous-frame amount, decay, and zoom |
.lumaMask(threshold, softness, invert) |
Luminance cutoff, softness, and inversion |
.chromaKey(r, g, b, tolerance, softness) |
Make the selected RGB color transparent; RGB channels use 0..1 |
Color operators:
| Method | Arguments |
|---|---|
.posterize(bins, gamma) |
Color levels and gamma |
.shift(r, g, b, a) |
Per-channel shift |
.invert(amount) |
Inversion amount |
.contrast(amount) |
Contrast multiplier |
.brightness(amount) |
Brightness adjustment |
.luma(threshold, tolerance) |
Luminance key |
.thresh(threshold, tolerance) |
Threshold and transition tolerance |
.color(r, g, b, a) |
Color multiplication/tint values |
.saturate(amount) |
Saturation multiplier |
.hue(amount) |
Hue rotation |
.colorama(amount) |
Nonlinear color cycling amount |
.sum(scale) |
Sum RGB channels with scaling |
.rgba(r, g, b, a) |
Explicit channel weighting |
Option-object families expose settings described in each Library patch’s guide. Positions are normalized; native angles are radians, whereas editable
Library patch angle settings commonly use degrees. See the setting’s own note.
Numeric options accept fixed values or full-context callbacks; keep construction
outside draw() and reevaluate the scene when changing the chain structure.
| Native methods | Available directly on arrays? | Related collection |
|---|---|---|
.reflectAxis(options), .kaleidoscopeFold(options), .radialCopies(options), .recursiveCopies(options) |
Yes | Symmetry & Repetition |
.metaballField(options) |
Yes | Metaballs |
.displacementField(options), .rippleWarp(options), .waveWarp(options), .lensWarp(options) |
Yes | Distortion |
.compoundMask(options), .noiseMask(options), .wipeMask(options), .windowMask(options), .tilePanels(options), .spatialFade(options) |
Yes | Masks & Cutouts |
.atmosphere(options) |
Yes | Particles & Trails |
.paletteMap(options), .gradeColor(options), .duotone(options), .posterizeDither(options) |
No; explicit new ShaderChain() |
Color & Palette |
.surfaceGrain(options), .halftone(options), .surfaceDither(options), .emboss(options) |
No; explicit new ShaderChain() |
Texture & Surface |
.lightBloom(options), .alphaGlow(options), .lightRays(options), .lightSweep(options), .focusVignette(options) |
Yes | Light & Glow |
Image-combination operators accept a private input array and an optional amount. They render that array as their image input, not as an extra top-level scene entry:
| Method | Image operation |
|---|---|
.add(image, amount), .multiply(image, amount), .screen(image, amount), .overlay(image, amount) |
Add/multiply/screen/overlay input pixels with preceding imagery |
.difference(image, amount), .subtract(image, amount), .lighten(image, amount), .darken(image, amount) |
Difference/subtract or choose lighter/darker pixel contributions |
.mask(image, amount), .alphaMask(image, amount) |
Use input luminance or alpha to mask preceding imagery |
.composite(image, mode = 'alpha', amount = 1) |
Composite a private input with a chosen mode |
ShaderChain processes the pixels already present in its current scene or nested
group. .modulate(image, amount) also accepts an array as a private image input;
that image displaces the current pixels. Use nested groups to choose effect scope.
Other custom multi-texture operations require a custom WebGL patch.
p5.js drawing surface
Normal p5 drawing functions, math helpers, constants, dimensions, and input globals are available in patch code. See the official p5.js reference for the broad drawing API. Thunk Machine adds the patch, scene, context, control, and replacement model described here.
33. Files, sharing, and persistence reference
What each save mechanism contains
| Mechanism | Stored data | Where it lives | Primary use |
|---|---|---|---|
| Browser working session | Working source and recent recovery copies | Current browser profile and origin | Resume after reload and recover a recent draft |
| Named performance | The complete saved set: working source, scenes, clips, controls, modulations, layout, mappings, shared code, tempo, audio and view settings | Browser storage; also included in a performance export | Fast recall during a set |
| Safe State | Exact confirmed definitions and bindings, version data, recursive active scene, controls/mappings, source, and clone-compatible occurrence state | Current running session | Emergency rollback |
| Performance file | The whole performance: working source, scenes, clips, controls, layout, and performance shared code | Downloaded JSON file or portable package | Backup and transfer |
| Patch file | One source cell plus metadata | .p5patch.js file |
Share one patch |
| Legacy patch link | One patch's source encoded in the URL fragment | Existing shared URL; new-link controls are not exposed | Import an existing source exchange |
| Workspace backup | Saved performances, working drafts, collections, global code, preferences, thumbnails and attached files | .p5workspace.json file |
Move the complete workspace between machines |
Code-only files do not embed media bytes. A portable package can include explicitly attached images, fonts, and audio selected in its export dialog, but not video. Compiled functions and live browser resource handles are not serialized.
Move an entire workspace
Settings → Workspace backup → Export workspace… downloads one .p5workspace.json
file containing saved performances, the current working scene and drafts, personal
and developer collections, global code, recovery history, preferences, thumbnails,
and referenced attached images, fonts, and audio. Each attached file is included
once, even when several performances use it. Included patches come from the installed
app rather than being duplicated in the backup. Secrets are not workspace content.
The opening dialog's recent performance order and recent song names travel too.
Song history includes names, sizes, and timestamps, not external audio bytes or
browser file permissions.
On the other machine, use Import workspace…. Review the contents, then choose Export current, then restore to download the old workspace first, or Replace workspace to replace it directly. Cancel leaves everything unchanged. Restore replaces this browser's workspace, not the files on your computer, and reloads the app. Only restore trusted backups: saved code will run after reload. Personal collections stay personal; developer collections remain read-only.
Linked video permissions and externally selected audio files cannot travel with the backup. Relink those videos and select external audio again. Attached files are included up to 150 MB total, with up to 50 MB of source and preview data. A missing attachment stops export rather than creating an incomplete backup.
If saved scenes or the performance library contain unreadable records, the original data stays intact and writes to that store are blocked. Readable entries remain visible. Open Settings → Workspace backup → Download unreadable records to save the original text for repair before restoring a known-good workspace. That recovery file is not an importable workspace backup and contains no attached media; ordinary exports may fail validation until the data is repaired. Repeated saves do not repair or discard unreadable records.
New performance, reset, and reload
- Reload resumes the working session, including pending editor text and scene drafts. Browse session backups… offers older recovery copies when needed.
- + Performance offers Cancel, Use current scene, and Use default scene. The current-scene choice keeps the stage running and makes it the first scene of a new unsaved performance, with its shared code and settings. The default choice starts a fresh unsaved performance with the black starter scene. Previously saved performances remain in the library; the new one is not added until you name and save it.
- New blank scene under + Scene, or
Cmd/Ctrl+Option/Alt+N, asks before clearing the working scene to black without changing performances. Cancel leaves the code and running scene untouched; Start blank scene keeps changed working code in recovery before replacing it. Saved scenes, controls, modulations, clips, and audio remain. The blank scene is Untitled and unsaved; Save creates a new scene rather than overwriting the scene you left. Its session draft remains available on recall. - Duplicate, or
Cmd/Ctrl+Option/Alt+S, saves and selects a copy named Untitled without restarting the visuals. Subsequent Save updates the copy, not the original. - Settings → Start over → Reset to starter… discards the working project and returns to the starter. Export a backup first when any current work matters.
- Recall runs the selected performance source and restores its saved settings. A failed recall restores the previous working performance.
Project import behavior
Import validates the JSON format. The review shows existing global code, imported performance shared code, and the complete runtime replay blocks in execution order. That replay can differ from the visible editable draft. Saved-scene replay code is shown separately and runs only when those scenes are launched. Cancel runs none of the imported code. Confirm adds the performance to the library and loads it; successful loading replaces its working scenes/settings, while a failed load restores the previous performance. A library-only import adds entries without running them; the first load asks you to review and approve that entry's executable code.
Because imported source is executable JavaScript, review and trust it before allowing it to run.
Portable patch format
A shared patch uses this source header:
// %% patch myPatch
// @title My Patch
// @author Your Name
// @description One sentence explaining what it does.
// @tags ambient, geometric
// @version 1

const myPatch = {
  draw({ audio }) {
    circle(width / 2, height / 2, 20 + audio.bass * 200);
  },
};
The binding after // %% patch must be a valid JavaScript identifier and should match
the exported patch binding. Tags are optional and open-ended. Browser sharing
supplies friendly defaults for missing optional metadata. Technical implementation
does not determine a patch's collection or tags.
Importing a patch or opening a patch link reviews it into a chosen writable collection. It does not install, evaluate, activate, or run the source.
Importing and exporting patch collections
In Library → Collections, choose ⋯ → Import patch… on an editable collection to select JavaScript patches,
ISF .fs files, or single-patch .p5package.json packages. Loose patches and
shared links are reviewed into a writable collection. Existing names start at
Skip; choose Replace explicitly.
The collection you import from is preselected as the destination in the review.
In Library → Collections, Import collection… accepts named collection files
and collection packages. Personal collection files remain editable; published
developer packs install as read-only originals. Both retain identity, author,
version, description, cover and license.
Reimporting the same collection ID asks before replacing its catalog contents.
Imports never change scene source or run patches.
On its collection card, choose ⋯ → Export collection… to export selected patches
with collection identity, cover and metadata. Optional assets come from the current
performance and are opt-in on import; they attach to the receiving performance.
Personal exports default to Personal collection · editable. Choose
Developer pack · read-only original to publish a pack with a separate, stable
identity, without changing your editable working collection.
Source-only files use format: "thunk-machine-patch-collection", schema: 1, a
name, kind: "personal" or kind: "developer", optional id, author, version,
license, description, thumbnail, and a patches
array. Patch entries may include tags for discovery; source-only patches also
support // @tags ambient, geometric. Unnamed batches are reviewed
as loose patches into a writable collection.
Collections with assets retain the asset-package envelope with kind: "patch-collection".
Add a repository community patch
- Put one
.jssource file incommunity-patches/. - Include the required marker and metadata shown above.
- Keep loops, histories, and resource use bounded.
- Run
npm run build:patches. - Run the relevant tests and inspect the patch before sharing the change.
The build validates metadata and generates src/generated/communityPatches.js as
catalog data. Do not edit the generated file directly. See the
community patch guide.
34. Product limits and safety
Trusted code, not a sandbox
Thunk Machine evaluates JavaScript with new Function. Evaluated code can access browser
globals and same-origin data, allocate excessive memory or GPU resources, or enter an
infinite loop. Use source only from people you trust and review imports before
evaluation.
Errors that throw can be caught. Code that never yields control cannot be interrupted by the evaluator. Safe State is recovery, not isolation from hostile code.
Browser-dependent capabilities
Desktop Chrome is the documented setup path and the automated browser tests use Chromium. Other browsers are not equally verified; rehearse on the browser and machine you will actually use.
| Browser/setup | Practical support boundary |
|---|---|
| Desktop Chrome / Chromium | Preferred full-feature setup, including Web MIDI and WebUSB Push display access where the browser exposes them |
| Other desktop browsers | Core canvas/audio depends on their WebGL, codecs and permissions; hardware and file-picker APIs may be absent |
| Mobile/tablet browsers | Not the supported editing or Push workflow; screen layout and device APIs differ |
Hardware access requires a secure origin (HTTPS or a trusted localhost setup) and explicit browser permission. See the current browser compatibility tables for Web MIDI and WebUSB.
- Web Audio requires an explicit user gesture before sound can start.
- Audio codec support varies by browser and operating system.
- Direct MIDI uses Chrome's Web MIDI support. Onscreen controls work without hardware.
- Fullscreen, multiple windows, local file pickers, and autoplay remain subject to browser permissions.
- Browser storage is local to one browser profile and site origin.
localhost,127.0.0.1, and the hosted site do not share saved projects.
Current product boundaries
- OSC is not implemented.
- Recording and deterministic event replay are not implemented.
ShaderChainsupports array image inputs through.modulate(). Other custom operations that combine several textures still need custom WebGL code.- Code-only exports omit media bytes. Portable packages can include selected attached images, fonts, and audio, but not video or camera frames.
- The Network tab is unavailable; the experimental source API remains callable.
- The included networking architecture is intended for small peer groups, not a large broadcast audience.
Network developer API (beta)
The included Network (Experimental) collection provides networkPublisher; Sources provides
the networkReceiver template. Publication sends video, not audio. Installing a
template does not connect; activating it in a scene does.
StreamRoom remains available to expert projects and development deployments even
though the Network tab is unavailable. Treat it as an experimental API, configure the required signaling infrastructure, and do
not depend on it for a set without testing the exact deployment.
Set its signaling endpoint in Settings → Network → Connection URL, then click
Apply. The browser remembers this URL separately from performances; active
rooms reconnect without source changes. Use default restores the page host's
/network. HTTPS pages require wss://. For the hosted performer and iPhone
camera using a local Mac server, see the camera setup.
The receiver template defaults to iPhone/camera.
const room = new StreamRoom({
  name: "warehouse-stage",
  performer: "Maya",
});

const remoteParticles = room.receive({
  stream: "Alex/particles",
  fit: "cover",       // "cover", "contain", or "stretch"
  opacity: 1,
});

const publishMain = room.publish({
  name: "main-output",
  fps: 30,
});

const scene = [
  remoteParticles,
  plasma,
  publishMain,
];
scene.activate();
receive() and publish() return normal lifecycle patches. Publication is explicit
and video-only. A receiver progresses through waiting, connecting, live, and stalled
states without throwing merely because a peer leaves. Its texture becomes a stable
p5 media source after a track arrives. See Networking for signaling,
deployment, source selection, security, and peer-mesh limits.
Performance boundaries
The project targets live use, but patch code determines the final cost. Common sources of slowdown are unbounded state arrays, per-frame DOM work, repeated graphics-buffer allocation, deeply nested full-resolution groups, expensive raymarching, too many full-canvas effects, and high pixel density.
Use dt for frame-rate-independent motion, keep histories bounded, allocate durable
resources once, release them in dispose(), and use the Settings panel's FPS warning threshold
as an early warning rather than a guarantee.
Secret handling
API-key configuration is not part of the app. Do not paste secrets into source: source is included in saved performances and exported files.
See Security for the full trust boundary.
35. Troubleshooting
An audio file stays on Decoding
Reading… reads the whole file; Decoding… expands it into an audio buffer before playback setup. Duration, channel count, browser resources, and any needed resampling affect the work and decoded memory. MP3 always requires decoding; matching sample rates can avoid resampling, not decoding. A small compressed file can still represent a long, large decoded track.
Load the intended track during rehearsal and wait for the transport to be ready. When diagnosing, use a simple scene and compare the same file. Avoid repeatedly selecting replacements: stale results are ignored, but an existing browser decode is not cancelled. There is no fixed load-time guarantee.
A color becomes white or does not match
Hex strings need quotes and a leading #: fill("#ff0000") is red;
fill("ff0000") is not a valid hex color. Numeric RGB uses three values from
0 to 255, for example fill(255, 0, 0). Check which patch supplies the visible
color, then run that patch cell. Also check commas, matching quotes/brackets, and
whether you ran the scene after changing its membership. Undo the last edit and
run again, or save your work and use the Quickstart’s
complete scene as a known-good replacement.
The music plays, but the canvas is blank
- Open Settings → Diagnostics and look for an evaluation or first-frame error.
- Confirm the scene cell was evaluated.
- Confirm the Library marks expected patches Active or Running.
- Add
() => background(20, 22, 27)first in the scene while diagnosing. - Remember that an isolated shader group cannot see pixels outside the group.
If Diagnostics reports 0 running, evaluate the scene cell. If it reports active
patches but fewer Running patches, open Settings → Diagnostics to find the patch that failed.
A patch is Installed but not visible
Installed only means source is in the project. Add the patch to the scene array, then evaluate the scene.
If Add to scene changed the source, move the cursor into that scene cell and press
Cmd/Ctrl+Enter. Installation and source insertion are deliberately separate from
activation.
A nested group is unexpectedly black or faint
The group starts transparent. Put drawing content before its effect inside the group. An outer background is intentionally not sampled by an inner effect.
Compare the flat and isolated forms:
const flat = [solidBackground, asciiNoise, plasma];
const isolated = [solidBackground, [asciiNoise, plasma]];
If flat works and isolated is faint, the effect needs a richer or opaque source
inside its group.
The source changed, but the image did not
Typing does not evaluate. Put the cursor in the edited cell and press
Cmd/Ctrl+Enter. If you changed array membership, evaluate the scene cell. If you
changed a factory that constructs the scene, reevaluate the code that calls that
factory.
Look for a red evaluation flash or error message. Failed source remains visible for repair while the previous version remains on stage.
Line numbers seem to skip
Folded cells hide source lines without renumbering the file. A visible cell may start
at line 112 because lines 1–111 are folded above it. Unfold all with
Cmd/Ctrl+Option/Alt+] to see the continuous source.
Delete is missing for a patch I removed from the scene
Look for Live · Edited on the scene. Removing the name from the text prepares
a change; the old scene still runs until you press Cmd/Ctrl+Enter inside the
scene cell. After that, hover over the unused patch header to reveal Delete.
Also check other scene cells: a reference inside a nested array or effect input
still counts as use. An unused patch can keep its source; source presence alone
does not hide Delete.
I deleted the code but its patch header remains
The heading and body are ordinary editable text in one document. To remove the
whole patch, include its // %% patch heading in the selection and delete it.
Deleting a heading also removes that fold boundary. Alternatively, use Delete on
an unused patch's heading. Cmd/Ctrl+Z restores the deletion and
Cmd/Ctrl+Shift+Z redoes it. Controls and Modulations remain protected.
A class reports a duplicate declaration
Keep the class and its constructed patch value in one explicit patch cell:
// %% patch myEffect
class MyEffect {
  draw() {}
}

const myEffect = new MyEffect();
Evaluate that cell as a unit. Keep one declaration of each name in the full source buffer. Re-running a cell updates its retained binding, but two declarations in one full-buffer evaluation are a JavaScript error. Remove the duplicate yourself; the evaluator does not rewrite or repair source.
Push 3 connects only partly
Open Settings → Keyboard & controllers → MIDI & controller setup… and inspect MIDI and display status separately. A working MIDI port does not authorize the USB display. Click Connect Push display and choose the device when prompted. Use the Push User Port if the MIDI selector appears; ensure another app or browser tab is not claiming the display, then disconnect and reconnect it. Test with a data-capable USB cable and the documented desktop Chrome setup. Ordinary controls remain usable without Push.
The audience window does not open
Press Esc, then p, or use Open display. Allow popups for this site in
the browser's address-bar permission indicator, then invoke the action again.
An audience window must be opened from a user gesture. Move it to the target
monitor and enter fullscreen there; that monitor's browser window remains
separate from the performer's Settings and navigation.
A permission prompt was denied
Microphone, camera, MIDI, USB and local-file prompts authorize different resources. Use the matching action again after changing the site's browser permission. Check operating-system microphone/camera permission as well. Previously granted permission on another browser profile or origin does not carry over. Selecting an attached file or importing a project cannot silently authorize hardware or restore access to an external video.
MIDI does not connect
- Confirm the browser supports Web MIDI.
- Connect and power on hardware before selecting Connect MIDI.
- Grant the browser permission.
- Use MIDI Learn, then move or press one physical control clearly.
- Use an onscreen control when the browser does not support MIDI.
If Learn succeeds but values do not change, confirm that the declared control type matches the hardware gesture: continuous for knobs/faders, momentary or toggle for pads/switches, and choice for a discrete menu.
The instrument was opened in another browser
Thunk Machine targets current desktop Google Chrome. Open the same URL in Chrome before diagnosing audio, MIDI, shader, fullscreen, or performance behavior. Browser-local projects do not automatically move between browsers; export the project from the old browser and import it in Chrome when necessary.
A local video does not appear
Install and activate localVideo, then explicitly evaluate:
localVideo.choose();
Select a browser-supported video. A one-off choose() file is session-only;
an explicitly attached file referenced by localVideo.assetName restores from
browser storage and can be relinked when missing. Video remains silent by design.
A shader fails or produces a solid color
- Put a visible drawing source before the effect in the same render scope.
- Open Settings → Diagnostics for a shader compilation or uniform error.
- Reduce the chain to one operator, then restore operators one at a time.
- Confirm dynamic argument functions return finite numbers.
- For a custom shader, confirm resolution, texture, time, and audio uniforms match the program's declarations.
Old source returns after reloading
The browser automatically restores the last working project. Use New performance for the starter or import the intended project.
Remember that storage is origin-specific. Opening localhost, 127.0.0.1, and the
hosted site can reveal different browser-local projects.
The frame rate falls
Look for arrays that grow forever, large nested loops, too many full-canvas effects,
high-resolution shaders, and repeated allocation in draw(). Reduce shader passes or
resolution and keep persistent buffers bounded.
Use dt rather than assuming a fixed frame rate. If one patch is suspect, comment it
out of the scene and evaluate the scene; then restore simpler settings or a known-good
version from Diagnostics.
The browser freezes
An infinite loop or blocking operation cannot be caught while it is still running. Reload the tab. If startup recovery can isolate the failed source, repair or remove the offending cell before evaluating it again. Otherwise export any recoverable work and use Settings → Start over → Reset to starter only as a last resort.
A performance will not recall
Open Settings → Diagnostics. Recall evaluates the performance's source before applying its saved settings. If that evaluation fails, Thunk Machine restores the performance that was running before recall. Update or delete the broken saved performance after recovering its source.
Import or export is incomplete
Source-only performance JSON contains source, controls, mappings, scenes, and clips, but not media bytes. To transfer attached images, fonts, or audio, choose a portable package and select the files in its export dialog. Video cannot be packaged; relink it on the receiving computer. A Library row's ⋯ → Export source writes that patch's source, not its external dependencies; include or document any helper it requires. There is no visible current-cursor patch export control.
36. Glossary
- Active: present in the currently evaluated scene.
- Available: present in the Library catalog.
- Binding: a retained top-level JavaScript name and its current successful value.
- Candidate: a staged patch version waiting to survive its first active frame.
- Cell: an independently foldable and evaluable source unit.
- Context: live values injected into a patch each frame.
- Control: a named live value usable onscreen or through MIDI.
- Dependency injection: receiving shared capabilities from the host rather than constructing them inside every patch.
- Evaluation: compiling and executing selected source so a valid change can be staged for the runtime.
- Factory: a function that creates and returns a patch or group.
- FFT: frequency analysis that produces spectrum bins and frequency bands.
- First-class value: a value that can be stored, passed, returned, or placed in a collection; patches have this property.
- Frame boundary: the transition between displayed frames when queued changes can be applied atomically.
- Higher-order function: a function that accepts or returns behavior or patches.
- Installed: editable patch source has been added to the project.
- Instance/occurrence: one position occupied by a patch in the active scene, with its own identity and state.
- Nested render group: an isolated transparent offscreen scene array.
- Patch: a function, drawing object, class instance, or pixel effect used in a scene.
- Performance: a complete saved set of working source, scenes, clips, controls, modulations, layout, mappings, shared code, tempo, audio and view settings.
- Polymorphism: different forms satisfying one contract, such as functions and objects both serving as patches.
- Rollback: automatic restoration after a candidate fails its first active frame.
- Running: an active patch has evaluated and rendered successfully.
- Safe State: the explicit known-good recovery snapshot.
- Layer: an array of patches and nested groups in render order; nesting isolates its image.
- Scene: a named layer selected for rendering with
.activate(). Only one scene is active at a time, except during a cross-dissolve; the host renders it every frame. - ShaderChain: a configurable GPU post-processing patch.
- Strategy pattern: choosing interchangeable behavior through a common contract; a patch is the product-level name for such visual behavior.
- Structured clone: the browser's copying model used for recoverable plain state.
- Transaction: staged replacement of supported runtime definitions and scene configuration. First-frame confirmation is per candidate definition; arbitrary JavaScript side effects are outside rollback.
37. Where to continue
- Quickstart: start at the welcome screen, make a first edit, add a visual, and save your work.
- API reference: exact patch, context, lifecycle, control, audio, and shader behavior.
- Nested render groups: recursive isolation, state, and error behavior.
- Architecture: how editor, evaluator, registry, host, persistence, and views are separated.
- Composition cookbook: complete examples of array effects and nesting.
- Data model: arrays, patch state, and active-scene selection.
- Networking: experimental source-based canvas sharing; no Network tab.
Appendix A — Push 3 and the virtual controller
Push 3 gives the browser instrument a physical performance surface: an 8 × 8 pad grid, eight main encoders, buttons, a touch strip and a display. Thunk Machine uses these to launch visual scenes and clips and change source-declared controls and modulations. The browser remains the instrument: it evaluates JavaScript, renders the stage and owns audio analysis. This integration does not require an Ableton Live set and does not make Thunk Machine a standalone Push application.
Both Push 3 integration and the Virtual controller are Experimental. The virtual controller extends the running browser session with a similar layout for rehearsal. You can use Thunk Machine fully without either controller.
Connect Push 3
- Power Push 3 and connect its USB cable to the computer running Thunk Machine.
- Use desktop Chrome on HTTPS or a trusted local origin such as
localhost. Hardware access depends on browser support, site permissions and operating-system device access. A plain HTTP LAN address is not equivalent to localhost. - Open Settings → Keyboard & controllers → MIDI & controller setup… and choose Connect Push 3. Approve MIDI access and choose the Push device in Chrome's USB picker when prompted.
- Check both connection statuses. MIDI carries input and LED messages; USB carries the display image. The application chooses an unambiguous Push User Port automatically. If a MIDI output selector appears, choose that User Port.
- If MIDI works but the screen is not streaming, choose Connect Push display and authorize the device. The live screen should appear after the startup display.
- Test a saved scene pad, an assigned encoder and the display before performing. A working screen alone does not prove that MIDI input is connected.
First display authorization needs a user click. The browser can reuse a previously authorized device on reload or USB attachment without another picker. Permissions belong to the browser profile and site; saving or importing a performance cannot grant them on another computer or origin.
Disconnect releases the dedicated MIDI connection and USB display interface. Unplugging drops LED state; held momentary button controls are released when the adapter observes the disconnect. Reconnect and check both statuses before continuing. Leaving the page makes a best-effort attempt to clear LEDs and release the display; a crashed browser cannot guarantee cleanup. If another tab owns this workspace, resolve the ownership notice before saving. Keep one operator tab and check whether another application is claiming the device when connection or display claiming fails.
Advanced / Debug… provides separate MIDI/USB connections, display claiming, test patterns, LED tests and calibration. Normal operation does not require these tools. Pulse pad 64 tests the bottom-right pad; it does not create a scene.
Open the virtual extension
In the same setup dialog, find Virtual controller and choose Open controller. Allow popups for the site if the browser blocks it. This window shares the existing parent page's instrument; it is not a second renderer or an independent saved session. Keep the parent page open. Closing the popup returns the controller to the parent.
Click pads and buttons, drag or scroll knobs, or use a knob's arrow keys and
−/+ buttons. The virtual Shift button latches until clicked again; holding
keyboard Shift also modifies gestures. Fine adjustments depend on the control's
declared step: a fixed step remains the unit for a knob detent.
The virtual strip can target a numeric control using its selector. Its default
strip control is created on first use if needed. Click or drag vertically; when
focused, Up/Down steps the value, Home chooses its minimum and End its maximum.
During a cross-dissolve the strip instead sets the scene blend.
Keep your hands on controls and your attention on code
Control and modulation definitions remain part of the performance's source. Controls created in the interface appear in the protected Controls declaration cell; interface-created modulations appear in Modulations. Edit their definitions through their panels. Handwritten declarations remain editable source. A patch reads the current values each frame, for example:
// %% patch controllerPulse
control("energy", 0.5, {
  type: "continuous", min: 0, max: 1, step: 0.01,
});
modulation("drift", { hz: 0.25, depth: 0.25, offset: 0 });
function controllerPulse({ controls, modulations }) {
  noStroke();
  fill("#ff572b");
  circle(width / 2, height / 2,
    80 + controls.energy * 160 + modulations.drift * 30);
}
// %% scene controllerScene
const controllerScene = [() => background(17), controllerPulse];
controllerScene.activate();
To try this independent example, save your work first. Replace all editable patch and scene code with this complete program and run with Cmd/Ctrl+Shift+Enter. The circle changes size as energy moves; drift adds slow movement without audio. Any existing performance controls remain, so locate energy in Controls or page through encoder targets rather than assuming encoder 1.
Numeric controls occupy eight encoder columns per page in declaration/registry order. Changing a knob adjusts its live base value; it does not rewrite your drawing function. The control editor selects existing controls and their pages; it does not rearrange an arbitrary encoder assignment matrix. Save the scene to preserve its source version and save the performance to preserve controls, modulation settings, MIDI mappings and scene-pad layout. Connections and permissions stay separate.
The ordinary MIDI Learn assignments map a device message to a named control.
Push pressure mappings reserve a particular pad. These mappings and scene-pad
assignments are performance data, while a declaration such as
control("pressure", 0, { type: "pressure", min: 0, max: 1, pad: 64 })
places its user-facing pad assignment in source. Pad numbers in declarations are
1–64, starting at the top-left; no patch needs to interpret raw MIDI bytes.
Read the grid and play scenes
| Grid area | Default purpose |
|---|---|
| Pads 1–32, upper four rows | Saved scenes in the current 32-scene bank |
| Pads 33–64, lower four rows | Boolean button controls, in declaration order |
| Pads 49–64, when a clip bank exists | Clips 1–16; Shift accesses the underlying button controls |
| A pressure-assigned physical pad | Its pressure control replaces the usual scene, button or clip action |
Pad 1 is top-left and pad 64 bottom-right. Pressure reservations can leave gaps among button controls, so lower pads do not have fixed effect names. A Boolean control affects imagery only when a patch or shader reads it. A toggle switches on each press; a momentary control stays on while held and turns off on release.
Press a scene pad to recall it immediately. Hold Quantize before the pad press for the next beat, or Fixed Length for the next measure. These buttons work while held on physical Push. In the virtual controller, click one to toggle its mode on, then click a pad; click it again to turn it off. Releasing a physical button does not cancel the queued scene. Another queued pad replaces the request, and Cancel in the virtual controller clears it. With the clock off or stopped, launch is immediate. Configure measure length and downbeat alignment in Tempo. See Launch on the next beat or measure.
To change a scene assignment, expand Controller options in the virtual surface, select Pad 1–32 and a Scene, then choose Assign pad. This changes that slot in the current bank. Save the performance to retain its layout. Choosing a blank scene clears a slot. Deleting scenes can compact later assignments, so recheck your cue positions after editing the scene list.
Page left/right changes the 32-scene bank. D-pad left/right pages controls or modulations instead. The eight lower display buttons normally launch the first eight scenes of the current bank on release. In a modulation layer/editor they have the different actions described below.
Clips overlay the scene for their configured duration and can overlap. Tap an
active clip pad again to stop it. A code call to clips.launch(index) restarts
that clip instead. See Clips for installation and lifetime examples.
Prepare, blend and commit a transition
With saved scene A running, hold Shift and press a different scene pad B. This prepares B immediately in a separate render scope while A stays visible. Move the touch strip toward the top for B (blue, ↑ B) or bottom for A (amber, ↓ A). Turn the jog wheel or use its left/right buttons to nudge the blend by 1 percentage point per step; Shift uses 0.2 percentage points.
Both scenes keep running even at 0% or 100%. Press B's scene pad normally to commit B without restarting its prepared runtime. Press A normally to return to A, or choose another scene to leave the pair. A failed preparation leaves A running. Outside editor focus, keyboard Left/Right also nudge the blend; Shift is finer.
Rehearse the intended pair at projection size: two render scopes cost more than one, even while only one is visible. The physical strip is mapped here for cross-dissolves; the virtual strip's normal parameter selector does not establish a corresponding normal physical-strip mapping.
Edit modulations on the controller
Turn a main encoder to change its numeric control using the declared step. Without an explicit step, the fallback is 1% of the range, or 0.1% with Shift. Press its upper display button to restore the declared default. Shift-press that button enters/leaves the control editor: encoder 1 selects an existing control, encoder 2 changes its value, and encoder 3 selects the modulation that targets it. Range, step and default are shown as reference, not editable fields on this screen.
Select Main alternates CTRL and MOD pages (the virtual surface labels its corresponding buttons Master and Select). D-pad left/right pages the active mode in groups of eight. Shift exposes modulation slots from CTRL. In a modulation layer, tapping a lower display button selects/leaves that modulation's editor; the first empty slot creates an LFO. When the editor is open and the modulation layer is no longer exposed, an ordinary lower-button tap toggles its modulation on/off; Shift-tap selects/leaves editing.
While in MOD, holding Shift, or editing a modulation, hold a slot's lower button and turn its matching encoder to adjust depth. Add Shift while turning to adjust rate for repeating signals, attack for an Envelope, or duration for a Ramp. Turning while held suppresses the release tap action.
The editor's eight columns correspond to encoders 1–8:
| Kind/page | 1 | 2 | 3 | 4 | 5 | 6 | 7 | 8 |
|---|---|---|---|---|---|---|---|---|
| LFO | Shape/kind | Rate | Sync/free | Depth | Offset | Target | On | Slot |
| Noise | Shape/kind | Rate | Sync/free | Depth | Offset | Target | On | Roughness |
| Sample & Hold 1 | Kind | Rate | Sync/free | Glide | Chance | Depth | Offset | Page |
| Sample & Hold 2 | Kind | Target | On | — | — | — | — | Page |
| Envelope 1 | Kind | Attack | Decay | Sustain | Release | Depth | Offset | Page |
| Envelope 2 | Kind | Units | Gate/hit | Curve | Invert | Beat interval | Gate length | Page |
| Envelope 3 | Kind | Auto-trigger control | Trigger control | On | Target | — | — | Page |
| Ramp 1 | Kind | Duration | Shape | End behavior | Depth | Offset | On | Page |
| Ramp 2 | Kind | Units | Invert | Beat interval | Auto-trigger control | Trigger control | Target | Page |
Kind cycles signal types; the LFO choices also include its waveform shapes. Auto-trigger control creates/removes the modulation's own momentary trigger button; Trigger control selects an available momentary control. Envelope waits for a trigger, button, or beat interval. Ramp starts when enabled; its trigger or Fire action restarts it. Invert negates the shape (0 to −1), rather than reversing it from 1 to 0. Encoder 8 changes pages where shown.
New performance modulations default to a sine LFO, enabled, one beat per cycle, depth 0.25, offset 0 and no target. Free-running fallback is 0.25 Hz. Hardware beat selection offers ¼, ½, 1, 2, 4, 8 and 16 beats; source accepts 1/32–64. Hardware free-rate editing spans 0.01–30 Hz without the sidebar's Slow/Extended switch. Noise adds roughness 0.3; Sample & Hold defaults to no glide and chance 1. Envelope defaults to seconds, attack 0.1, decay 0.3, sustain 0.5 and release 0.3; Ramp defaults to four seconds, linear shape and hold at the end. See Modulations for depth, offset and target scaling. These are performance-modulation defaults, separate from code signal helpers.
Physical pressure uses aftertouch rather than strike velocity. Assigned pad release restores the control's minimum. A browser pointer does not generate continuous Push pressure; rehearse that value through its onscreen numeric control.
Controller gesture reference
| Gesture | Result in Thunk Machine |
|---|---|
| Scene pad | Launch immediately; hold Quantize for next beat or Fixed Length for next measure |
| Shift + incoming scene pad | Prepare an immediate cross-dissolve |
| Page left/right | Previous/next 32-scene bank |
| D-pad left/right | Previous/next CTRL or MOD page |
| Select Main | Switch CTRL/MOD |
| Main encoder | Adjust control, or edit the displayed field while an editor is open |
| Upper display button | Reset its control to the declared default |
| Shift + upper display button | Enter/leave control edit |
| Lower display button, normal CTRL state | Launch scene 1–8 of the current bank on release |
| Lower display button, exposed MOD layer | Select/leave modulation edit; first empty slot creates LFO |
| Lower button in an open modulation editor, without exposed MOD layer | Toggle the corresponding modulation |
| Hold lower button + matching encoder in modulation context | Depth; with Shift, rate/attack/duration according to kind |
| Eight buttons beside the grid | Preview the corresponding row's assignments for four seconds |
| Clip pad | Start its clip, or stop it if playing |
| Shift + clip pad | Operate the underlying Boolean control |
| Pressure-assigned physical pad | Continuous pressure; release restores minimum |
| Save / Undo / Add | Save scene / revert scene / duplicate and select a scene copy |
| Swap | Return to the previous available scene in the current performance |
| Jog outside a dissolve | Browse named performances; press to load; jog-left or Escape cancels |
| Jog during a dissolve | Adjust blend; Shift gives finer steps |
| Layout | Toggle the UT artwork display and return to live information |
| Play | Play/pause the loaded audio file |
| Volume encoder | File output ±0.02 per step; Shift ±0.005; no change to visual opacity |
| Tap Tempo / Tempo encoder | Tap tempo / ±1 BPM per step, Shift ±0.1; select Manual, bounded 30–300 BPM |
The side row buttons preview assignments; they do not choose musical note divisions. Undo reverts a saved scene rather than undoing a source keystroke. Browsing expires after eight seconds without input. The browser's performance chooser shares that highlight and supports arrows/Enter/Escape. The Metronome button is unbound and held off. Unlisted device controls should not be assumed to have Ableton Live behavior here.
Read feedback and recover a connection
The display shows the performance/scene, encoder targets and values, tempo, editor fields, row previews and browsing information. A volume readout appears briefly after changing file output. Startup shows UT artwork with a white pad animation before returning to the live view; Layout provides artwork/live switching.
| Feedback | Meaning |
|---|---|
| White scene/clip pad | Ready assignment |
| Blue pulsing scene pad | Playing scene |
| Green pulsing clip pad | Playing clip |
| Amber scene pad | Queued launch |
| White blinking scene pad | Loading |
| Red blinking scene pad | Failed launch; inspect Diagnostics |
| Colored/dim button pad | Boolean control on/off |
| Green upper display button | Assigned numeric control |
| White upper display button | Control being edited |
Manual tempo uses timestamped MIDI lookahead for hardware animation. The playing scene pulses once per two beats; Tap Tempo flashes each beat. Off/Auto/MIDI use fallback animation timing, normally 120 BPM; Auto phase tracking is not scheduled onto hardware. A long stall resynchronizes instead of replaying a burst of missed ticks. Keep the performer tab foreground and compare clock readings as well as lights during rehearsal.
If pads work but the screen does not, inspect USB status and use Connect Push display. If the screen works but pads do not, inspect MIDI input/output and the User Port. If neither works, confirm browser support, secure origin, permissions, cable and power, then Disconnect/reconnect. Check site permission settings after a denial. If claiming fails, close another device-owning application or tab. Do not reset the composition to repair a connection.
If an assigned pad launches the wrong action, check current bank, Shift state, clip assignments and pressure reservations. If an encoder seems unassigned, check its CTRL page and declaration order. If a modulation appears inert, confirm its enabled state, target/patch connection, depth and trigger. Use Diagnostics for a failed scene; previous good visuals remain available.
The integration's automated tests use mocked MIDI and USB. They establish mappings and state transitions, not physical pad feel, USB display latency or stage reliability. Rehearse the actual computer, browser, device, media and projection output, including cold scene launches and warmed returns. The virtual controller shares many actions but cannot certify physical pressure, hardware timing or a normal physical-strip parameter mapping.